Data Integrations
6.0. Integrations Overview & Decision Guide
Overview
CQA delivers value by analyzing conversations. To do this, it needs access to call recordings and their associated metadata (agent name, campaign ID, team name, and similar fields).
CQA supports various integration methods to ingest data from different telephony systems, CRMs, and storage solutions — and to export analysis results to external destinations.
Once your account is onboarded (tenant created, users configured, quality profiles and assignment rules set up), data ingestion and analysis occur automatically.
Why Integrations Matter
CQA's value comes from analyzing your conversations. To do this automatically, it needs:
- Call recordings (audio files or transcripts)
- Metadata (agent ID, campaign, team, queue, etc.)
- A reliable way to move data from your system into CQA
Integrations are the pipes that deliver this data on schedule, with minimal manual effort.
How CQA Processes Data: The Three-Step Flow
Regardless of which integration you choose, CQA follows the same workflow:
STEP 1: INGEST
- Your system → CQA (via SFTP, S3, API, or native integrations)
- CQA retrieves recordings and metadata on your schedule
STEP 2: ANALYZE
- CQA applies your Quality Profile & Assignment Rules
- AI scores the interaction
STEP 3: STORE & EXPORT
- Results appear in CQA Analysis List
- Optionally: push scores back to your system (S3, SFTP, API)
Key Concepts
- Connector: A saved connection to a data source or destination (e.g., "Production S3" or "Support SFTP"). Created once, reused for multiple jobs.
- Job: A scheduled task that uses a connector to move data. Examples: "Daily S3 import at 2:30 AM IST" or "Weekly email report to leadership."
- Metadata: Structured data attached to every conversation (agent name, campaign, duration, queue, region). CQA uses this to route conversations to the right Quality Profile and to filter/report results.
- Assignment Rule: Logic that says: "If metadata matches X condition, use Quality Profile Y." Automation happens here.
Before You Start: Shared Prerequisites
All integration paths require:
- ✅ CQA tenant and user accounts created — Coordinate with your CSM
- ✅ Quality Profiles configured — Define what you want to score (see §4.2)
- ✅ Assignment Rules configured — Define which conversations get analyzed (see §4.3)
Without these, integrations have nothing to do.
Choose Your Integration Path
- Exotel Ecosystem Integrations (§6.1) — for customers on ECC 4X, ECC 6X, or Exolite platforms.
- Universal & External Integrations (§6.2) — for customers connecting via SFTP, Amazon S3, email, or the Standard API.
- Quick Comparison (§6.3) — see a table of all integration paths with capabilities and latency.
6.1 Exotel Ecosystem Integrations
For customers using Exotel's proprietary platforms (ECC 4X, ECC 6X, Exolite).
6.1.1 ECC 4X
In this setup, CQA can either function separately, or can be embedded directly within the ECC4x interface via an iFrame, providing a seamless user experience.
What you get:
- CQA fetches call recordings and metadata automatically on a daily basis
- Conversations appear in the CQA Analysis list for review
- Results stay in CQA; use export connectors (SFTP, S3, Email) or the Standard API to send scores elsewhere
- If CQA is directly enabled within ECC 4X as an iframe — results are visible without needing to log into the CQA console separately
How data flows: The ECC VLA module generates and uploads a call report to CQA's server (S3) via SFTP. CQA uses call SIDs from that report to fetch audio recordings.
Prerequisites:
- Shared prerequisites above
- Report Scheduler must be enabled on your ECC 4X setup for CQA to get access to your call metadata.
- VLA module must be enabled on your ECC 4X setup for CQA to get access to your recordings.
- On-premise requirement: Whitelist the CQA IP address, and set VLA server on public domain
Setup steps:
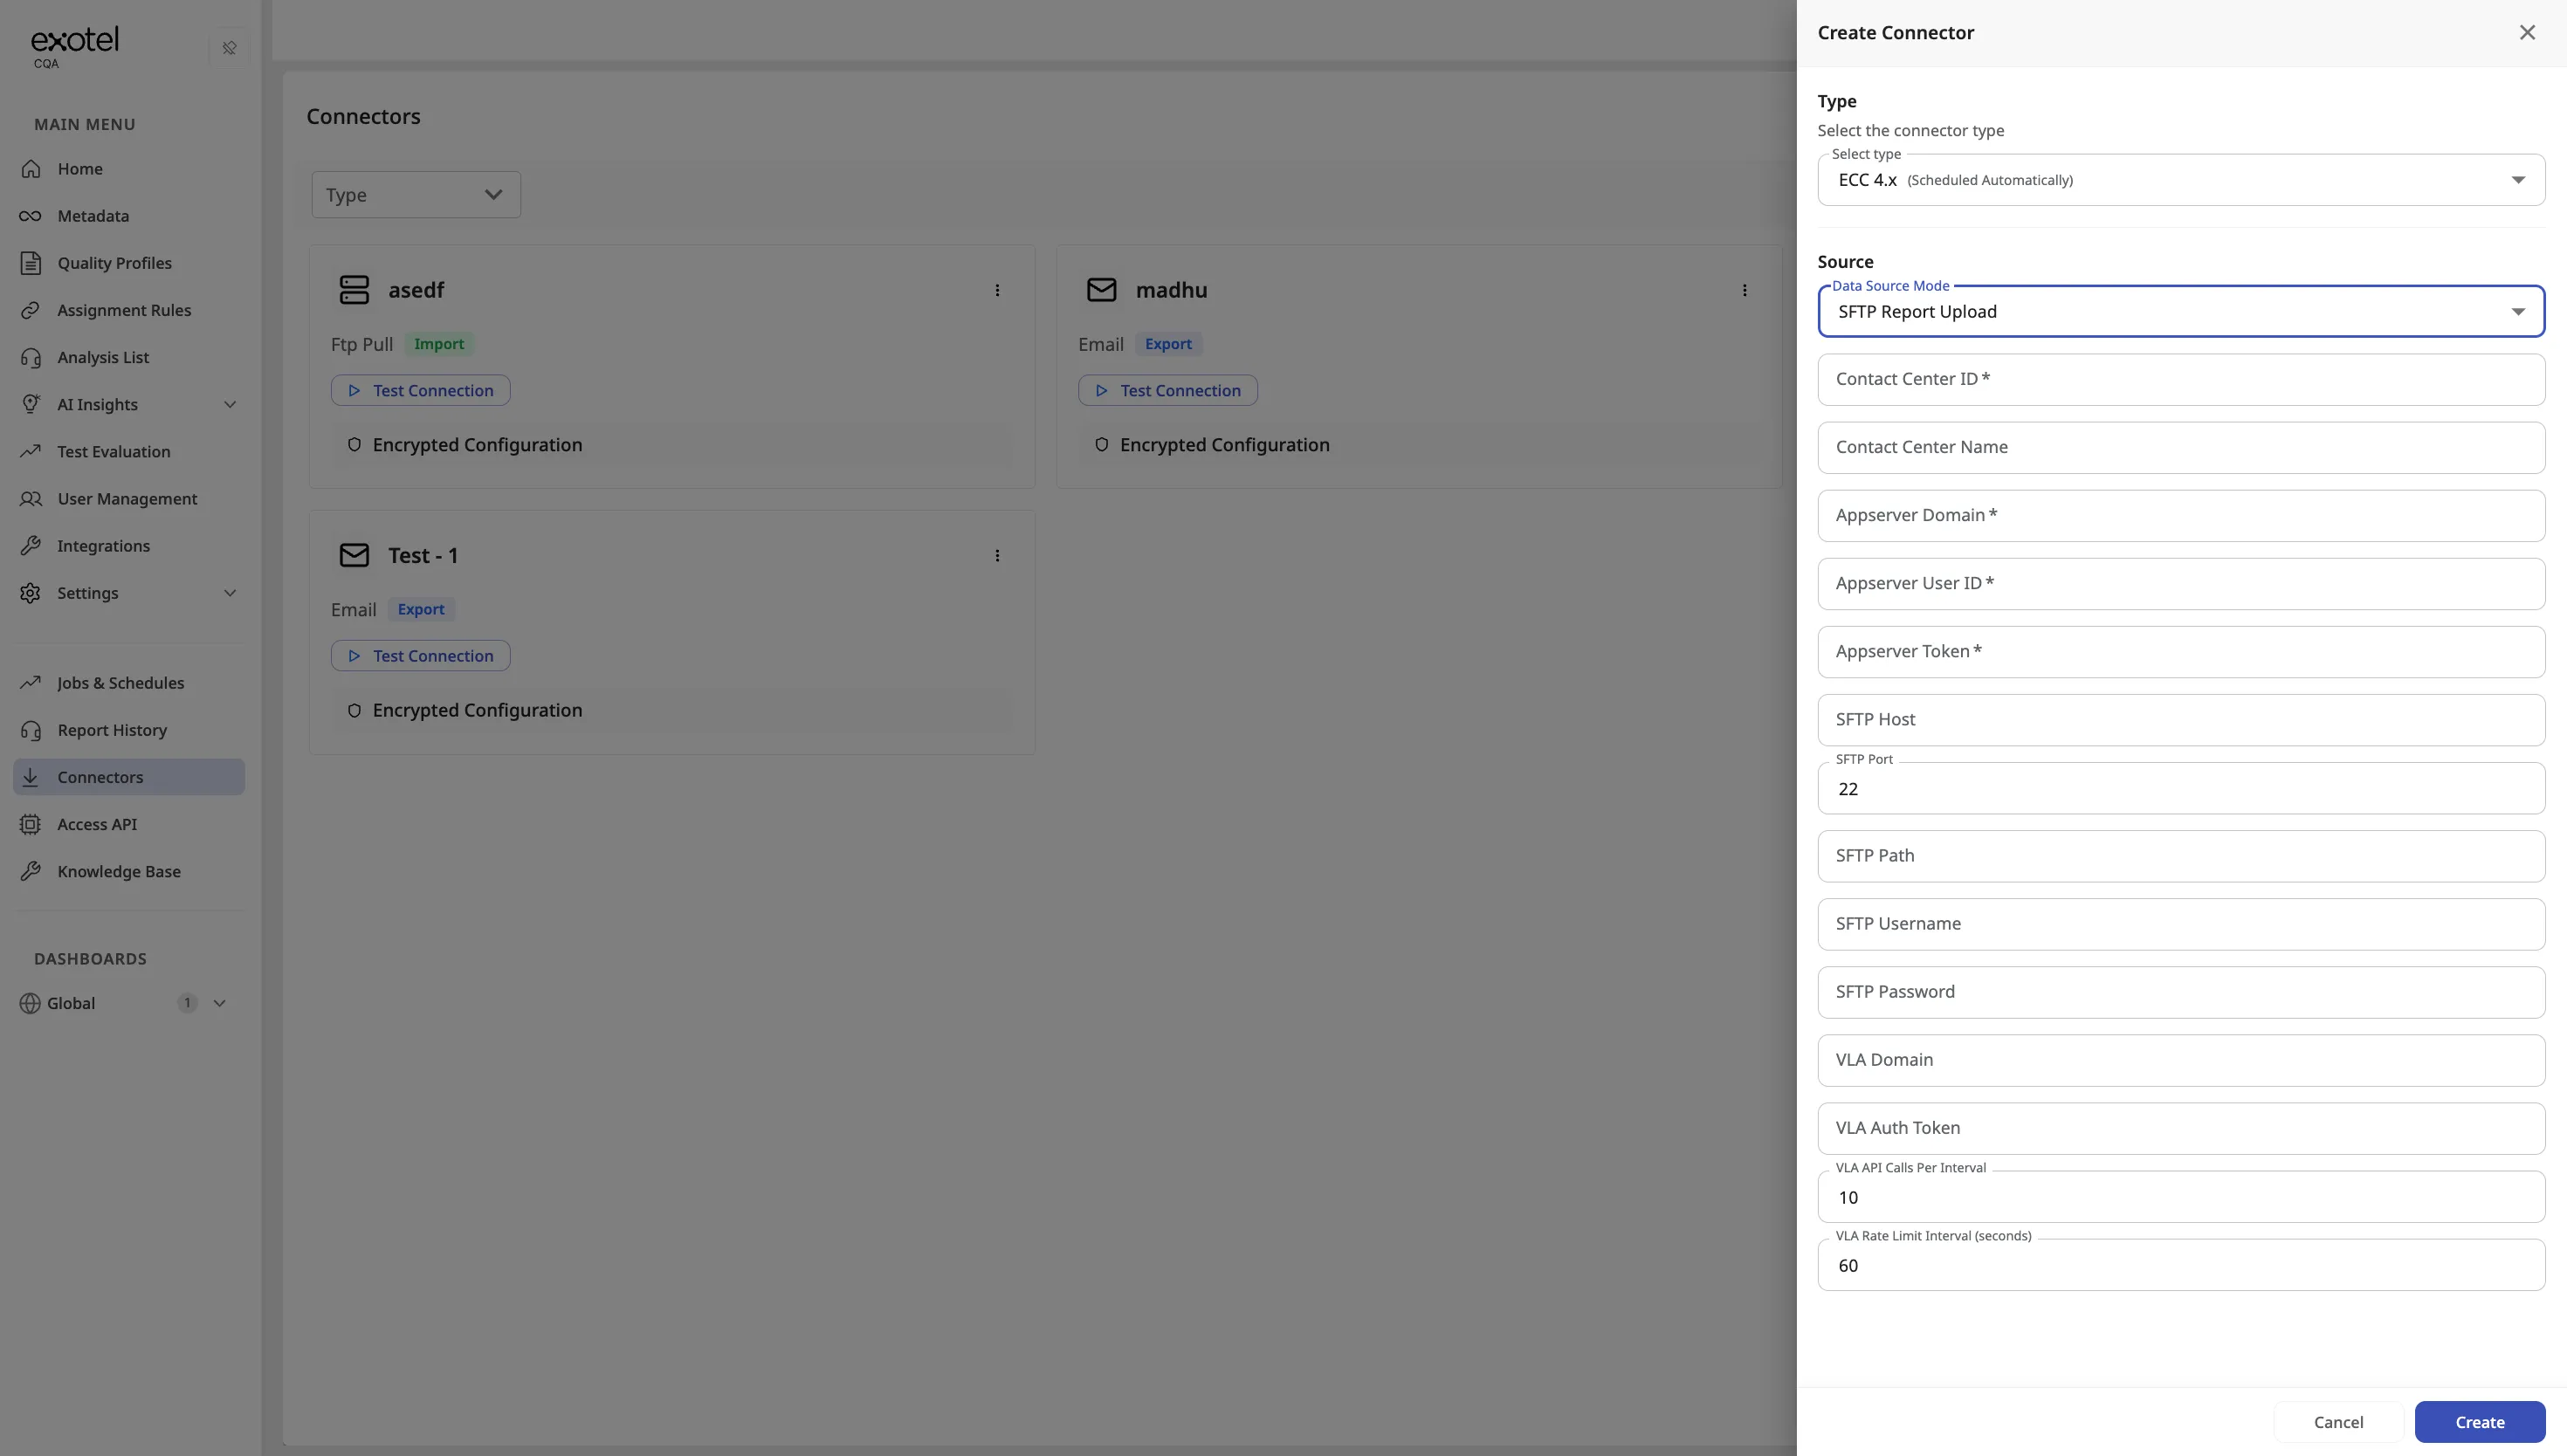
- Confirm quality profiles and assignment rules cover the traffic you want analyzed
- If the console is enabled: go to Connectors → Create Connectors → Import Connector → select type ECC 4X → data source mode SFTP Report Upload --> fill in platform-specific fields → Create → Test connection
- After the connector is saved, click Test Trigger to run a one-time test pull and analysis against the currently saved connector configuration (see below). You do not need to wait for the daily schedule.
- Note: The trigger will return an error if there is no file to analyze.
- The import job is scheduled automatically when the connector is created (you do not need to manually create a separate job in Jobs & Schedules)
- If the console is not enabled, ask your CSM or CQA Support to create the connector
Verify it's working:
- Identify a recent call from your ECC 4X system that matches your assignment rules
- Wait for the next daily import (runs at approximately 2:30 AM IST)
- Open Analysis List and confirm the conversation appears with a score
Test connection vs Test Trigger
Action | What it validates |
|---|---|
Test connection | Reachability and authentication for the connector (can CQA talk to the source?). |
Test Trigger | End-to-end setup: CQA pulls from the configured path, processes the file, and runs analysis. |
6.1.2 ECC 6X
This is a deeper, native integration designed for high-throughput environments.
What you get:
- CQA receives conversations as they become available (near real time), not just once a day
- After analysis, CQA can automatically send scores and results back into ECC. Use export connectors (SFTP, S3, Email) or the Standard API to send scores elsewhere
- Users logged into ECC 6X can view the scores and analysis results directly within ECC without needing to log into the CQA console separately
- Conversations also appear in the CQA Analysis list
How data flows: CQA consumes conversations from the ECC Kafka stream in real time and automatically publishes scores and results back into the pipeline for ECC to consume.
Prerequisites:
- Shared prerequisites above
- On-premise requirement: Whitelist the CQA IP address so CQA can listen to your ECC Kafka servers
Setup steps:
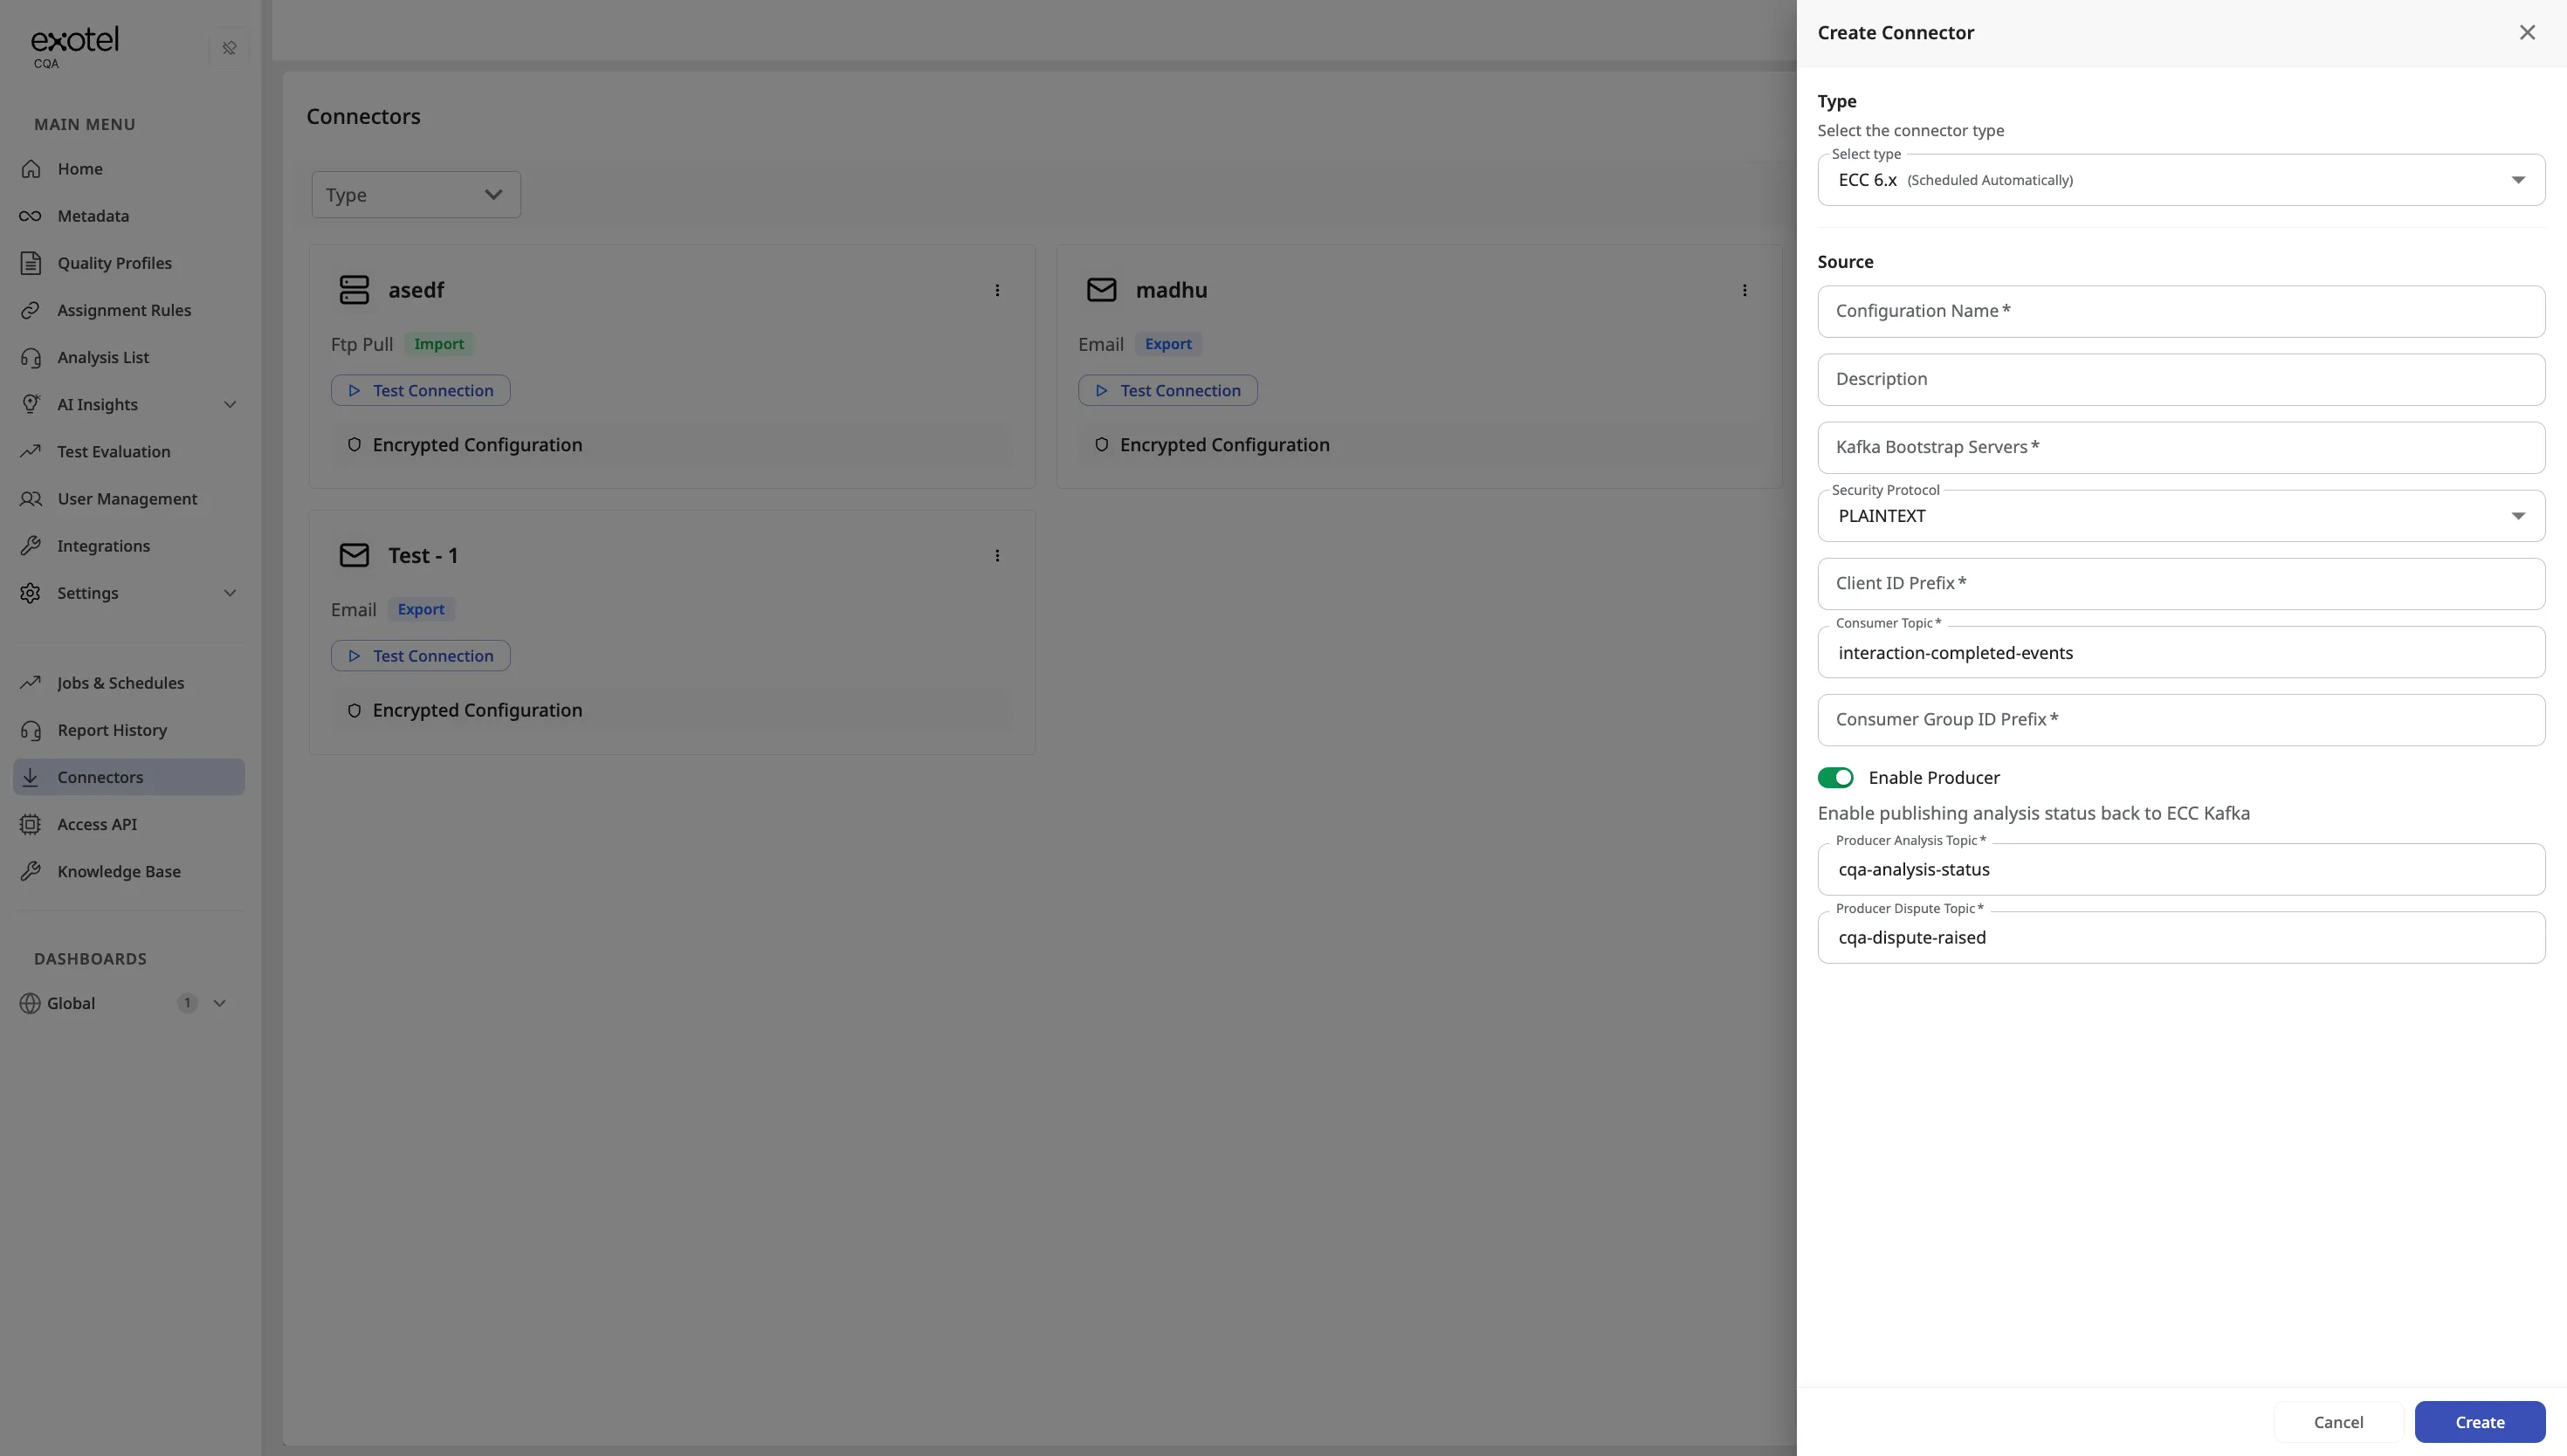
- Confirm quality profiles and assignment rules cover the traffic you want analyzed
- If the console is enabled: go to Connectors → Create Connectors → Import Connector → select type ECC 6X → fill in platform-specific fields → Create → Test connection
- The import job is scheduled automatically when the connector is created (you do not need to manually create a separate job in Jobs & Schedules)
- If the console is not enabled, ask your CSM or CQA Support to create the connector
Verify it's working:
- Complete (or identify) an eligible call in ECC 6X
- Within a short window, open Analysis in CQA and confirm the conversation is present and scored
- Confirm the scored result is visible where your ECC 6X workflows expect it.
6.1.3. Exolite Platform
Teams on standard Exolite who want CQA analysis with minimal integration work, and are comfortable viewing results in CQA or exporting them separately.
What you get:
- CQA automatically fetches Exolite call recordings and metadata on a daily basis
- Conversations appear in the CQA Analysis list (accessible via a separate CQA URL)
- Results stay in CQA; use export connectors or the API to send scores elsewhere
How data flows: CQA retrieves recordings daily using Exolite's bulk call API.
Prerequisites: Shared prerequisites above
Setup steps:
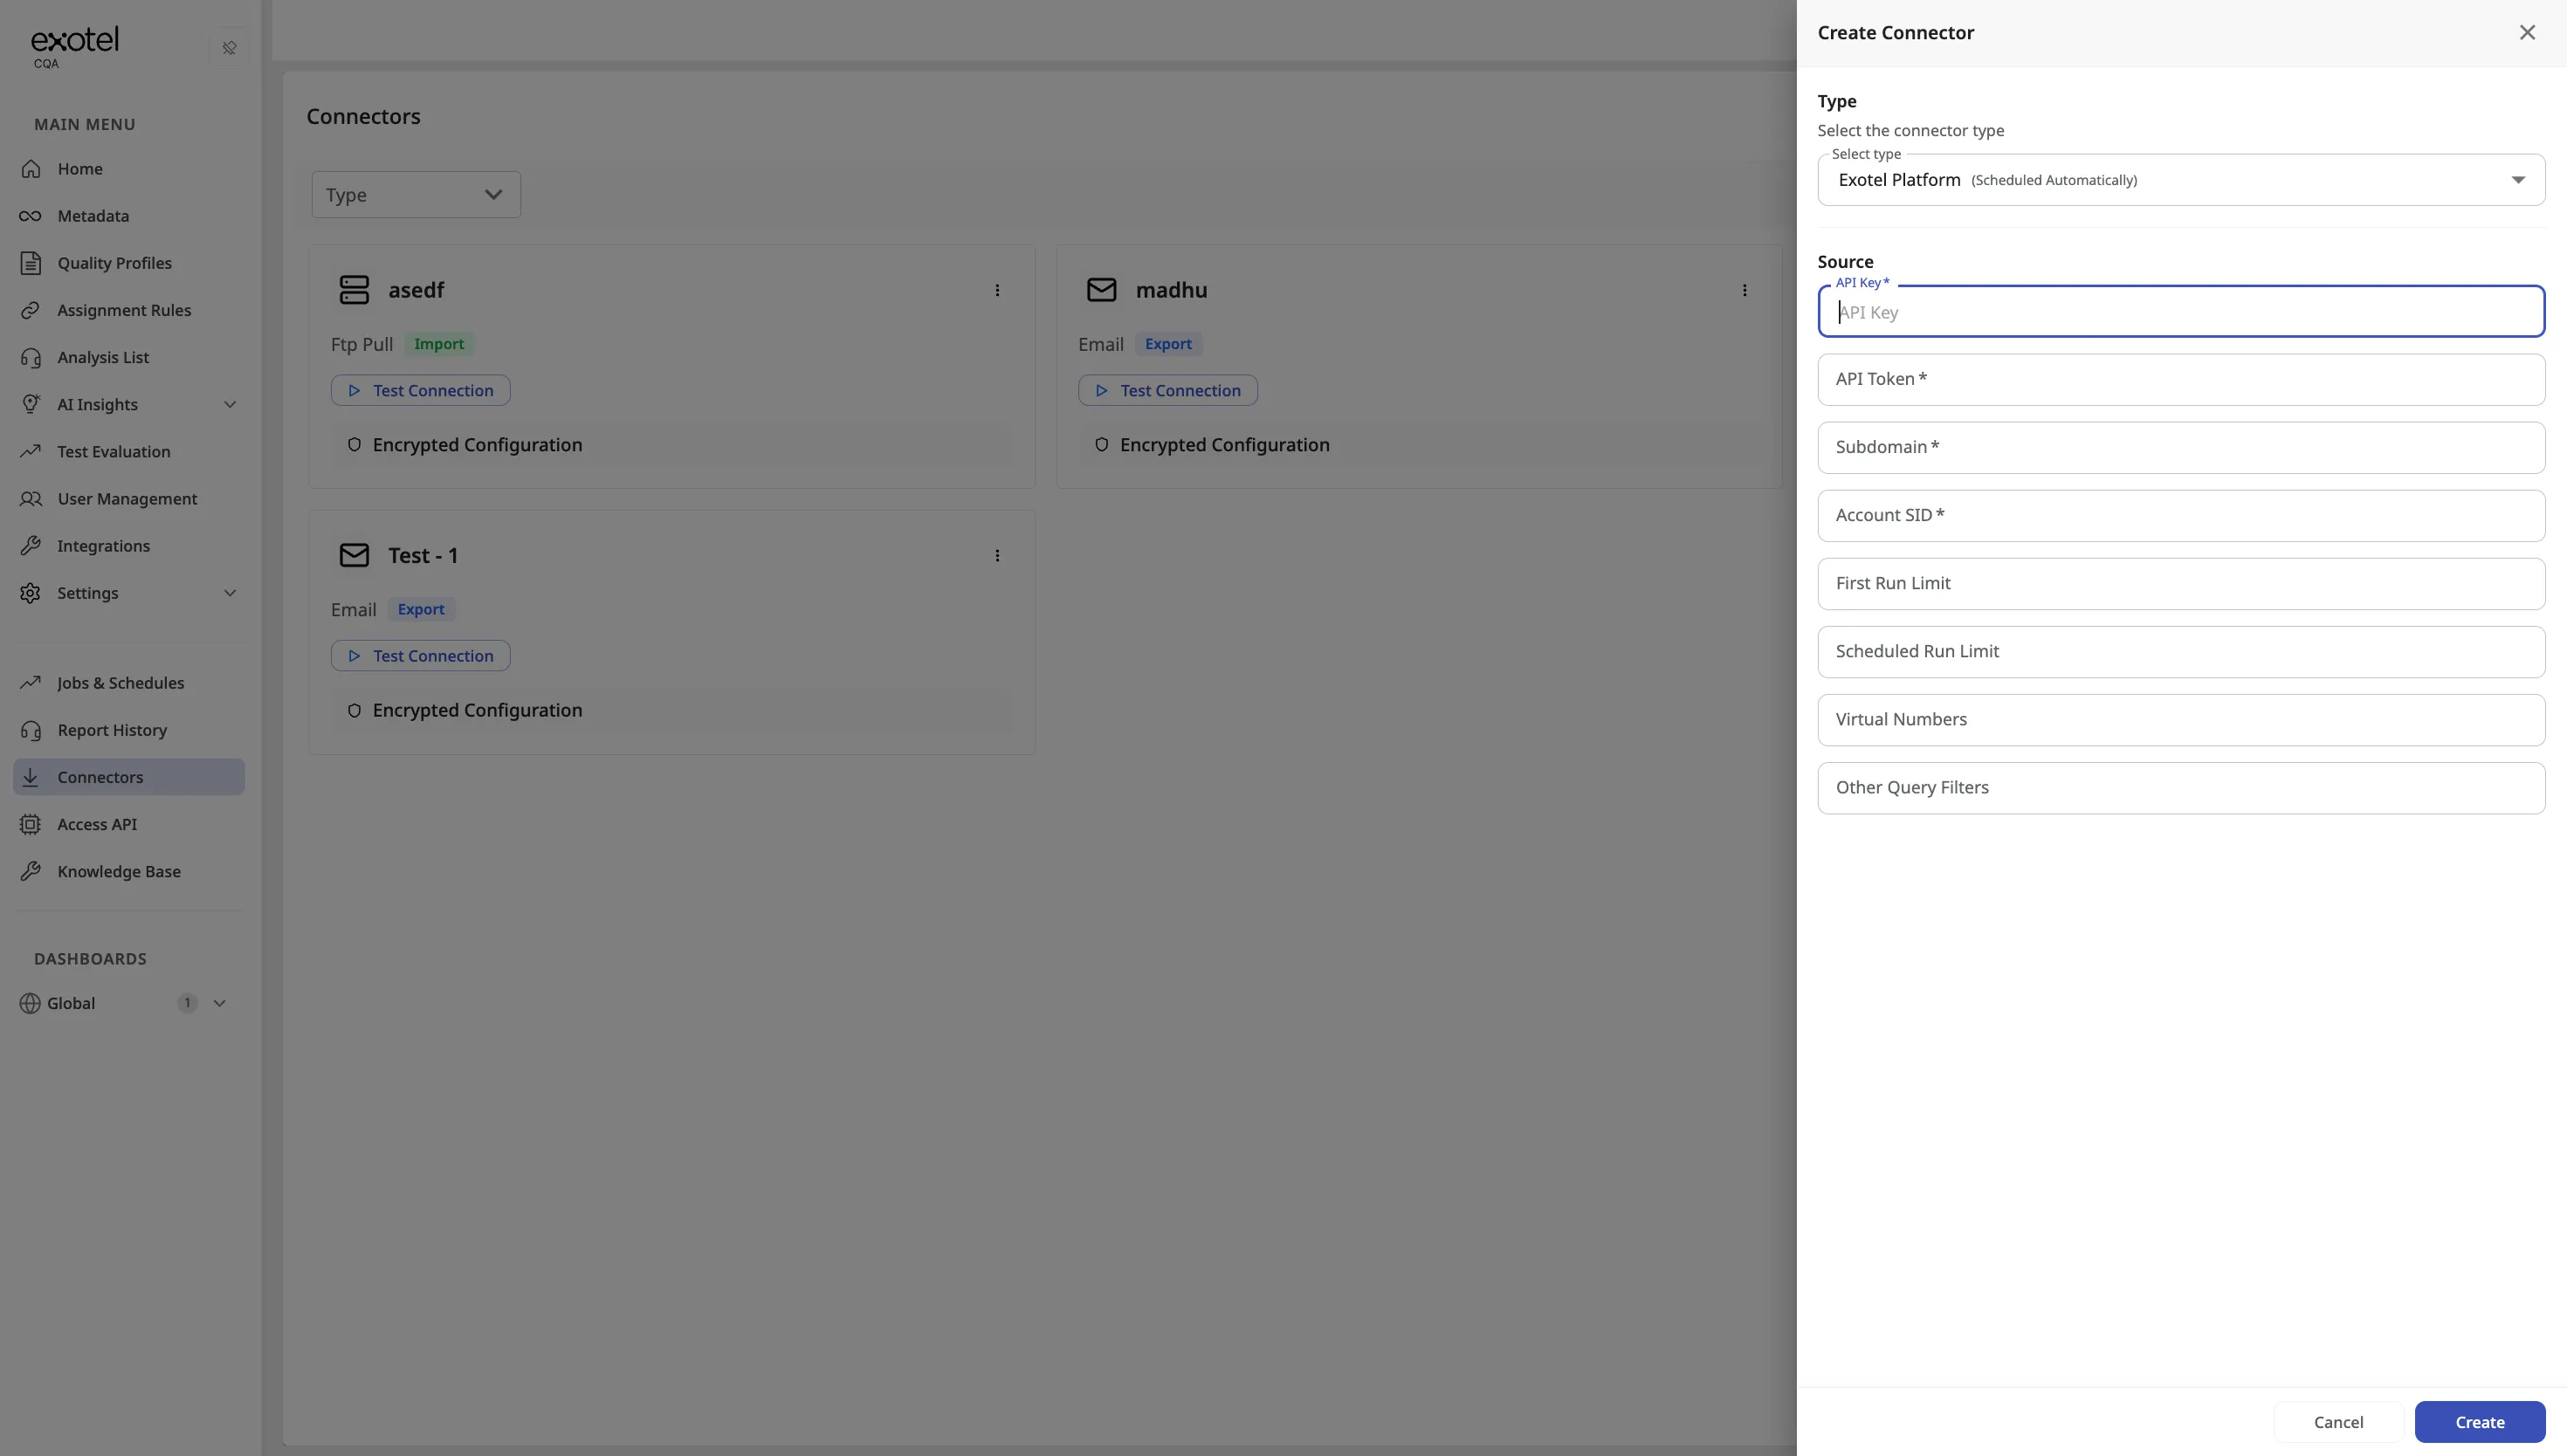
- Confirm quality profiles and assignment rules cover the traffic you want analyzed
- If the console is enabled: go to Connectors → Create Connectors → Import Connector → select type Exotel Platform → fill in platform-specific fields → Create → Test connection
- The import job is scheduled automatically when the connector is created (you do not need to manually create a separate job in Jobs & Schedules)
- If the console is not enabled, ask your CSM or CQA Support to create the connector
Verify it's working:
- Identify an eligible recent call from Exolite
- Wait for the next daily import (runs at approximately 2:30 AM IST)
- Confirm the conversation appears in Analysis List with a score
6.2. Universal & External Integrations
For customers connecting via self-hosted SFTP, Amazon S3, email, or the Standard API. These paths support both data import (getting calls in) and data export (sending results out).
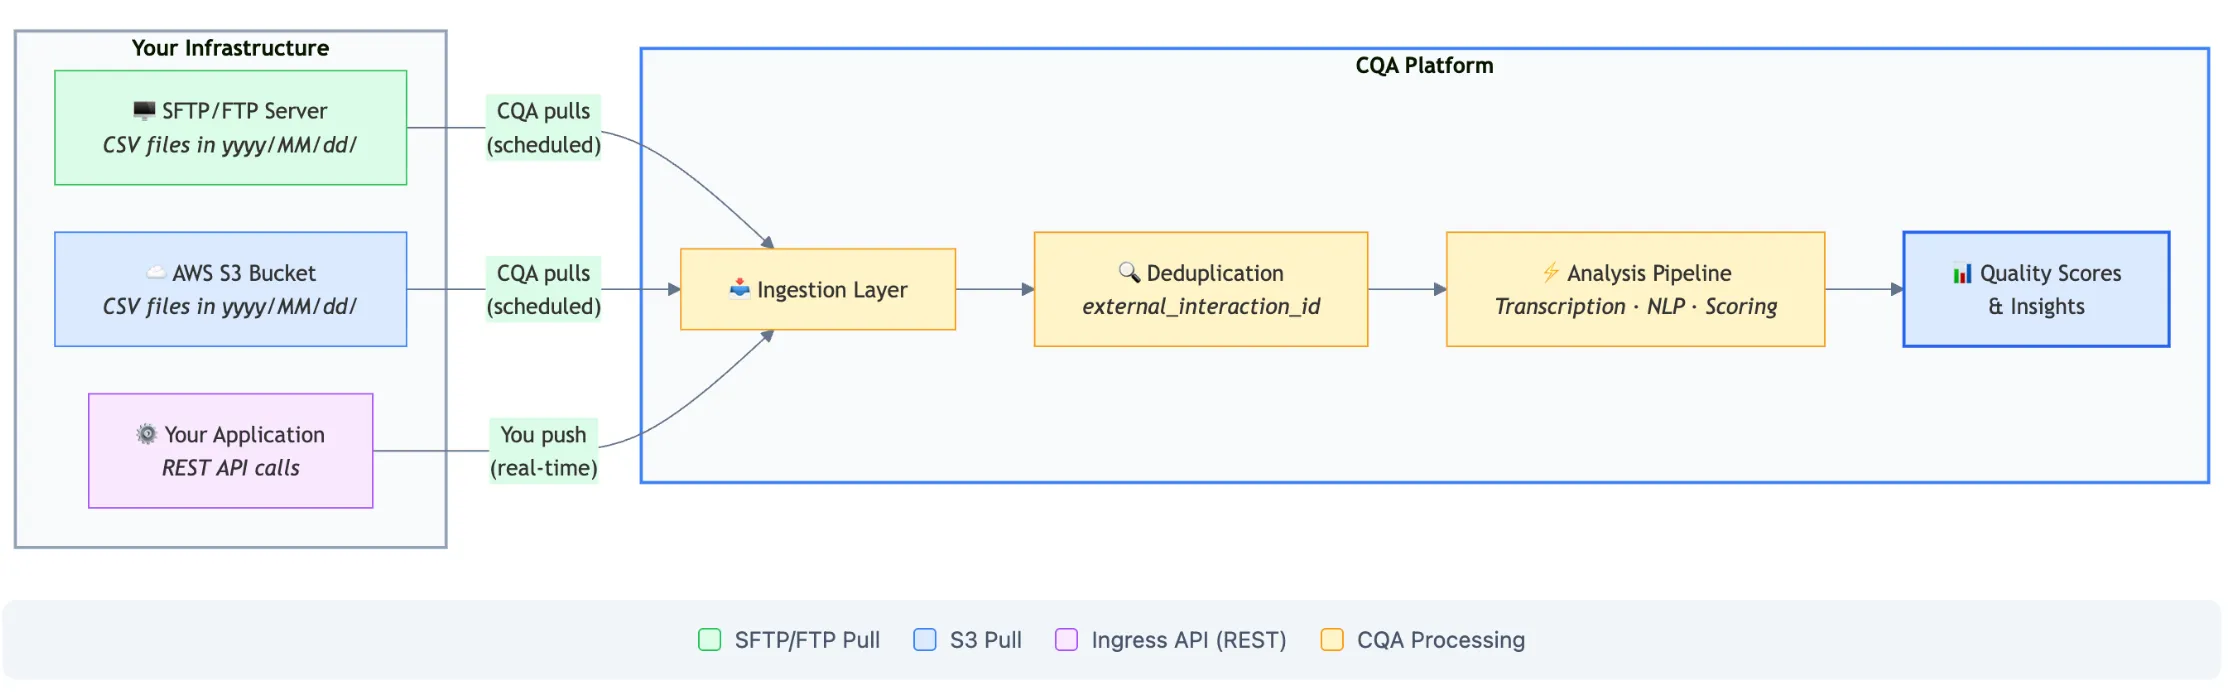
If the Data Integration Console is enabled, these connectors can be created and managed from the UI.
6.2.1. Standard API
CQA provides a Standard API designed to make the platform agnostic. This allows building a custom integration from any CCaaS, CRM, or middleware that can call REST APIs and for pulling scores back into your own systems.
What you get:
- Ingestion: Your system pushes conversations to CQA using the Standard API (single, batch, or file endpoints)
- Export: Your system pulls scores, parameters, and related analysis fields back out via the same API
- For external platforms (e.g., Genesys, Salesforce), a middleware layer to be built that typically reads the source system, maps fields to the CQA schema, and pushes/pulls via the API
- Limits: A single tenant can have a maximum of 2 active API keys. To create a new key when the limit is reached, revoke an existing key first.
Prerequisites:
- Shared prerequisites above
- An API key (from Access API section in the integration console, or requested from your CQA administrator)
- Integration middleware that follows the request schema in the API Reference Guide
- Audio/Chat URLs in your request must be publicly accessible or use pre-signed URLs (so CQA can fetch the recordings)
Setup steps:
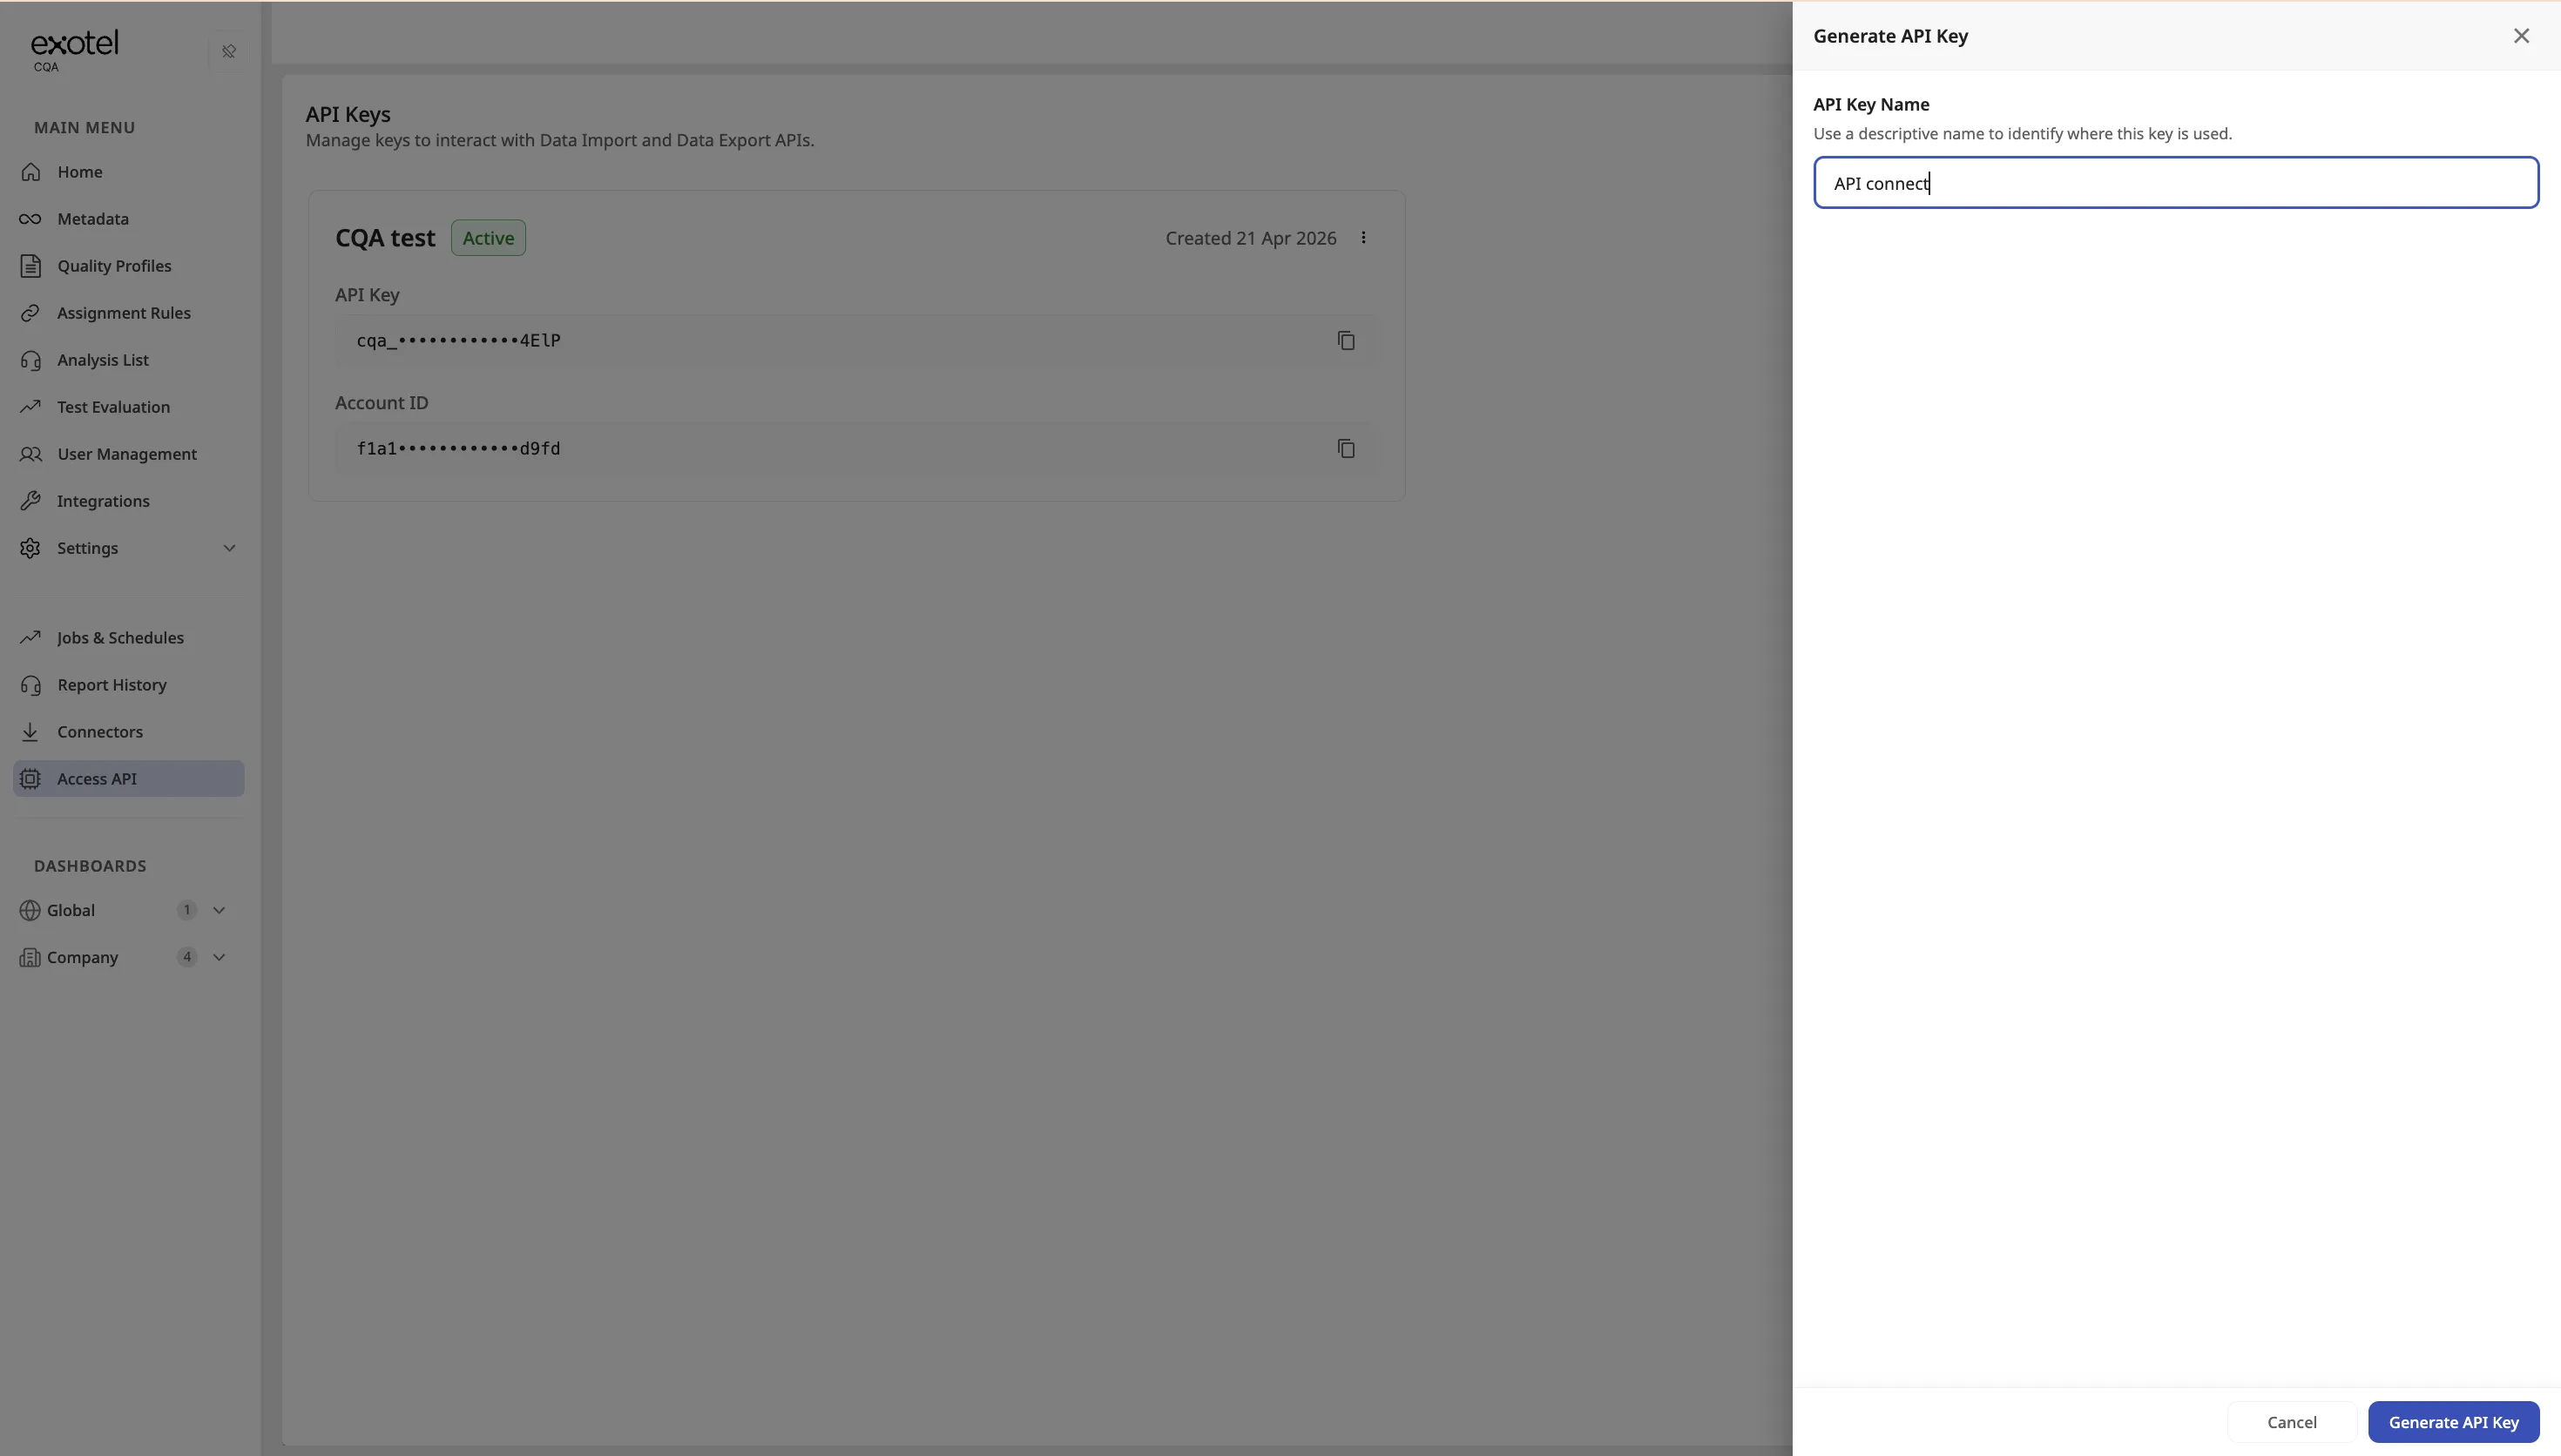
- Generate an API key and Account ID under Access API -> New API Key
- Implement push of conversations per the API Reference Guide (single, batch, or file endpoints)
- Implement pull of scores and results the same way. Refer to the API Reference Guide for fields, auth, and limits
Verify it's working:
- Push a test conversation with a unique external_interaction_id
- Confirm a success response from the API
- Open Analysis List and confirm the conversation appears after processing
- Pull the analysis result back and confirm it matches what you see in CQA
Note: The Standard API can be used by customers or professional services teams to build middleware that ingest data from external components into CQA and fetch analysis results back.
6.2.2. Customer S3
This integration supports batch processing of recordings and metadata via Amazon S3 buckets. S3 can be used for both import and export.
What you get:
- Ingestion: CQA authenticates to your bucket, pulls CSV files (and downloads recordings from the URLs in the CSV), and analyzes eligible conversations on your job schedule
- Export: CQA can push analysis reports (CSV or Excel) to a bucket you own on a configured schedule.
Prerequisites:
- Shared prerequisites above
- Audio URLs in your CSV must be publicly accessible or use pre-signed URLs (so CQA can fetch the recordings)
Setup steps:
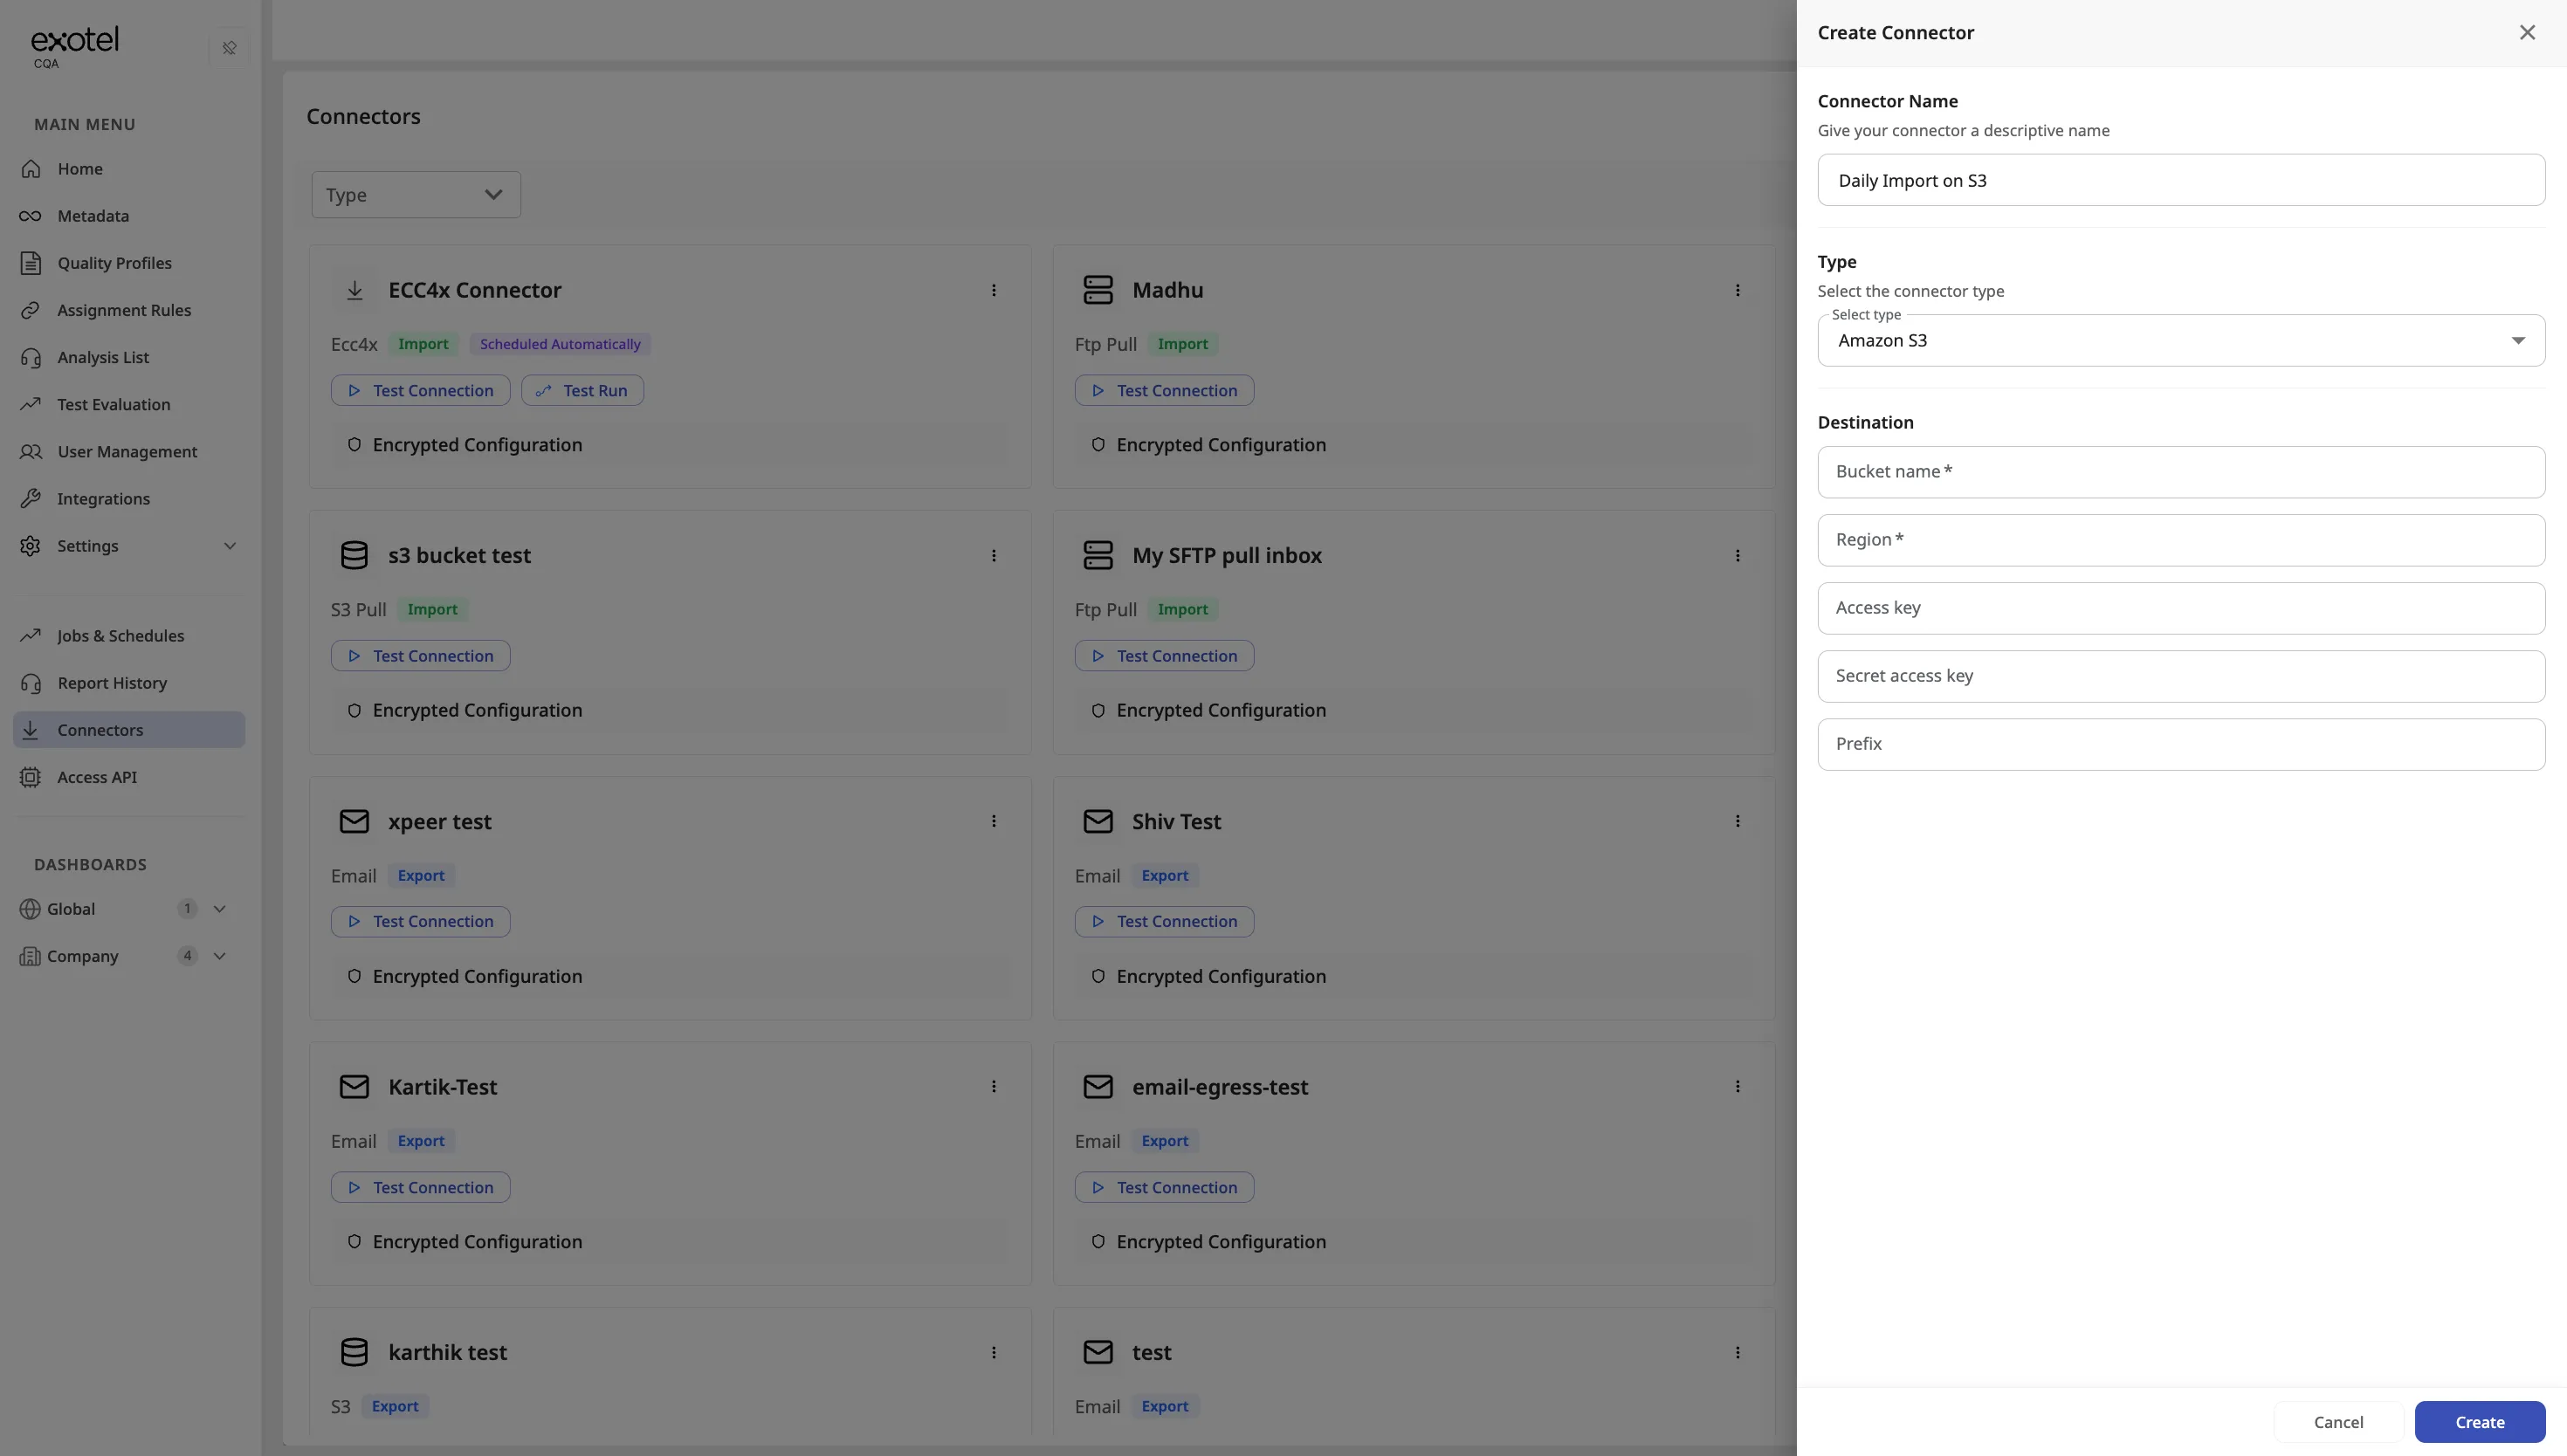
- For import:
- Prepare a sample CSV using the API Reference — CSV Schema and upload it (with reachable recording URLs) to your S3 bucket
- Connectors → Create Connectors → Import Connector → select type Amazon S3 → fill in platform-specific fields → Create → Test connection
- Jobs & Schedules → Create Job → job type Data Import → Source Connectors <select the S3 connector created in the previous step> -> fill in details → Create
- For export:
- Connectors → Create Connectors → Export Connector → select type Amazon S3 → fill in platform-specific fields → Create → Test connection
- Jobs & Schedules → Create Job → job type Data Export → Destination Connectors <select the S3 connector created in the previous step> -> fill in details → Create
- If the console is not enabled, ask your CSM or CQA Support to create the connectors
Verify it's working:
- Confirm Test connection succeeded
- For ingestion: confirm the conversation appears in Analysis List.
- For export: confirm the file lands in your destination bucket
6.2.3. Customer SFTP
CQA supports connecting to customer-hosted SFTP servers for both importing conversation data and exporting analysis reports.
What you get:
- Ingestion: CQA connects to your SFTP server, pulls CSV files (and downloads recordings from the URLs in the CSV), and analyzes eligible conversations on your job schedule
- Export: CQA can push analysis reports (CSV or Excel) to your SFTP server on a configured schedule.
Prerequisites:
- Shared prerequisites above
- Audio URLs in your CSV must be publicly accessible or use pre-signed URLs (so CQA can fetch the recordings).
- Alternatively, audio files can be accessed via SSH from your SFTP server
Setup steps:
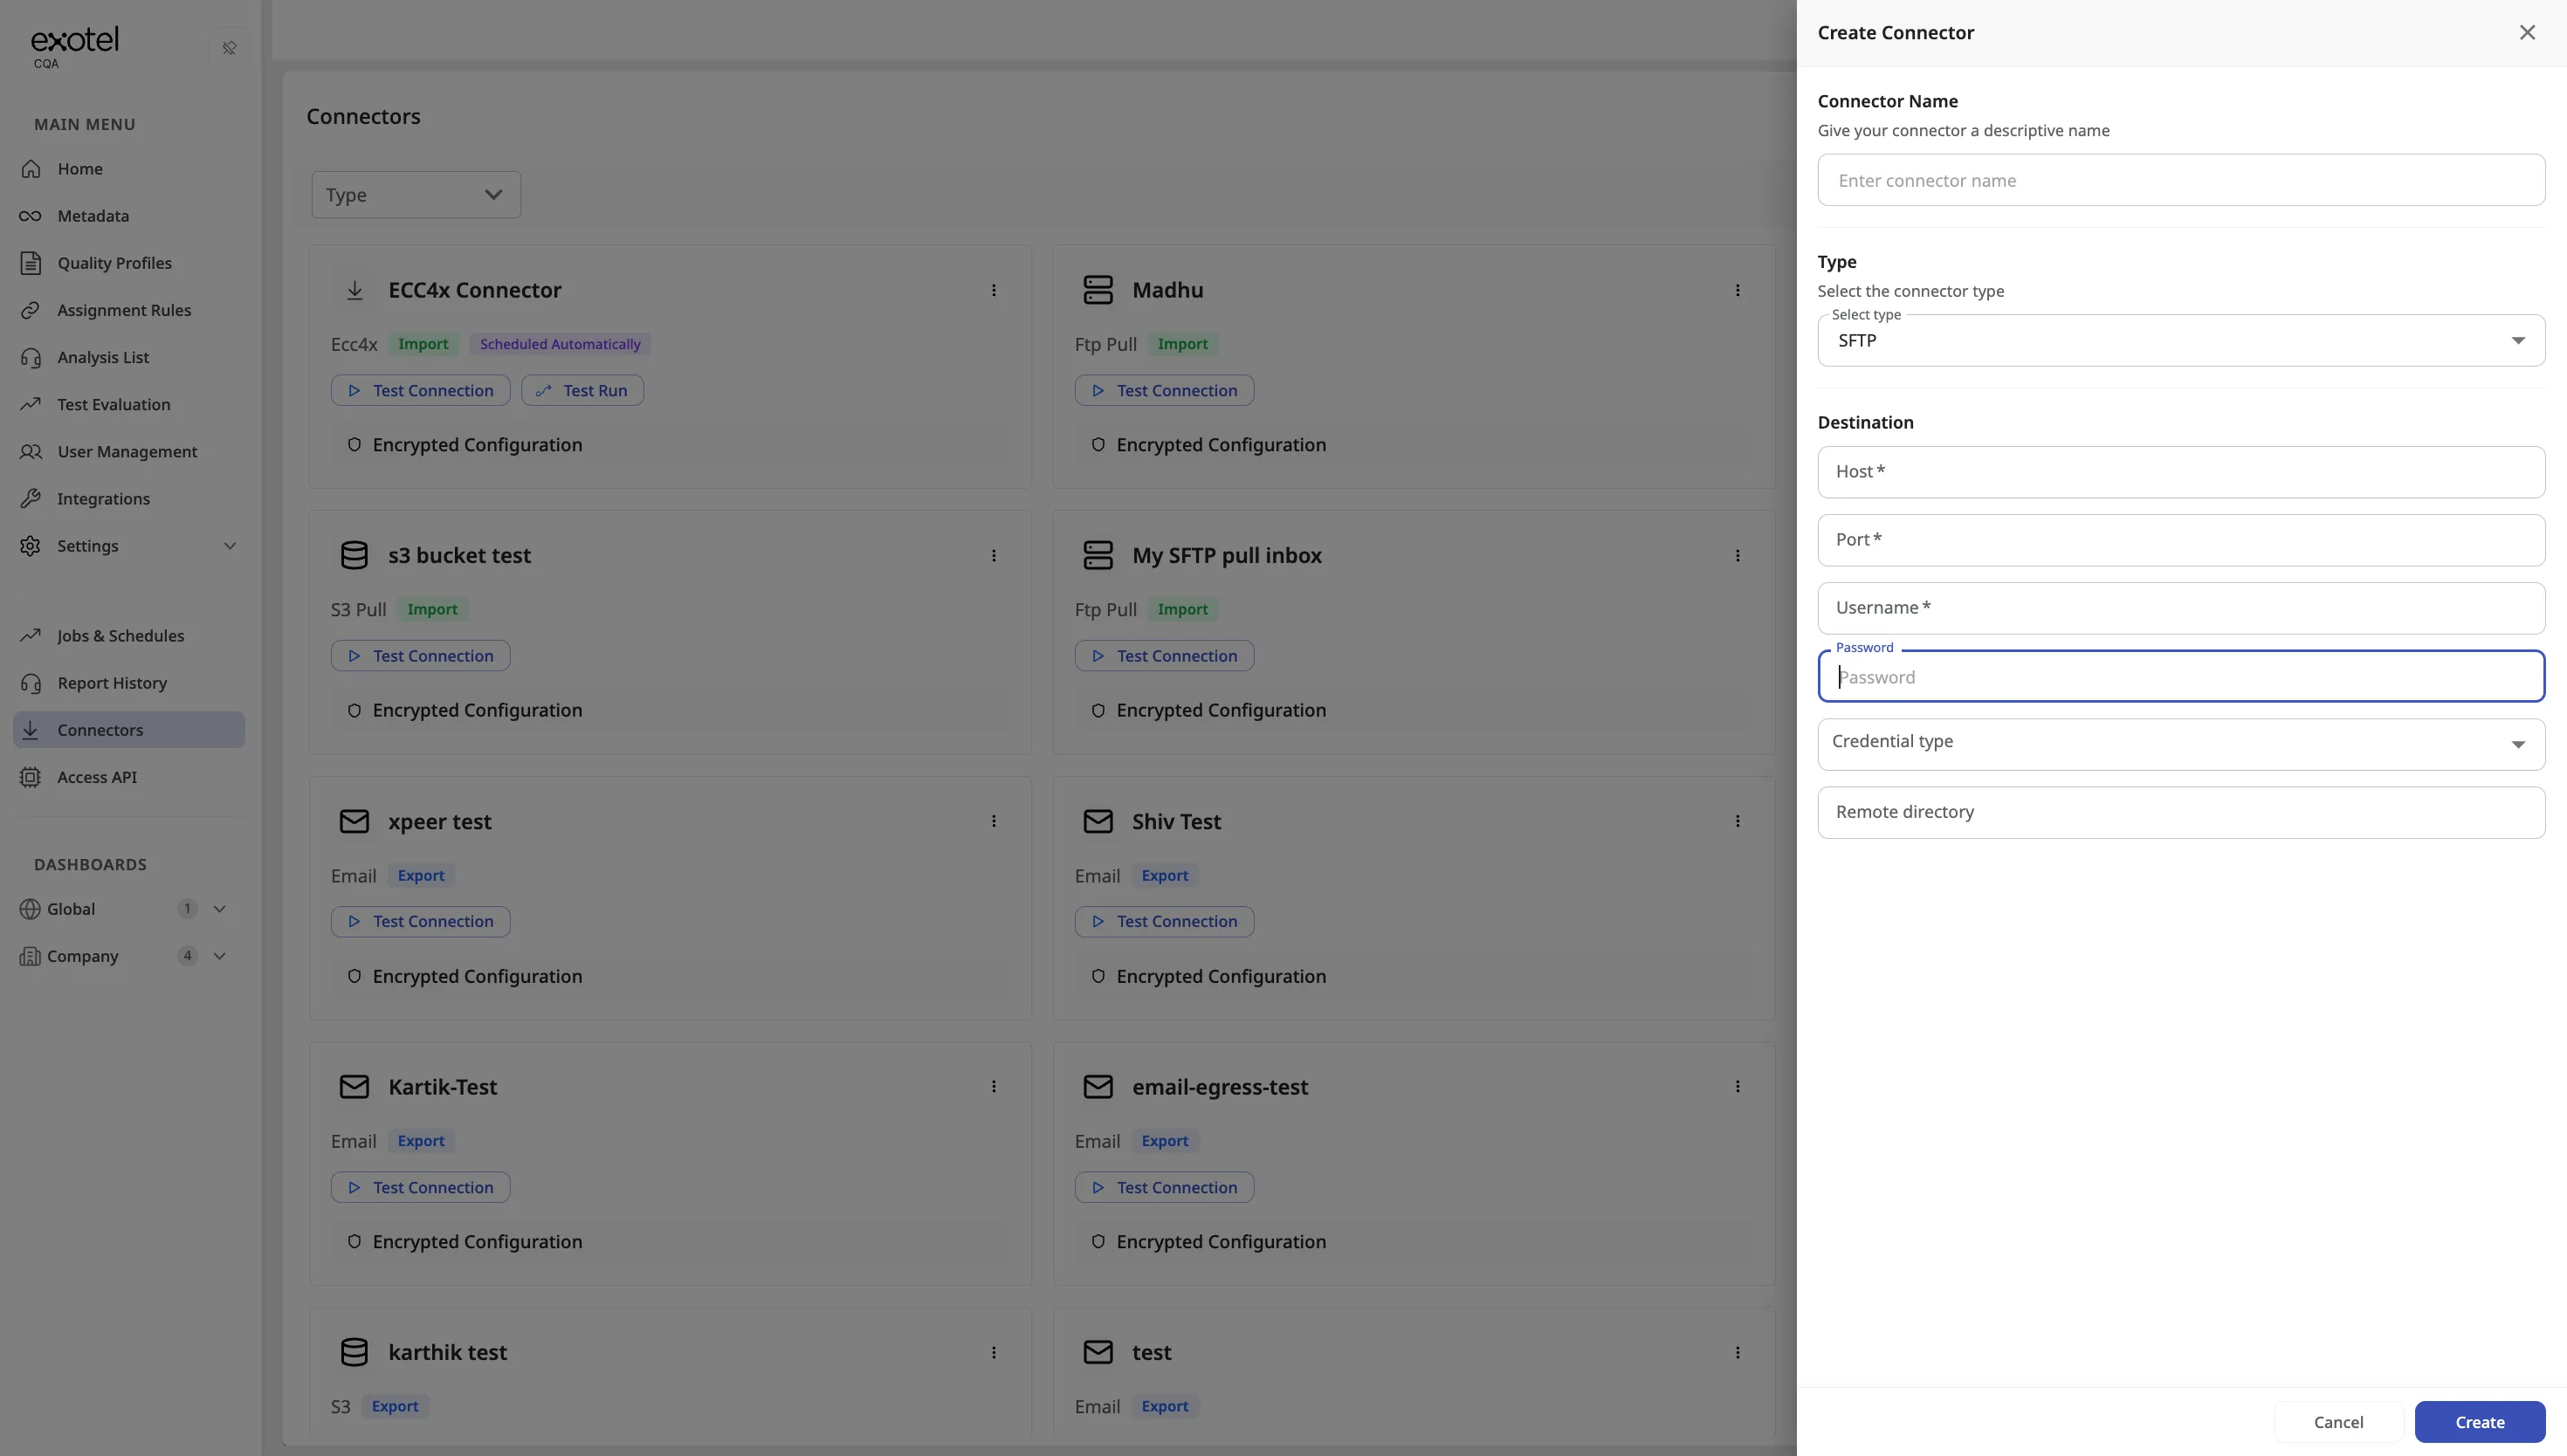
- For import:
- Prepare a sample CSV using the API Reference — CSV Schema and upload it (with reachable recording URLs) to your SFTP server
- Connectors → Create Connectors → Import Connector → select type SFTP → fill in platform-specific fields → Create → Test connection
- Jobs & Schedules → Create Job → job type Data Import → Source Connectors <select the SFTP connector created in the previous step> -> fill in details → Create
- For export:
- Connectors → Create Connectors → Export Connector → select type SFTP → fill in platform-specific fields → Create → Test connection
- Jobs & Schedules → Create Job → job type Data Export → Destination Connectors <select the SFTP connector created in the previous step> -> fill in details → Create
- If the console is not enabled, ask your CSM or CQA Support to create the connectors
- Credential types:
- Username/Password: Standard credential-based authentication.
- SSH Public Key: A more secure alternative to passwords. Contact CQA Support to set up, we handle key pair generation and guide you through the SFTP configuration.
Verify it's working:
- Confirm Test connection succeeded
- For ingestion: confirm the conversation appears in Analysis List.
- For export: confirm the file lands in your destination bucket
6.2.4. Email Export
CQA supports exporting scheduled or one-off analysis reports delivered straight to an inbox.
What you get:
- Export only — email cannot ingest calls into CQA
- CQA generates a report (CSV or Excel) and emails a download link (the file itself is not attached)
- Each file is limited to 10,000 rows; larger reports include multiple links
- If needed, multiple files can be compressed into a single zip file and shared as a single link in the email.
- Reach out to your CSM/CQA team to enable this functionality by default.
- Download links remain valid for 7 days
- You can also trigger a one-time email export directly from the Analysis List without setting up a recurring job.
Prerequisites: Shared prerequisites above
Setup steps:
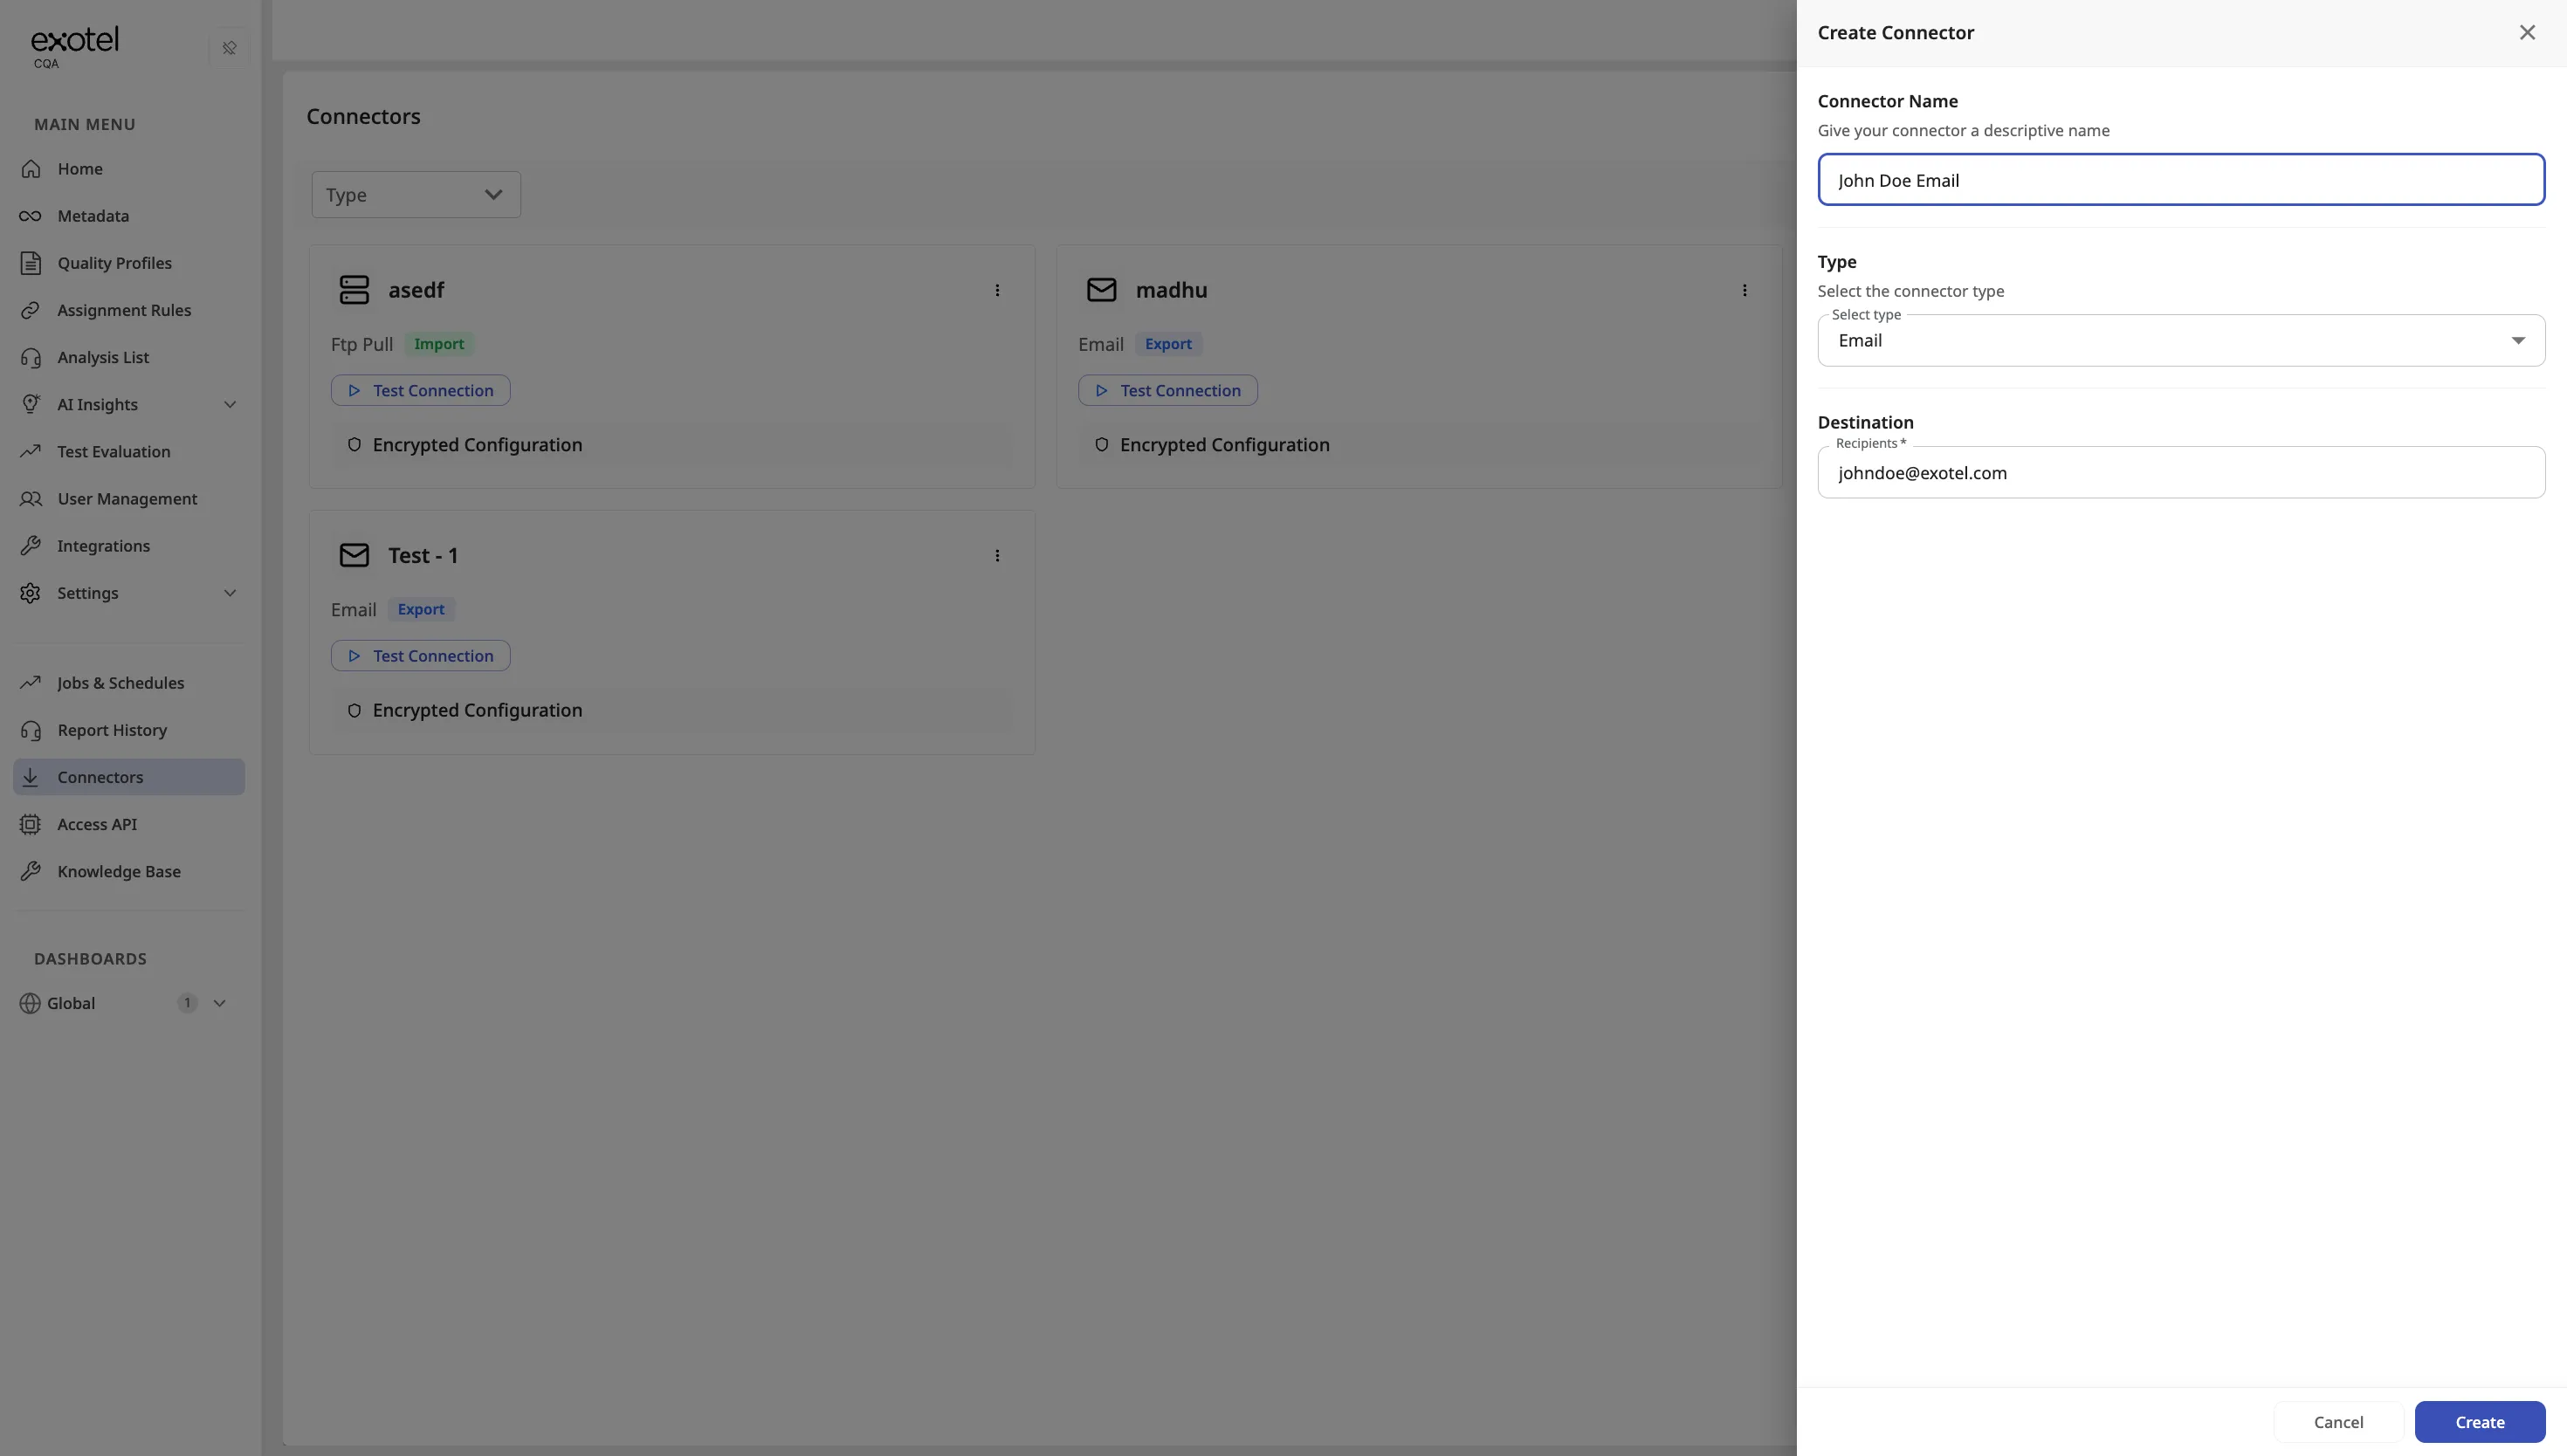
- Connectors → Create Connectors → Export Connector → select type Email → fill in platform-specific fields → Create → Test connection
- Jobs & Schedules → Create Job → job type Data Export → fill in details → Create
- If the console is not enabled, ask your CSM or CQA Support to create the connector
Verify it's working:
- Confirm the download-link email arrived and the link works
6.3. Summary of Integration Capabilities
Integration Type | Ingress | Egress | Console Support |
|---|---|---|---|
ECC 4X | ✅ | ❌ | Yes (auto-scheduled) |
ECC 6X | ✅ | ✅ | Yes (auto-scheduled) |
Exolite Platform | ✅ | ❌ | Yes (auto-scheduled) |
Customer SFTP | ✅ | ✅ | Yes |
Customer S3 | ✅ | ✅ | Yes |
✅ | ✅ | Yes | |
Standard API | ✅ | ✅ | Access API page |
6.4. Jobs & Schedules
Jobs link connectors to schedules, automating recurring data imports and report exports.
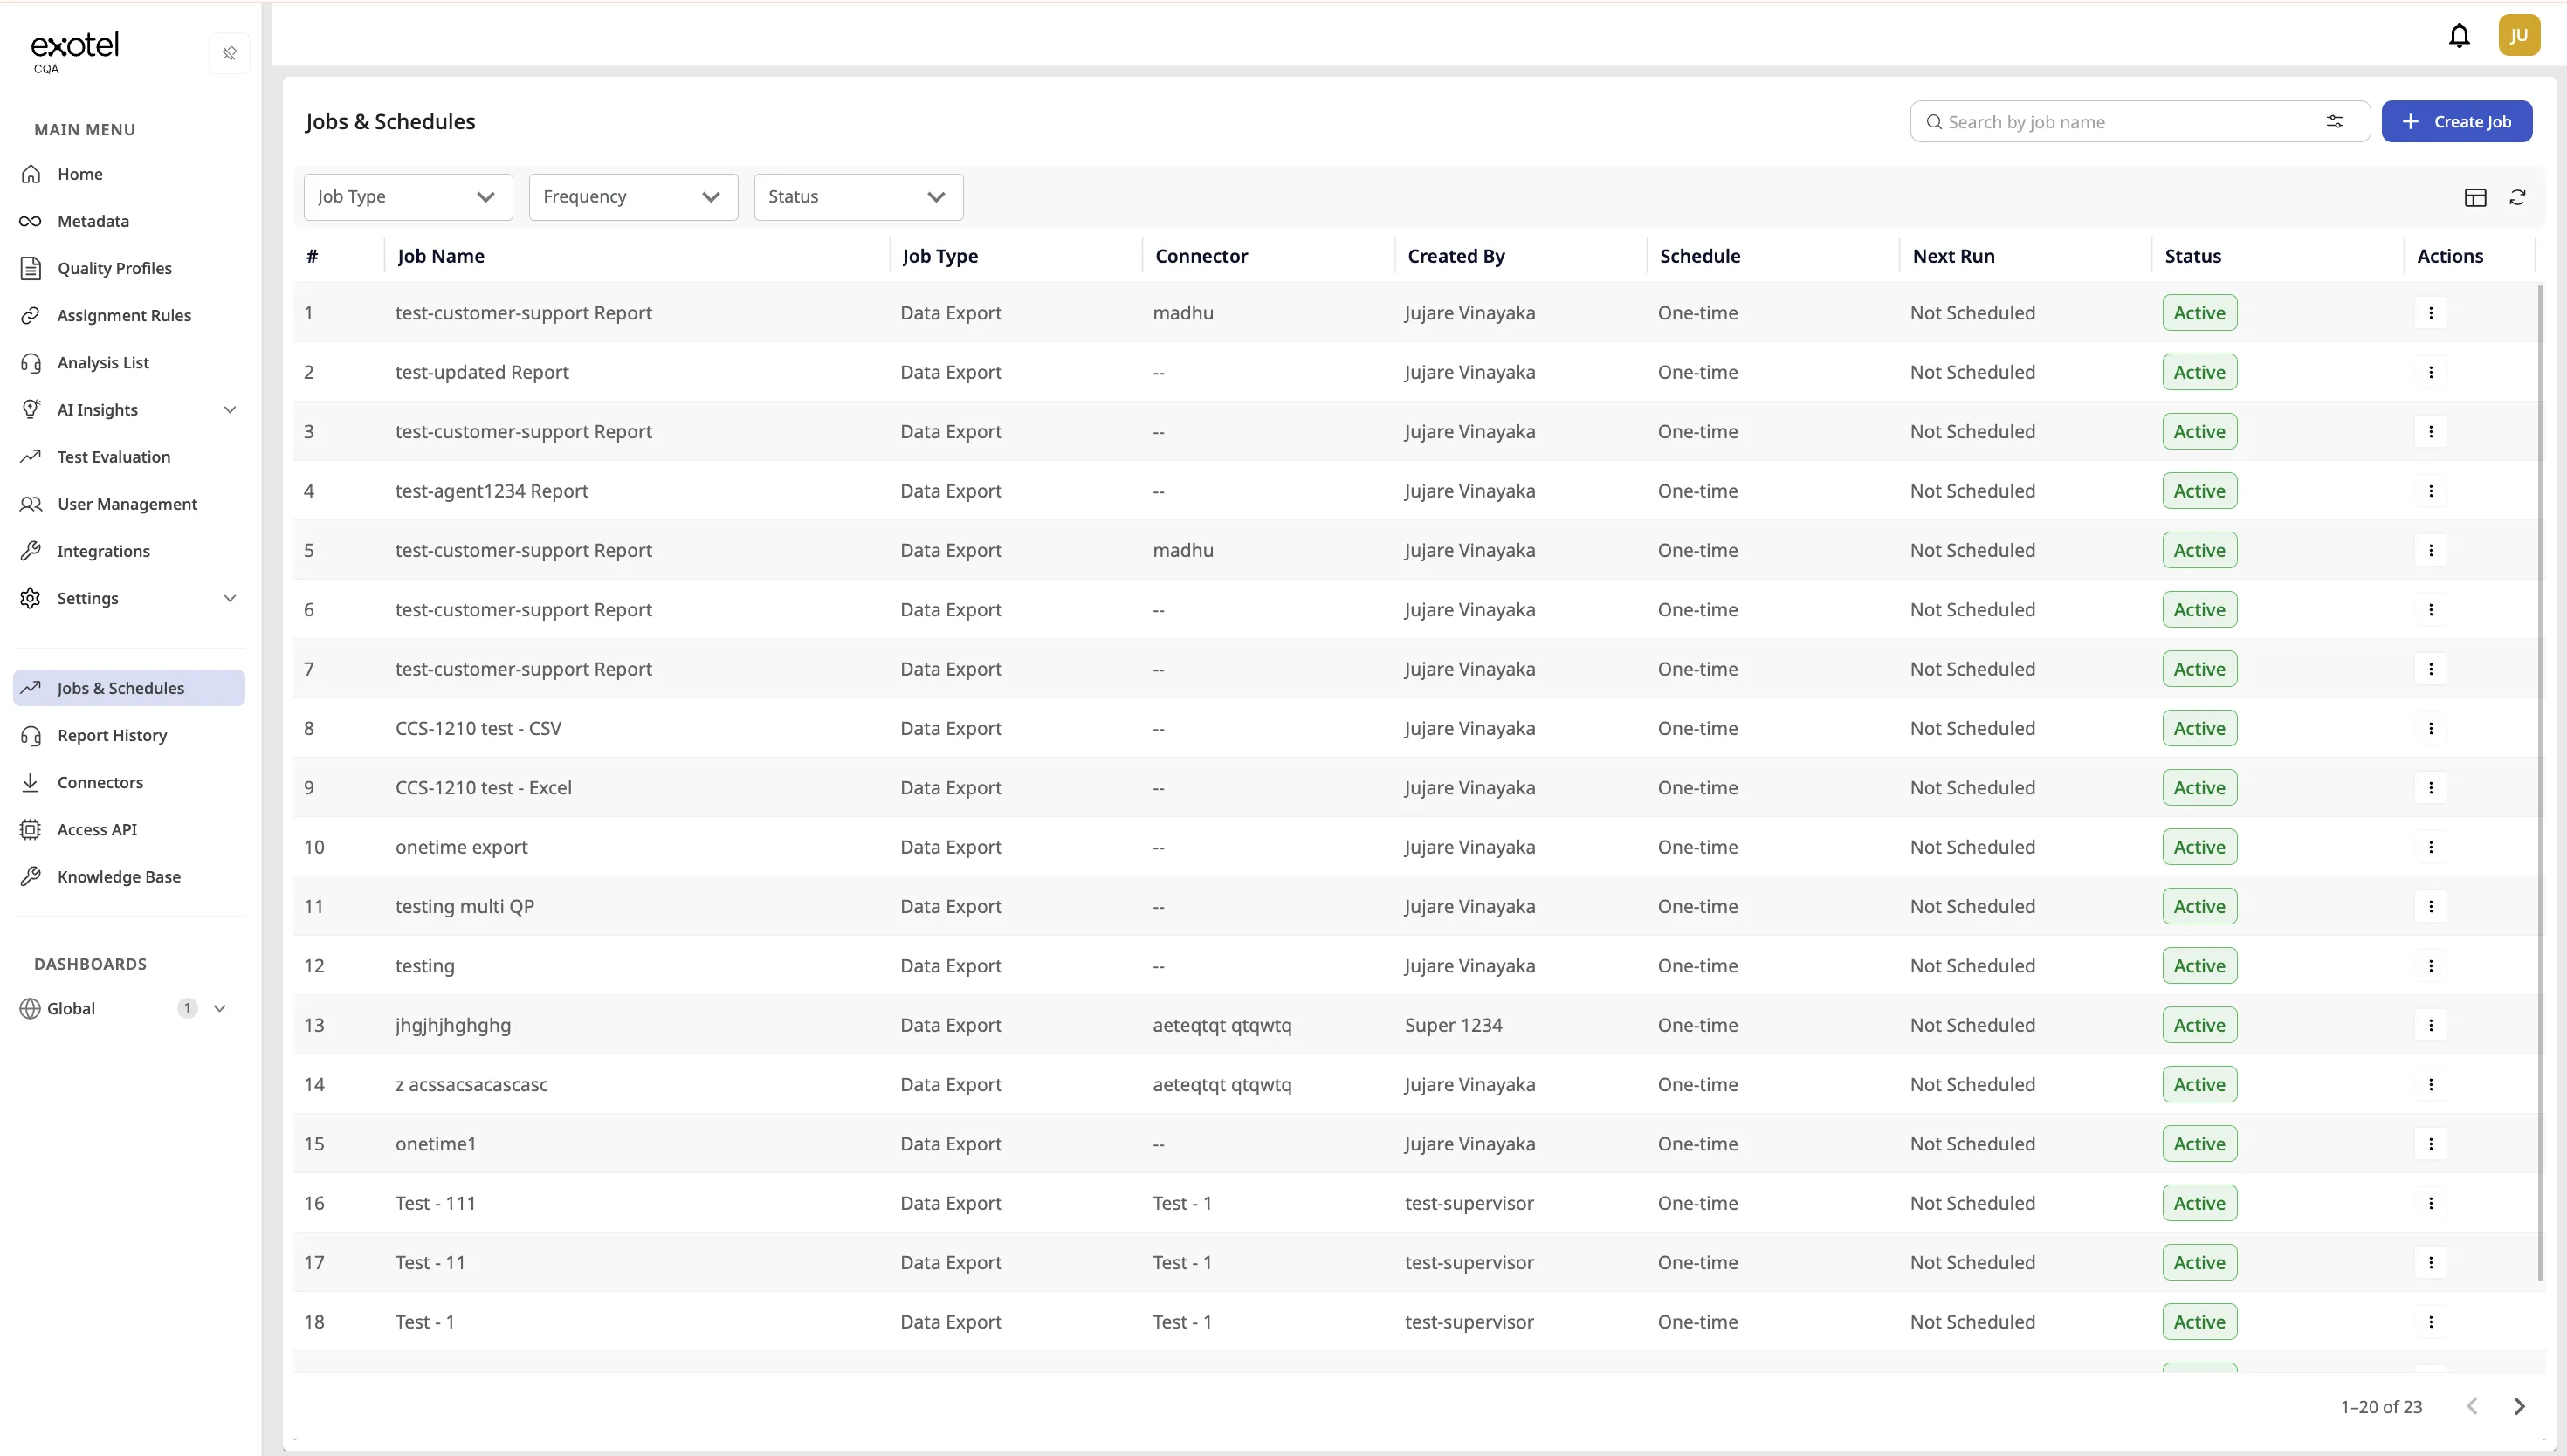
Creating a job:
- Navigate to Jobs & Schedules in the sidebar.
- View all jobs in a table showing: job name, job type (Data Import / Data Export), connector used, created by, schedule, and status.
- Click + Create Job.
- In the creation modal:
- Enter a Job Name.
- Select Job Type: Data Import or Data Export.
- Select the Connector to use (only connectors matching the selected job type are shown).
- Select Frequency: Hourly, One-Time, Daily, Weekly, or Monthly.
- Set Start Date and End Date (or select Never End).
- For Data Export (Report) jobs only: configure the report parameters — Quality Profile, date range, saved filters, column selection (choose which fields to include), and file format (CSV or Excel).
- Click Create job.
Job actions:
- Trigger: Manually run a job immediately using the play button, regardless of its schedule. Useful when a scheduled pull missed the file (e.g., the CSV was uploaded after the scheduled time) and you want to retry immediately.
- Disable: Temporarily pause a scheduled job without deleting it (e.g., during maintenance windows).
- Delete: Permanently remove the job.
Schedule timing: Daily scheduled jobs trigger at approximately 2:30 AM IST. The job pulls all conversations and CSV files available at that time, runs analysis, and results appear in the Analysis List.
Note: For Exotel product connectors (ECC 4X, ECC 6X, Exolite), the data import job is scheduled and starts running automatically when you create the connector. It appears in the Jobs & Schedules table, but you do not need to create or trigger it manually.
6.5. Report History
Track all job runs with their outcomes.
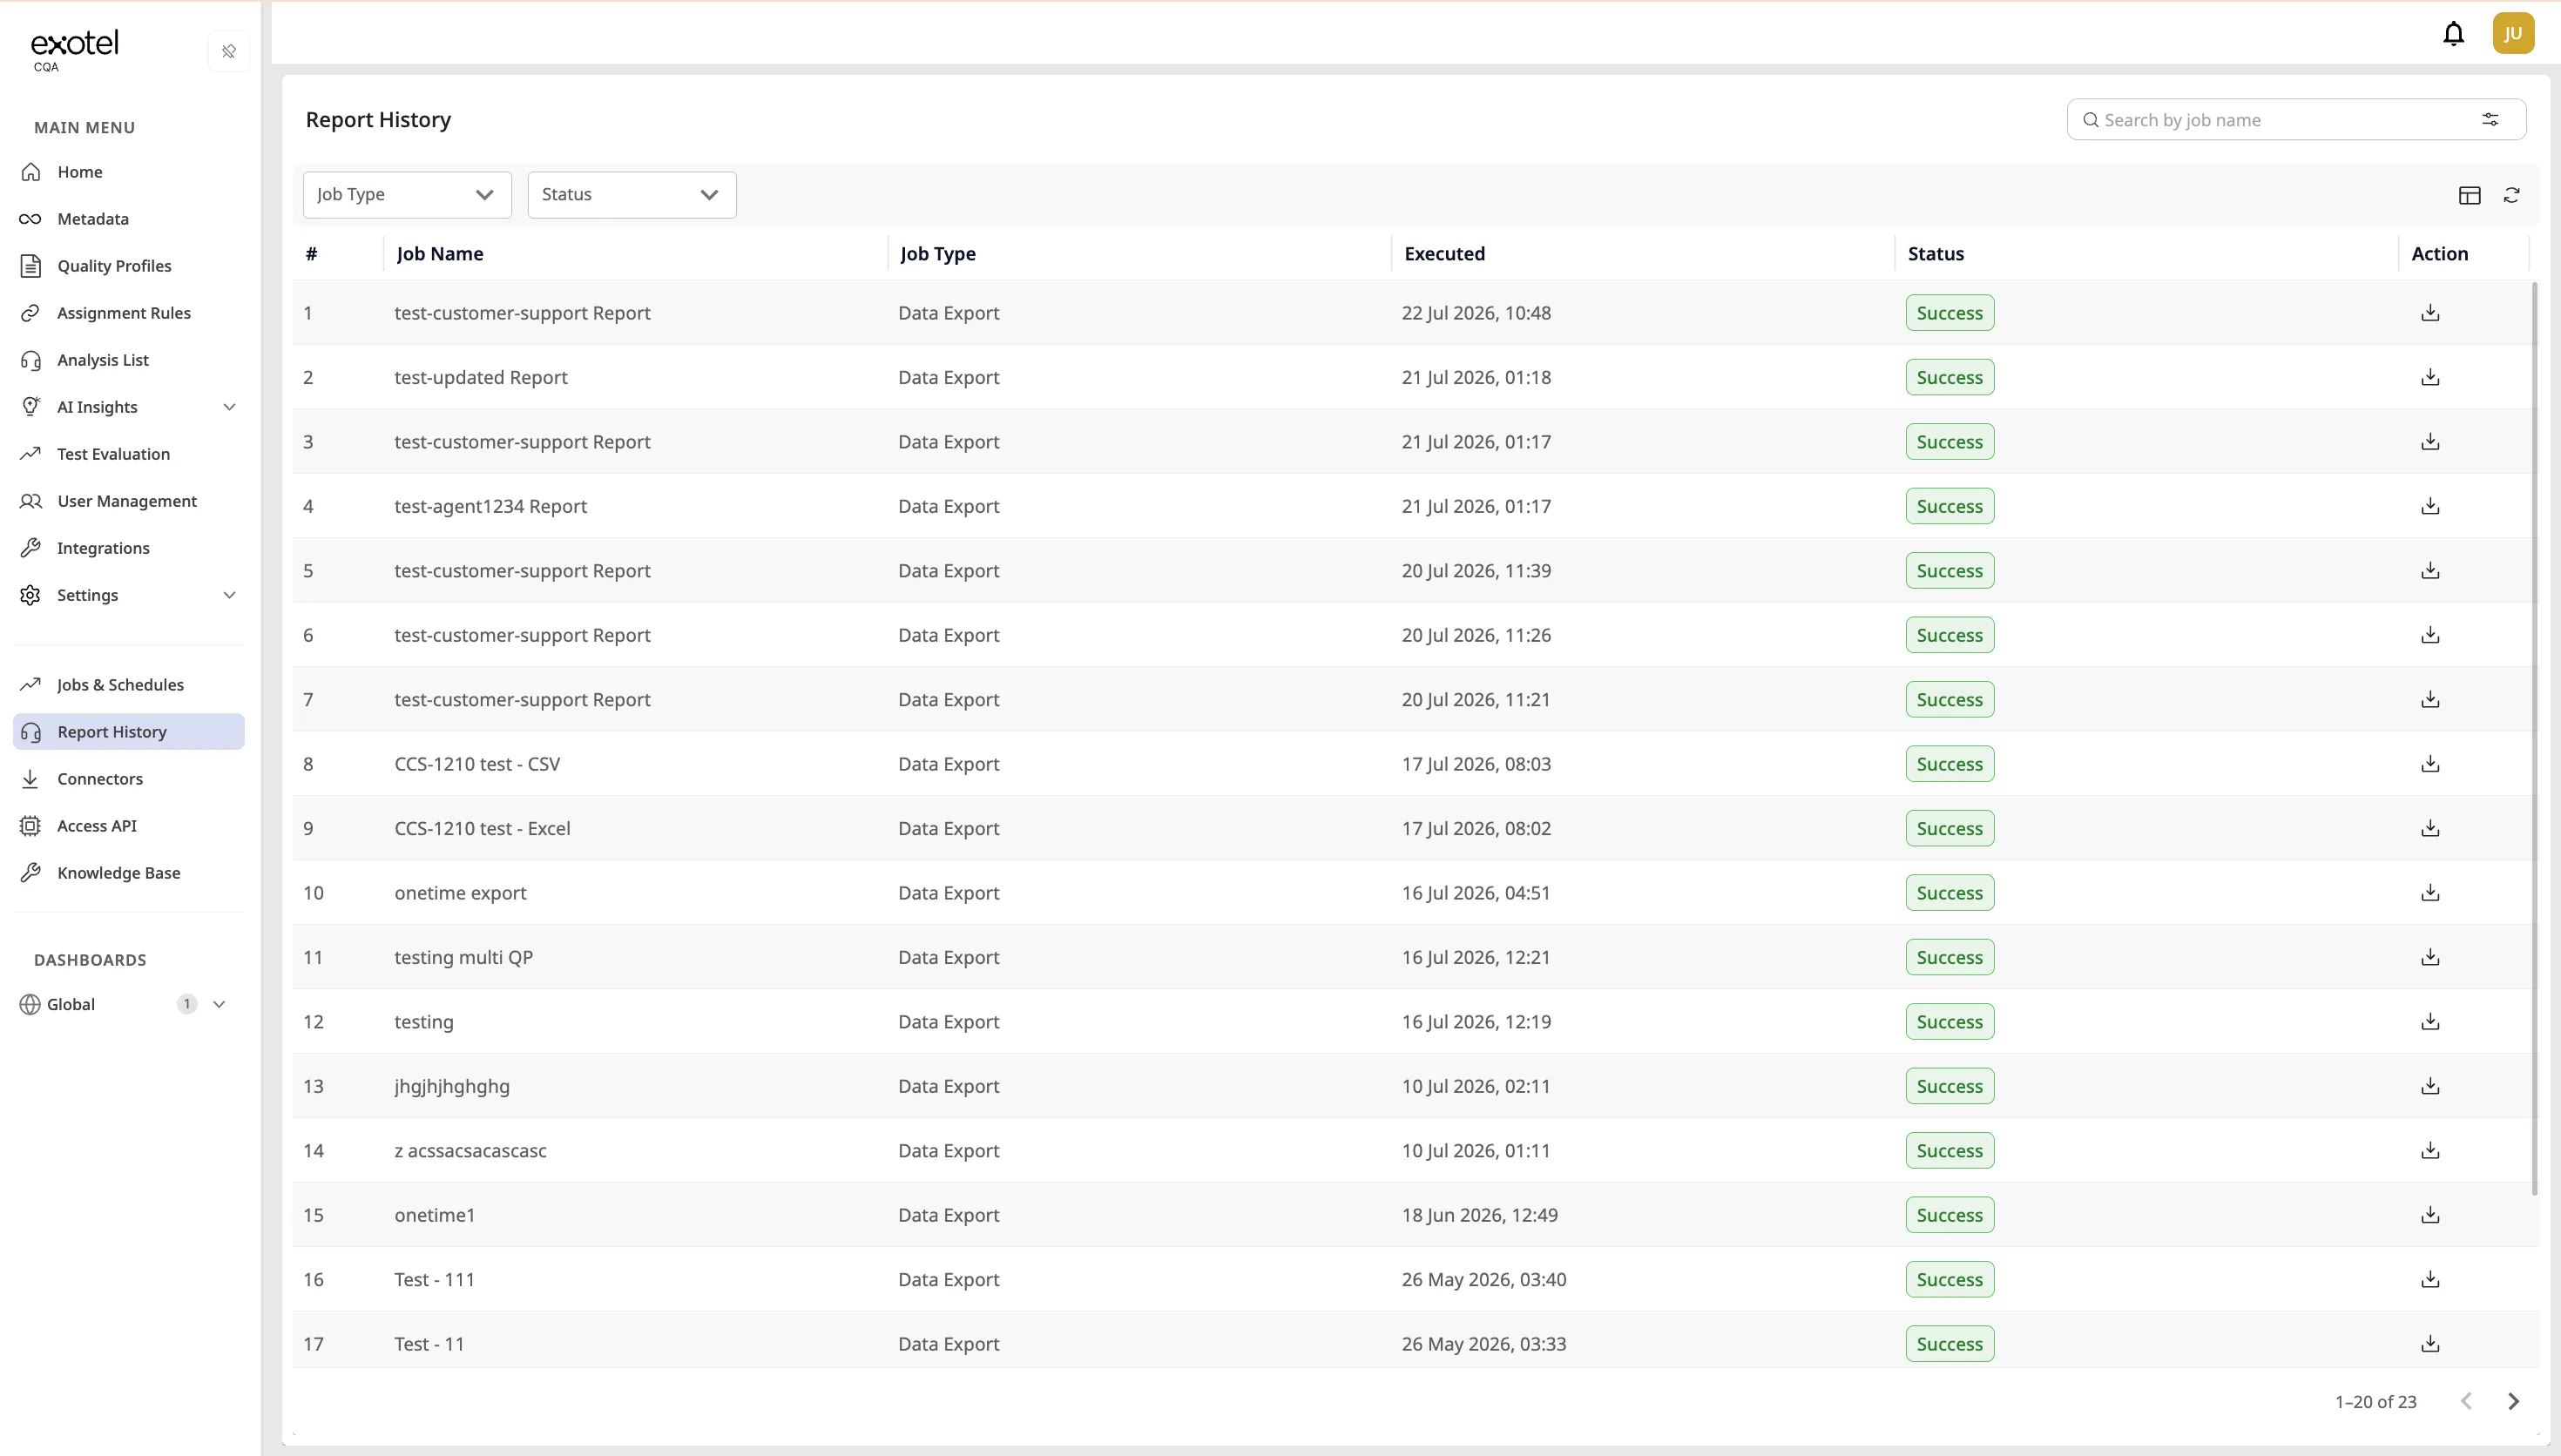
- Navigate to Report History in the sidebar.
- View a chronological table of all job executions showing: job name, job type, connector used, execution timestamp, and status.
- Filter by job type (Data Import / Data Export) and status.
- For Data Export executions: a download link for the generated report is available directly in the execution history. Links are valid for 7 days.
Execution statuses:
Status | Description |
|---|---|
Pending | Job is queued and waiting to start |
Processing | Job is actively fetching and processing data from the source |
Delivering | Processing is complete; for export jobs, results are being pushed to the destination (S3, SFTP, email). Import jobs pass through this state briefly before completing. |
Success | Job completed successfully — all data was processed and delivered |
Partial Success | Processing succeeded but some delivery destinations failed (e.g., SFTP delivery failed while S3 succeeded) |
Handler Failed | The data processing step itself failed (e.g., source unreachable, file format error) |
Delivery Failed | Processing succeeded but all delivery destinations failed |