Use your customer list to greet callers by name
Database tables hold your customer data — names, plans, order numbers — so your voice agents can use it on calls. Add a Contact Number column and turn on caller lookup, and the agent knows who is calling before it says hello, so it can greet them by name. No webhook or code needed.
Before you start
- Where it lives: left menu Build → Integrations → Database. Tables belong to your account; any agent can use them.
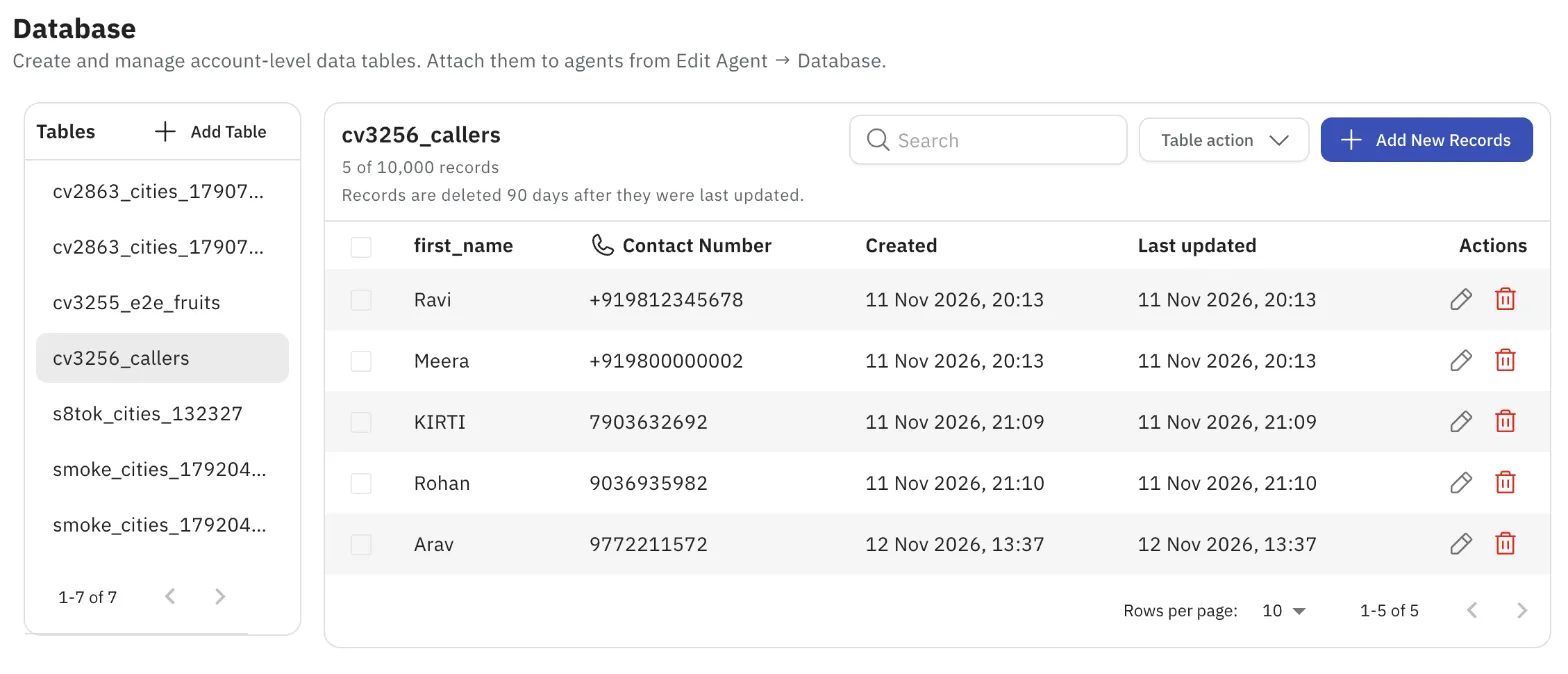
- Contact Number: the column caller lookup matches the caller's number against. Any format works: +91 98123 45678, 098123 45678 or 9812345678. A table can have one Contact Number column.
- Limits: up to 10,000 records per table and 10 columns. Records are deleted 90 days after they were last updated. Your account's limits are under Manage → Account → Database limits.
- File format: CSV. Column names use letters, numbers and _ only, and start with a letter.
Create a table from a file
The quickest way to start is to upload a CSV you already have, such as a CRM export. You don't need to rename its columns first.
Step 1 — Upload
- On the Database page, click + Add Table, then Create from file at the bottom left.
- Enter a Table Name (up to 20 characters).
- Drag your CSV into the drop zone, or click Choose file. The file's name, size and row count appear below it.
- Not sure of the format? Click Download sample file. The sample's first column is Contact Number.
- Click Next.
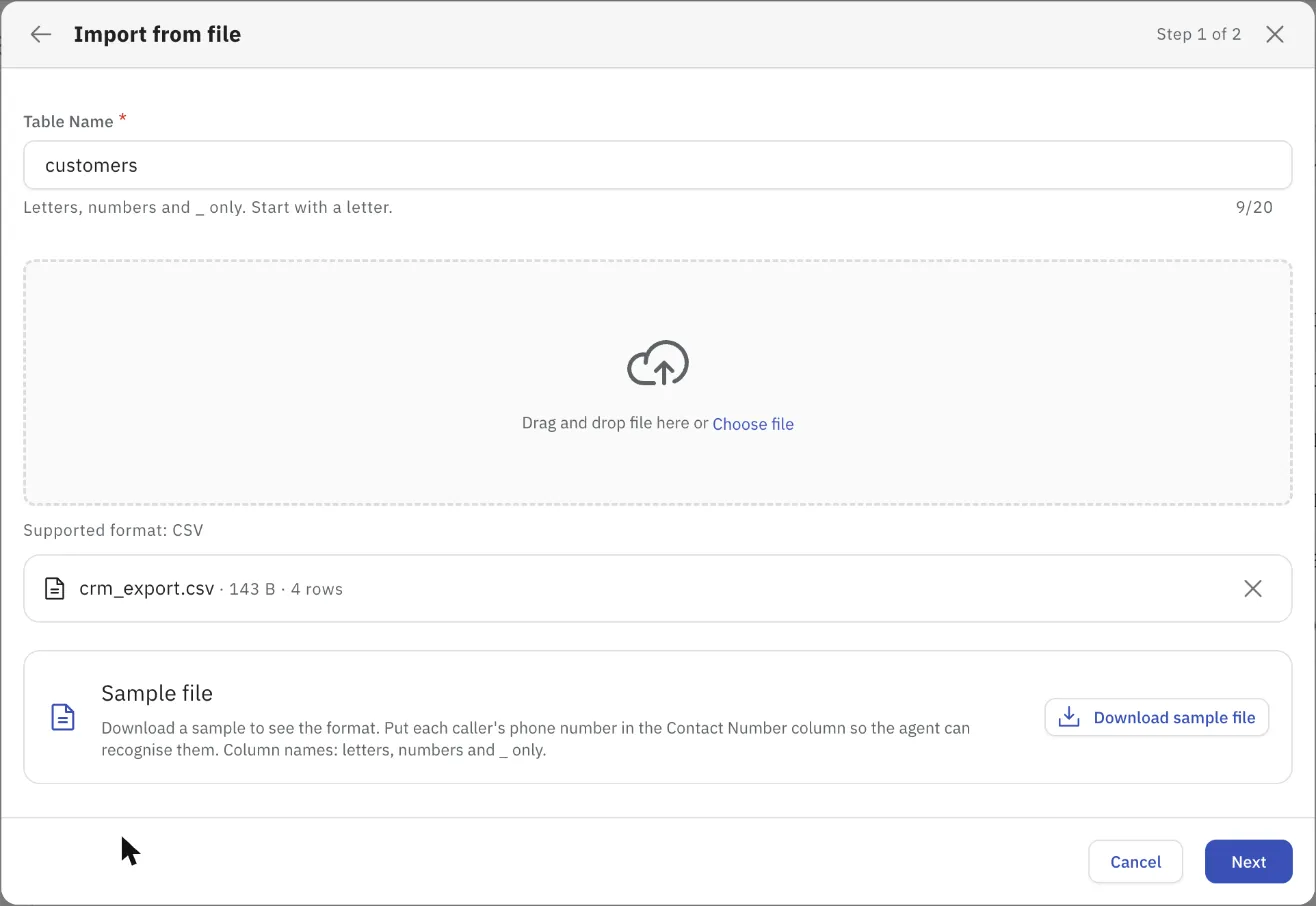
Figure 1 — Import from file, step 1.
Step 2 — Map columns
- Under Which column has the caller's phone number?, check the column picked. Columns named Mobile, Phone, Number or Contact Number are picked for you. If your file has no phone numbers, choose Skip — this file has no phone numbers; the table then can't be used for caller lookup.
- Check the column names. Headers are tidied for you ("Customer Name" becomes customer_name); you can edit them.
- Check each Field Type (string or number) and the Searchable boxes. Searchable lets the agent search that column during a call — leave it on for values callers say, like a name or order ID.
- Check the preview, then click Create table.
If some rows have a blank or invalid phone number, a yellow note tells you how many. Those rows are still imported, but they won't match a caller.
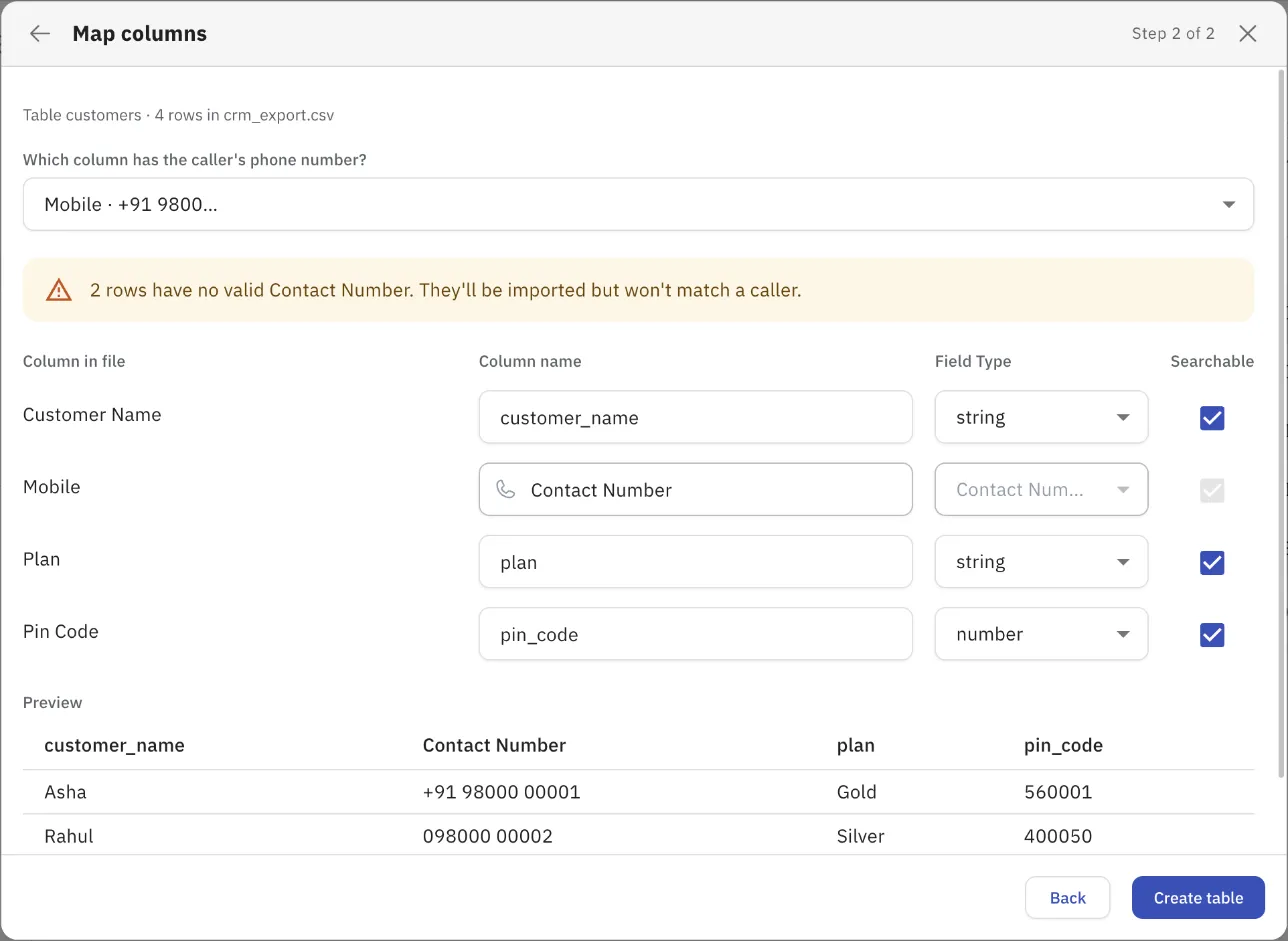
Figure 2 — Map columns: the Mobile column becomes Contact Number.
Create a table manually
- Click + Add Table.
- Enter a Table Name and, optionally, a Description.
- For each column, enter a Field Name, pick a Field Type and tick Searchable if callers might say this value.
- To use caller lookup later, click Add Contact Number column. It adds a locked Contact Number row; the link then disappears.
- Click + Add field for more columns (up to 10), then Create Table.
Names are checked as you type. If a name breaks the rules, a red message appears under it and Create Table stays disabled until you fix it.
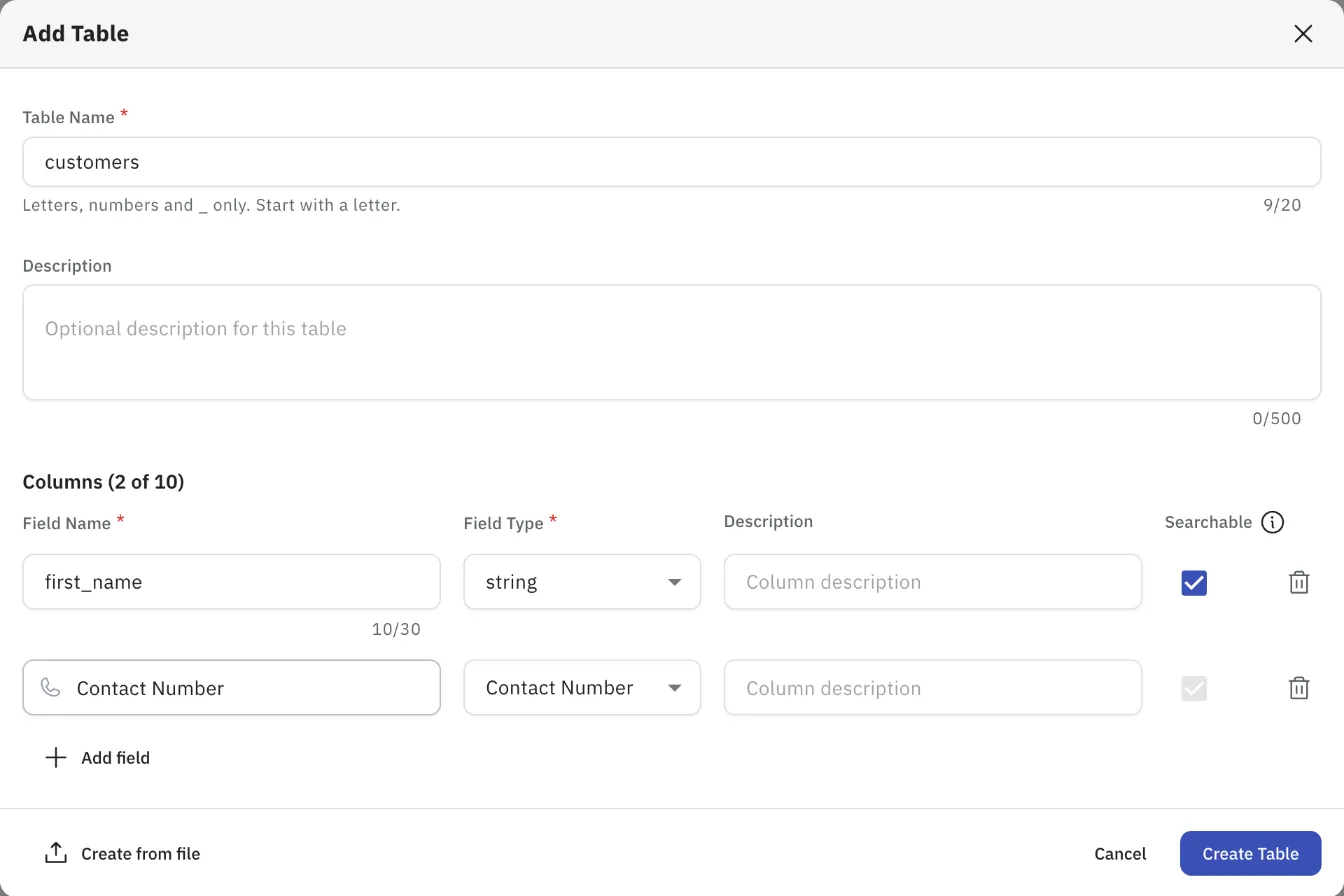
Figure 3 — Add Table with a Contact Number column.
Add, import and edit records
Select a table in the Tables list to see its records. Under the table name you'll see how many records it holds out of your limit, and when records are deleted.
Figure 4 — A table with a Contact Number column.
Add one record: click + Add New Records, fill in the fields and click Save.
Import more records from a file:
- Click + Add New Records, then Import from file.
- Choose how to add them:
- Append records (default) keeps what's there and adds the file's rows.
- Replace all records deletes every existing record first. A warning shows how many will be deleted.
- Upload the CSV and click Next.
- Match each table column to a column in your file. Matching names are picked for you. For Contact Number you can choose Skip — leave empty. Columns from your file that you don't use are listed and won't be imported.
- Click Import records.
If the import would take the table over its record limit, nothing is saved and an error shows above the buttons. Remove rows from the file or delete old records, then try again.
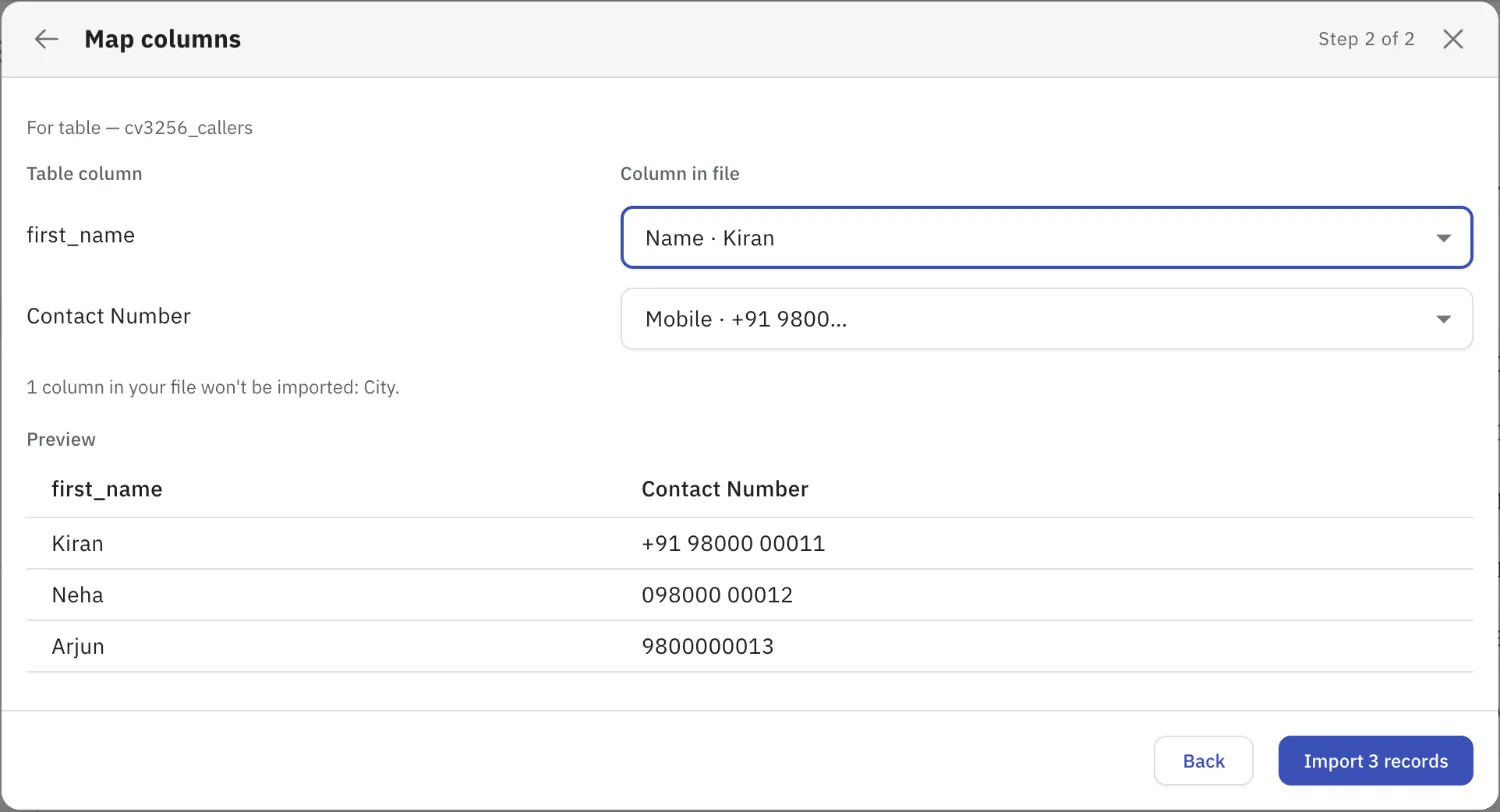
Figure 5 — Map columns when adding records to an existing table.
Edit a record: click the pencil icon on its row, change the values and click Save. Saving resets that record's 90-day retention.
Delete records: tick one or more rows, then click Delete in the bar above the grid. To delete a single row, use the bin icon on that row.
Attach a table to an agent
Attaching a table lets the agent look up its records during a call, for example to check an order status.
- Open Agents, select your agent and click Edit agent.
- Go to the Database tab and click + Attach table.
- Tick one or more tables and click Attach table.
- Click Save and rollout to create a new agent version.
Each attached table shows its record count. A Contact Number badge means it can be used for caller lookup; a Caller lookup badge means it already is. Click Detach to remove a table from this agent — the table itself stays in Database.

Figure 6 — The agent's Database tab.
Greet callers by name with caller lookup
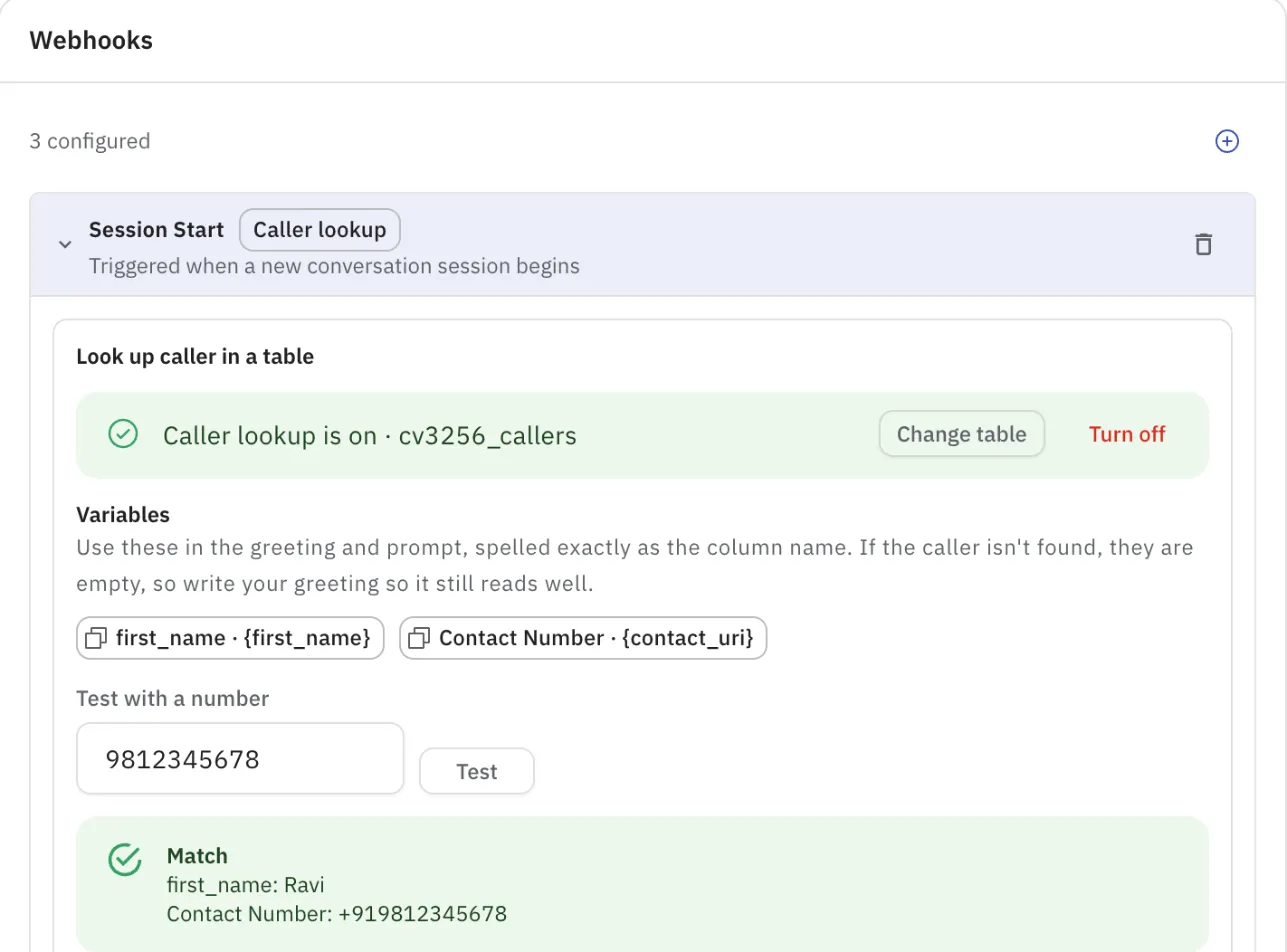
When a call starts, caller lookup finds the caller's number in a table's Contact Number column. That row's values become variables the agent can use in its greeting and instructions. If the caller isn't in the table, the variables are empty and the call goes ahead as normal.
Turn it on
- Open your agent, click Edit agent, then Configure → Webhooks.
- If there's no Session Start webhook yet, click ⊕ and choose Session Start. Expand it.
- Under Look up caller in a table, pick a table. Only tables with a Contact Number column are listed.
- Click Use for caller lookup.
- Click Save and rollout.
Use the variables
The card lists one variable per column, written exactly as the column name — for example {first_name} and {contact_uri} (Contact Number). Click a chip to copy it, then paste it into the agent's greeting or instructions:
Hi {first_name}, thanks for calling. How can I help you today?Write the greeting so it still reads well if the caller isn't found and the variable is empty.
Test it
Type a phone number under Test with a number and click Test. You'll see the values the agent would get, or No match — variables will be empty.
Change or turn off
Use Change table to pick another table, or Turn off to stop caller lookup. Then click Save and rollout.
Caller lookup can't run alongside your own Session Start webhook URL. If a custom URL is set, the card says so; clear the URL to use caller lookup.
Limits, retention and FAQ
Limits and retention. Each table holds up to 10,000 records. Records are deleted 90 days after they were last updated; editing or re-importing a record resets its clock. You'll be warned 7 days before deletion. To change these limits, write to [email protected]. Your account's values are under Manage → Account → Database limits.
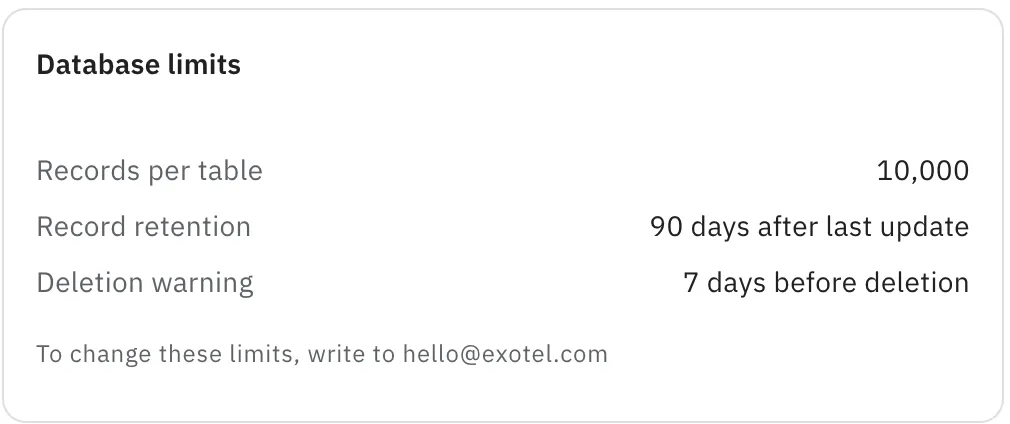
Figure 8 — Database limits on the Account page.
My table doesn't appear in the caller lookup list. It has no Contact Number column. Re-create it from a file and pick the phone column in Map columns, or add records to a new table that has a Contact Number column.
The caller isn't recognised. Check the number with Test with a number. Rows with a blank or invalid Contact Number never match. If several rows share a number, the most recently updated one is used.
My import was rejected. Check the message above the buttons: the file may have no data rows, or the import would take the table over 10,000 records. Nothing is saved when an import is rejected.
Can I use my own Session Start webhook too? Not at the same time. Use either caller lookup or your own webhook URL.