"Manage Lead" Tab in Lead Management
Manage Lead
In this tab, the Supervisor can see all leads (ID and Name), which are already created in the Process.
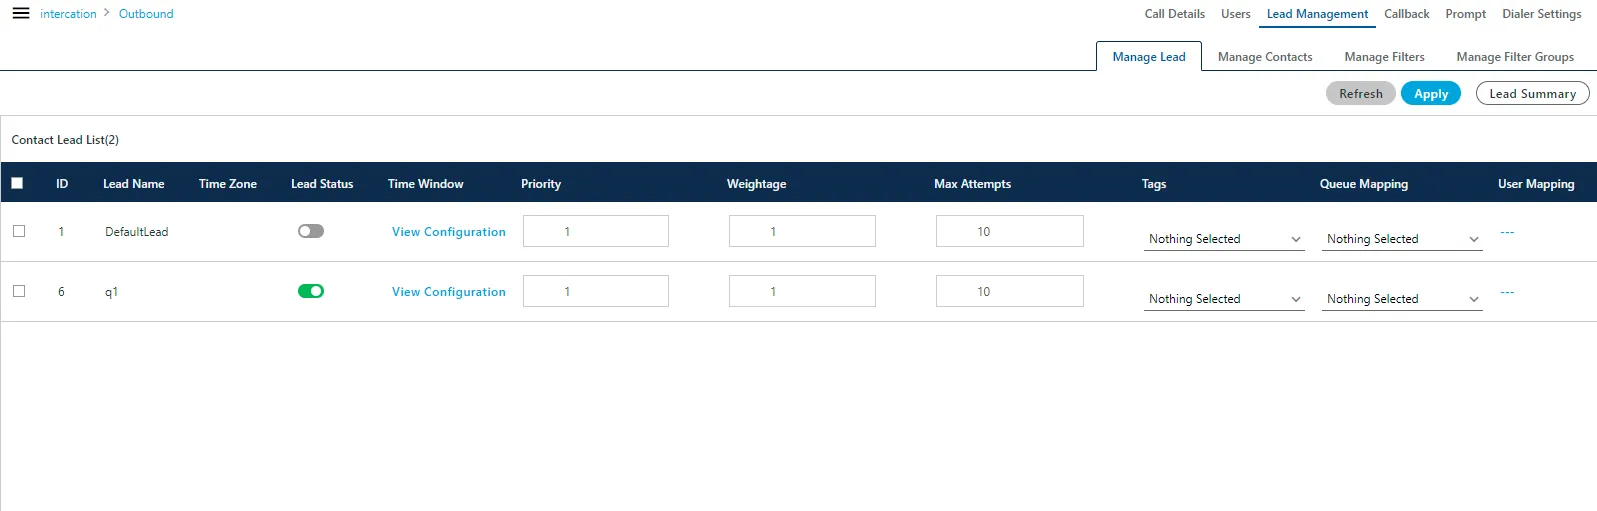
The total number of leads which you can enable at any instant of time, is the licensable feature which is configured by the administrator. Ask your administrator for further information on the same.
Here, Supervisor can perform the following operations.
Supervisor has to map the lead with the queue. This feature is licensable, hence ask your administrator about the license of it.
Tags (Licensable)
The supervisor can tag the lead with the users. Click the drop-down list of the tags to tag the user for the leads.
For example, In a case of a collection process, the supervisor can assign a particular lead to a specific agent by selecting Tags as Self. It helps agents to follow-up with their customers and produce efficient results.

The tagging contains the following options.
- Nothing Selected: No tag will be applied on the lead list.
- Absentee: If a lead list is marked as "Self," then the user selected in "User Mapping" will get all calls for this lead list. The Supervisor can click "--" link in "User Mapping" for a lead list for which the "Self" tag is selected to select the user who will get the calls of this lead list.
- Review: If a lead is mapped to a user, but now the agent is not available to attend the calls. Then The Supervisor can manually tag the lead as "Absentee." The Supervisor can take the decision not to use this lead of now, and if it has to be used, then the calls can be manually routed to other available agents.
- Self: A The Supervisor can mark a lead list as "Review" manually and remove this tag after conducting the review.
After selecting any of the above tags for the available leads, click "Apply" to apply the changes.
Queue Mapping (Licensable)
Select the Queue name from the drop-down menu in the "Queue Mapping" column and click "Apply" button.

Enable or Disable the Lead
Supervisor can enable or disable the Lead from the Status toggle bar present corresponding to the TimeZone of the lead name.
Click  switch to enable the lead.
Click  switch to disable the lead.
View Lead Summary
Select the leads and click "Lead Summary" to view and download the lead summary. It shows the following pop-up.
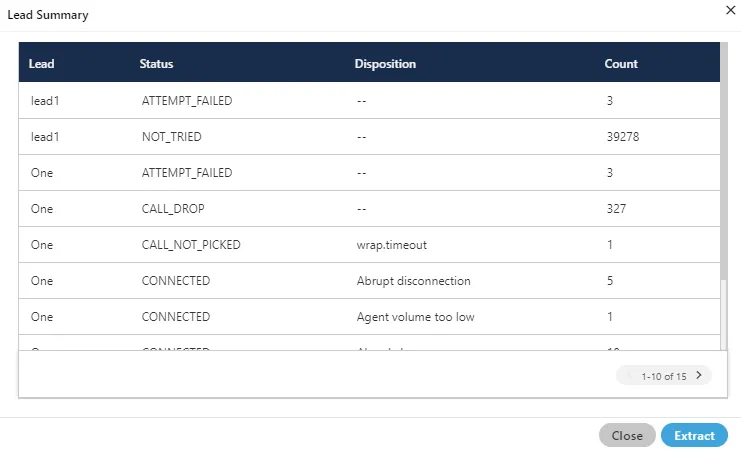
Click "Extract" in this pop-up to save the Lead Summary as a CSV file on the disk. It shows the following dialog box.
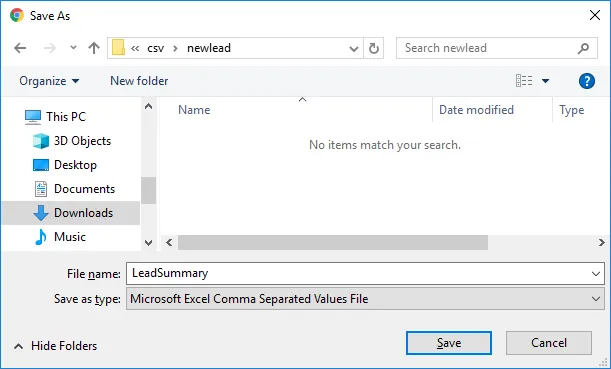
Select the location and provide a name to the file. Click "Save" to save the lead summary as the file.
Assign Priority
For any lead, the Supervisor can enter the priority in numbers. Here, "1" stands for First Priority and the lead with First Priority will be dialed first. The lead with "2" (Second) Priority will be dialed second and so on.
Assign Weightage
For any lead, the Supervisor can enter the weightage in the numbers. It is the ratio that will be assigned by the dialer. This will only work if the priority of the leads are same.
Use Case: If there are more than one lead with same weightage then dialer will prefer the lead with more weightage. For example, if Lead 1 has 2 Priority with 40 weightage and Lead 2 has 2 Priority with 50 weightage, then Lead 2 will be dialed in the higher ratio.
Assign Maximum Attempts
Here, the Supervisor can define the number of retry attempts for a customer The number will not be retried after the provided maximum number of attempts.
Assign Filters
Supervisor can assign or unassign the filter from any lead. Click "Assign Filter" button to assign or unassign the filter to the lead.
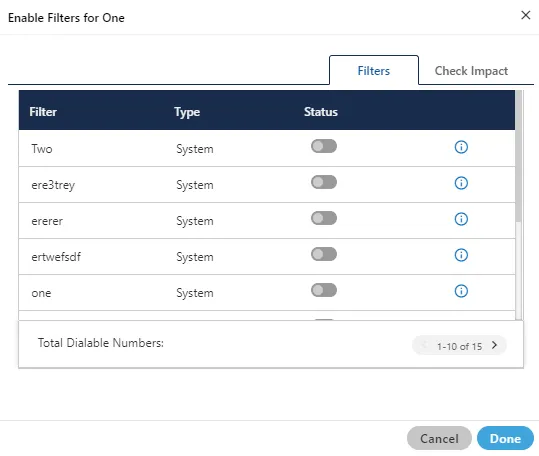
- For the very first time, "Total Dialable Numbers" will remain blank.
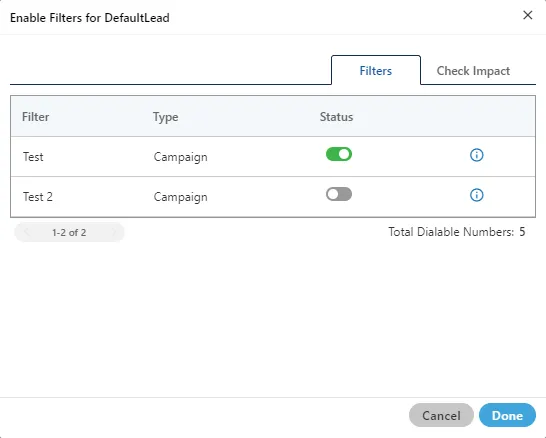
- When the Supervisor enable or disable any filter, the total dialable numbers will be displayed. "Test" filter has been enabled to get the total dialable number in the following screenshot.
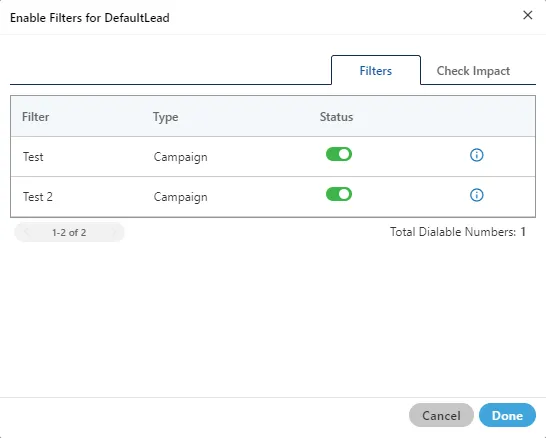
- The count of "Total Dialable Numbers" changes whenever the Supervisor enable or disable other filters. For example, the Total Dialable Number in our test case changes when the Supervisor has enabled one more filter.
- The Supervisor can switch to "Check Impact" tab to view the Dialable Numbers for every filter and total dialable numbers.
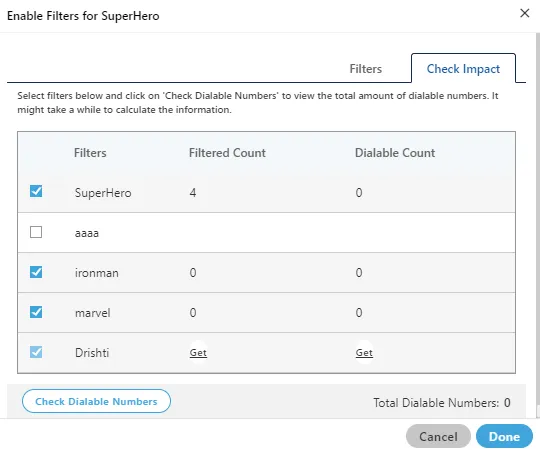
- If a filter has been disabled, then its checkbox will remain blank. If a filter is enabled, then its checkbox will remain selected (but disabled) and a "Get" link will be displayed. For example in the above screenshot, "Test" filter is disabled whereas "Test 2" filter is enabled.
- The Supervisor can click the checkbox for the disabled filter such as "Test" to view the numbers in "Filtered Count" and "Dialable Count" columns. Also, the Supervisor can click "Get" link to get these counts. It shows the Dialable Count for every filter separately and total count after enabling or disabling the filters.
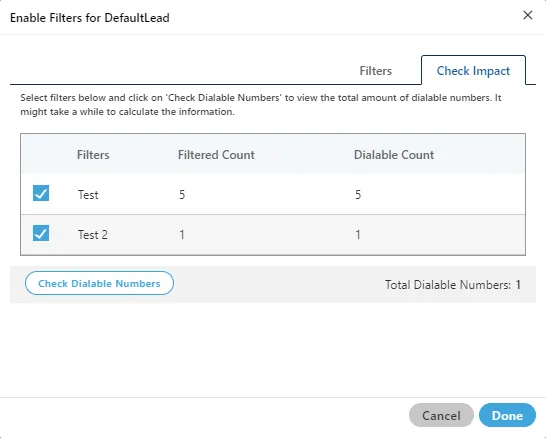
- The Supervisor can click"Check Dialable Numbers" to get the Total Dialable Number count after enabling or disabling the filters. Whenever the status of a filter is changed, the Supervisor has to click "Check Dialable Number" button to get the updated dialable number count.
- Click "Done" to save the changes and close the pop-up. Rater, click "Cancel" to close the pop-up without making the changes.
User Mapping (Licensable)
Supervisor can click "---" link under "User Mapping" header for any lead to map the users with the lead and the queue. Only the selected users will get calls dialed by the dialer for this lead.
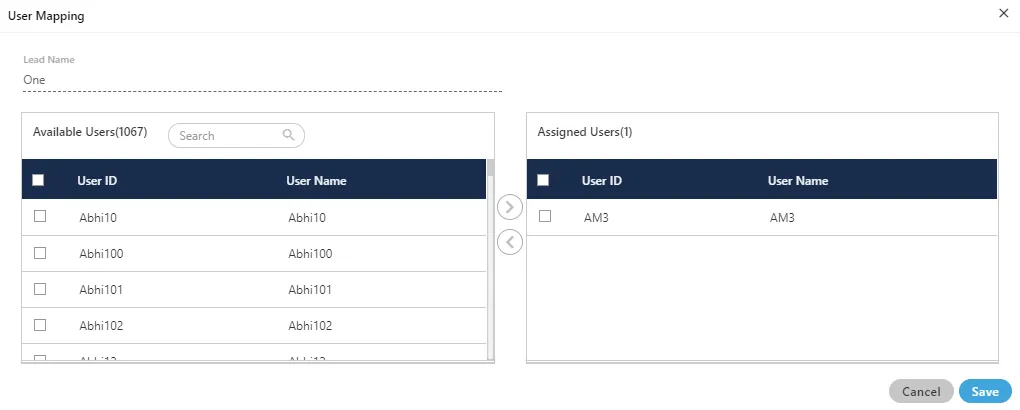
Perform the following steps here to assign or unassign the users.
- Select the users in "Available Users" section. You can click the checkbox given on top to select all users. You can also search for the user names in the provided search box.
- Click
 icon to add the selected users.
- Click "Apply" to apply the settings.
To unassign the users, select the users in "Assigned "Users" section and click  icon. Click "Apply" to make the changes.
Time Slots to Enable or Disable the leads
The supervisor can enable or disable the lead for a particular time slot. Click "View Configuration" link present in "Time Window" column for the lead.
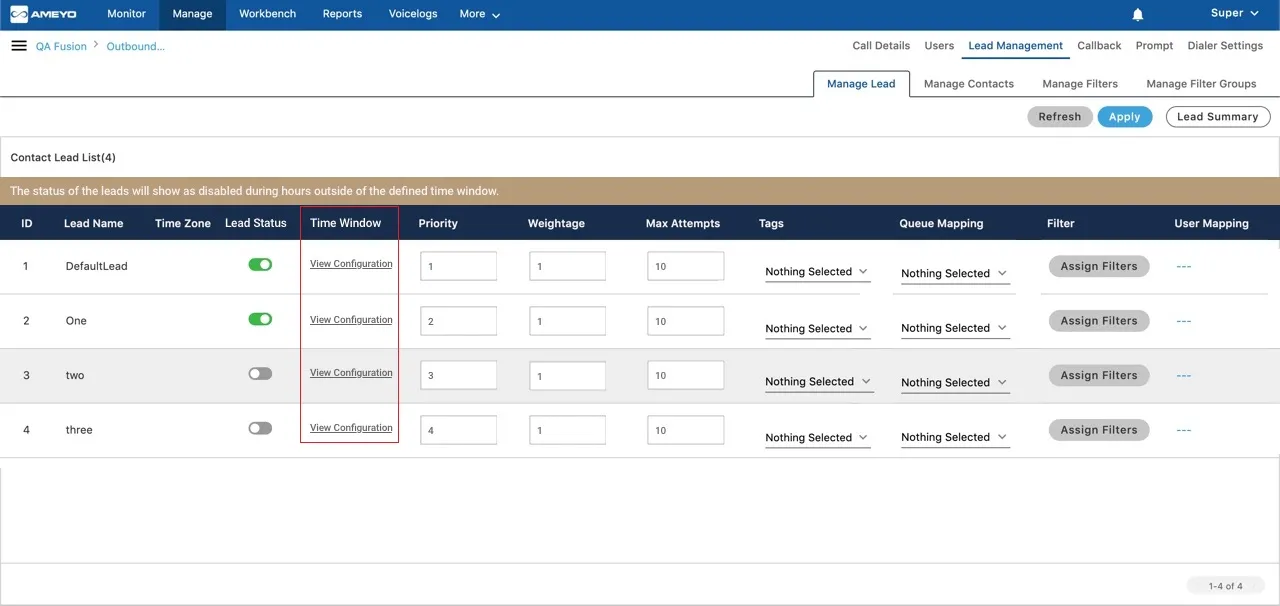
The Supervisor can click "View Configuration" link for any lead to configure the time slot in which this lead will be enabled. Other than the time slot configured, the lead will remain disabled.
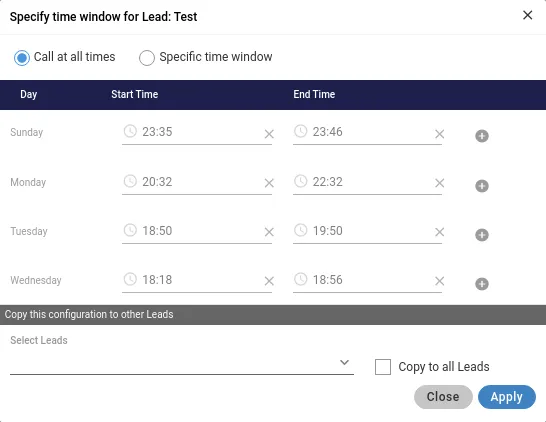
By default, "Call at all times" option is enabled so that the leads remain enabled to allow continuous calling even after upgrading the package to Ameyo Application Server 4.81 GA. The business' Supervisor has to configure the time slots as per requirement.
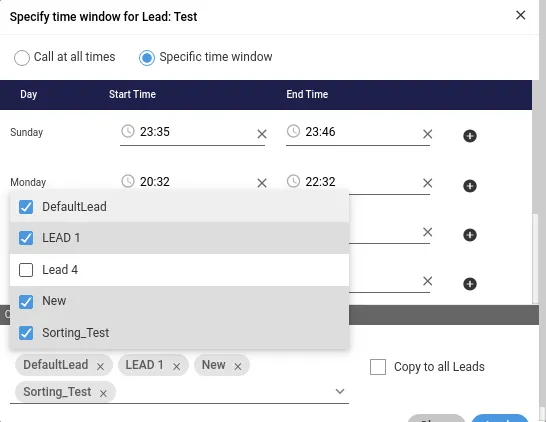
The Supervisor can click "Specific time window" option to define the time slots in the days.
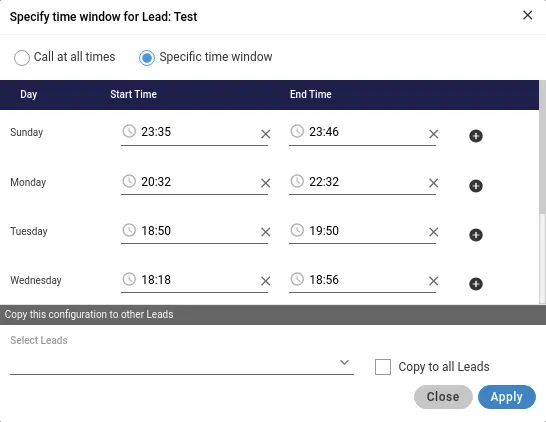
For a day, the Supervisor has to provide the values for "Start Time" and "End Time". The Supervisor can click "+" icon to add another time period for the same day.
Similarly, the Supervisor can configure the time slots daily.
If the Supervisor wants to apply the same time slots for all leads, then the Supervisor can click "Copy to all Leads" option. Once enabled, the Supervisor can select the leads in "Select Leads" drop-down menu for enabling the same settings in other leads as well.
Other Important Points
- "Get Dialable Number" under "Manage" tab will depend on the time-slot configuration.
- The time slot configured for a specific day should not be overlapped.