Salesforce Integration via CRM Integration App
This document outlines the simplified process for integrating Salesforce CRM with Ameyo using the dedicated UI connector within the Ameyo platform. This UI-driven approach replaces previous backend configurations, streamlining the setup and reducing potential errors. The Salesforce–Ameyo integration, previously managed from the backend, can now be configured directly through the Ameyo user interface. This enhancement simplifies setup, reduces configuration errors, and provides better visibility for administrators.
The document is intended to guide technical teams through the step-by-step process of integrating the Ameyo contact center with Salesforce using the CRM Integration App. It covers the prerequisites, setup steps, and configuration details required to enable this integration, including creating a Salesforce developer account, importing the Ameyo package, configuring toolbars and softphone layouts in Salesforce, adding custom fields, setting up SSO, and mapping Ameyo users to Salesforce users. It also details limitations, gaps, and troubleshooting tips for common issues encountered during integration.
Two ways to integrate Salesforce: This page covers two independent integration routes. The sections immediately below describe the CRM Integration App, configured from the Ameyo user interface. If you run your telephony from the Exotel dashboard instead, use the Native Salesforce Integration via the Exotel Dashboard (Click2Call) section later on this page, which covers the Exotel CTI Salesforce Connector, call flow setup, and user mapping.
Key purposes of the document include:
- Enabling telephony and CRM integration for call centers using Salesforce.
- Setting up Single Sign-On (SSO) between Salesforce and Ameyo.
- Synchronizing user accounts between Salesforce and Ameyo.
- Configuring server-side or client-side call data dumping to Salesforce.
- Providing guidance for customizations such as softphone layouts and custom activity fields.
All the configurations have been done on UI for simplifying the Ameyo-Salesforce Integration.
The Admin/Voice Admin is able to view the Settings tab for CRM integrations.
- The list shows all the integrations that can be done with Ameyo.
- Implementing the Salesforce Integration, the user selects the "Connect" option on the Salesforce CRM connector.
- SFDC CRM connector app is enabled in the App Manager.
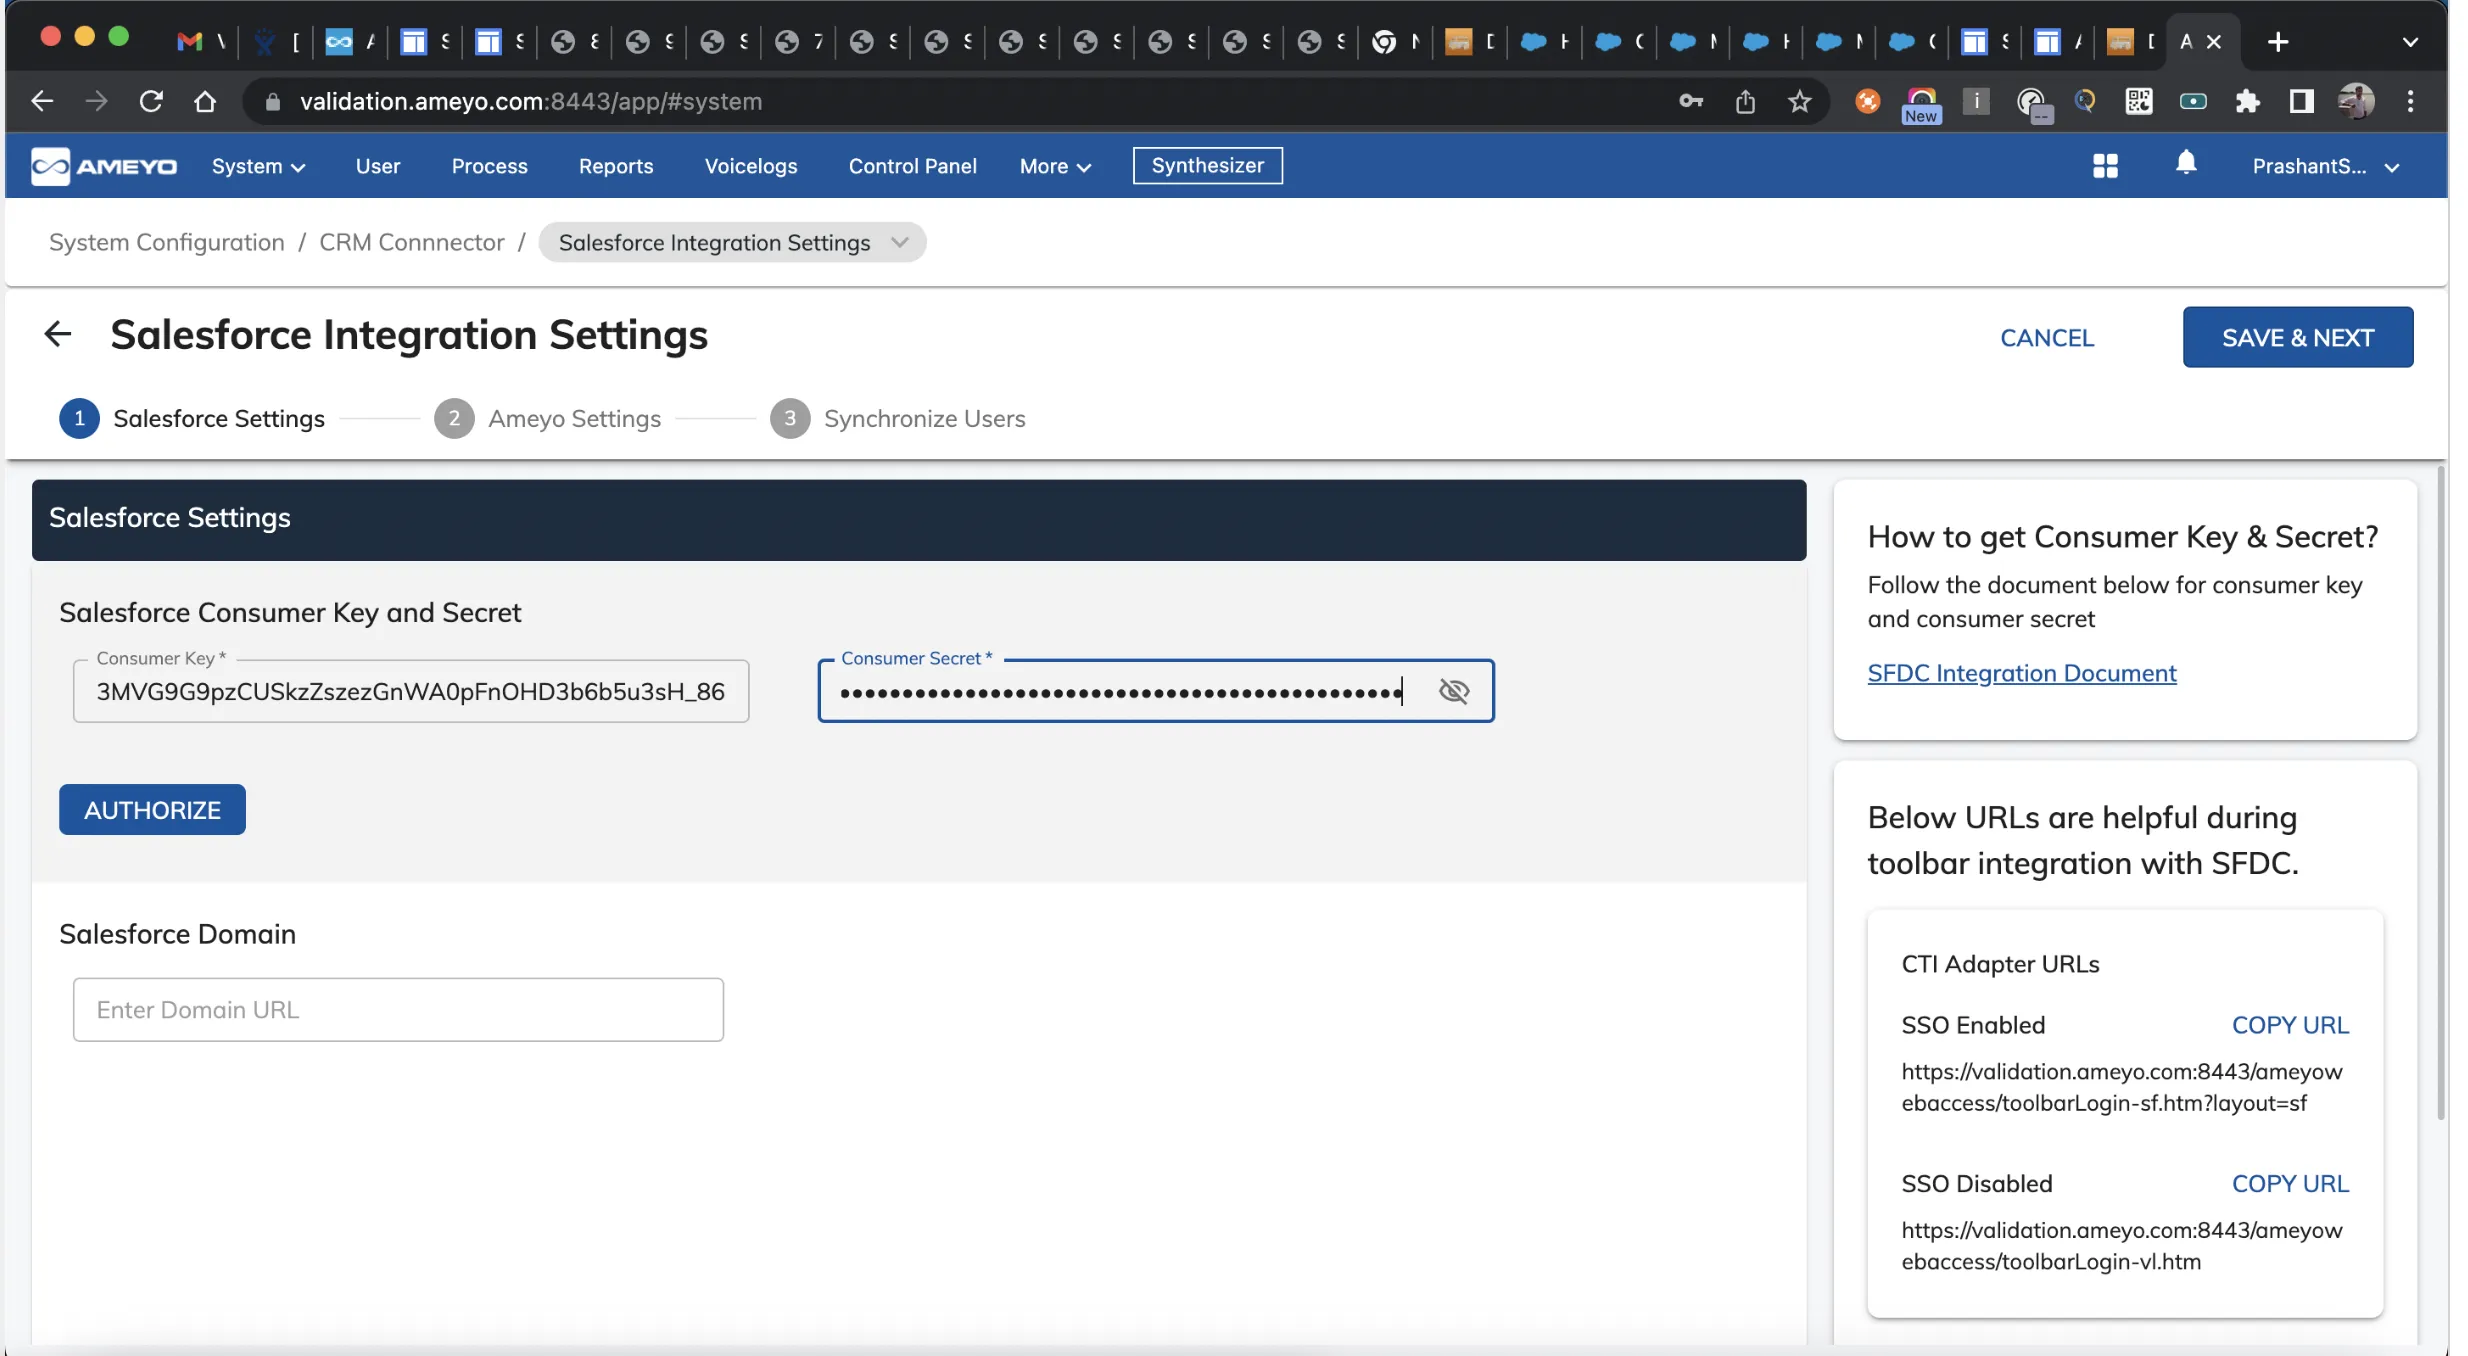
- The SFDC Integration Settings Page, it is divided into 3 steps:-
- Salesforce Settings :- This includes the information to be filled from the user's Salesforce account to proceed with the integration.
- The user needs to enter the Consumer Key and Consumer Secret.
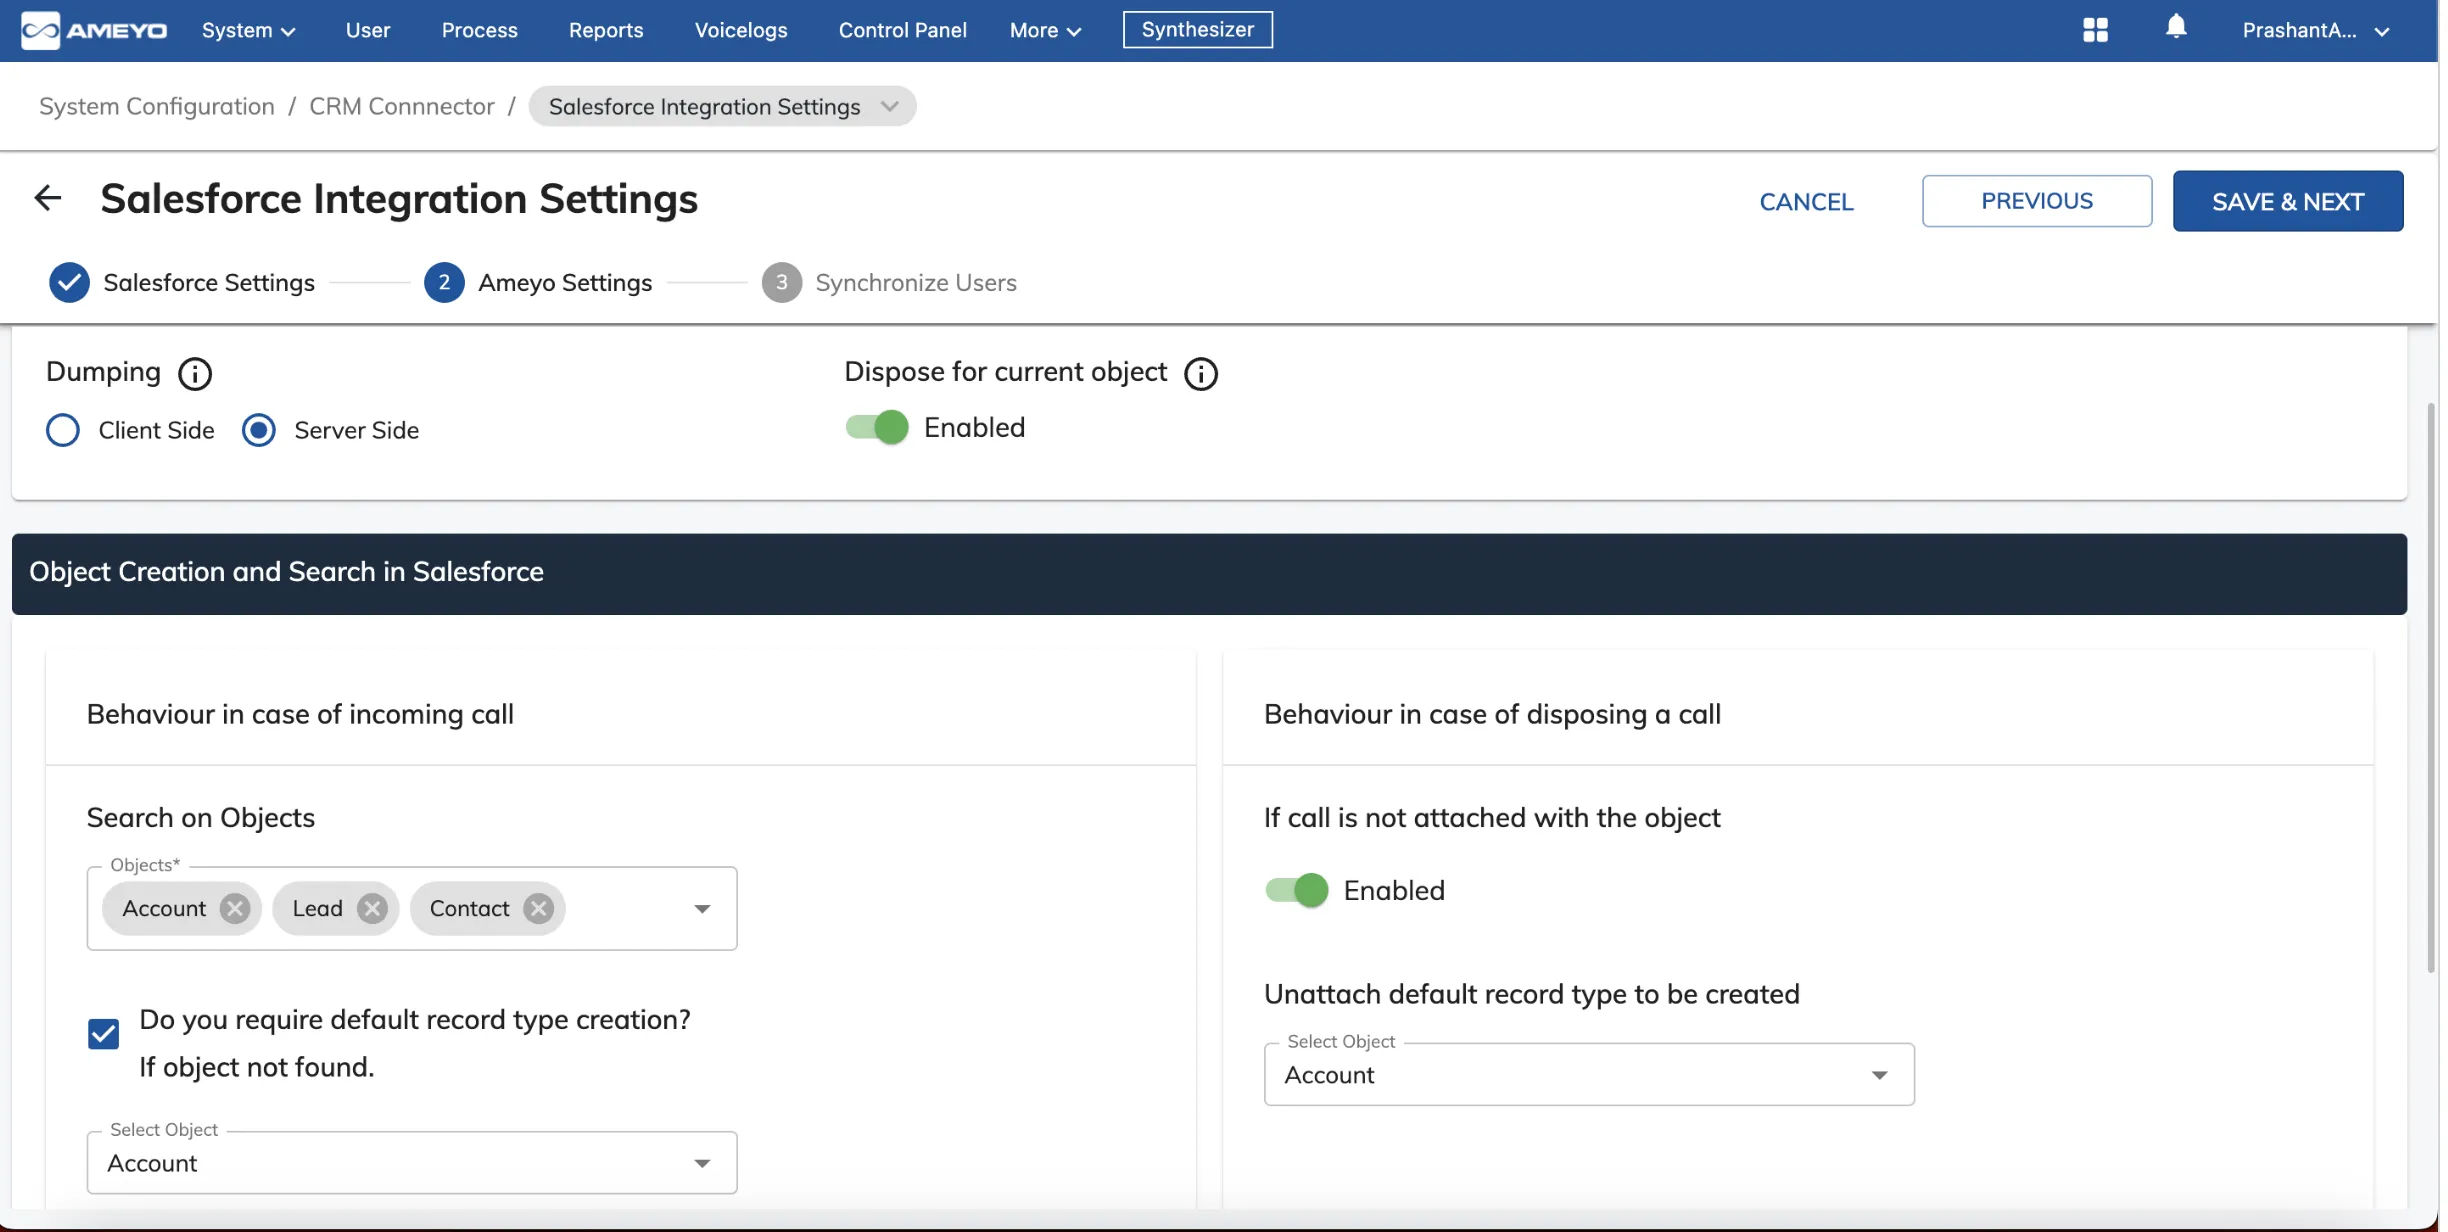
- Ameyo Settings :- These are the settings to be done specific to Ameyo for objects, dumping etc.
- The user first needs to select which object to be created, if a call comes from a new customer.
- The user has to select the objects on which the search is to be performed for an incoming call.
- The user needs to enable/disable, if call has to be disposed for the current object that is opened or only the object that opens with the call.
- By default, the agent should only be able to dispose of the call with the object that opens with the call.
- The user can select whether to choose client side/server side dumping.
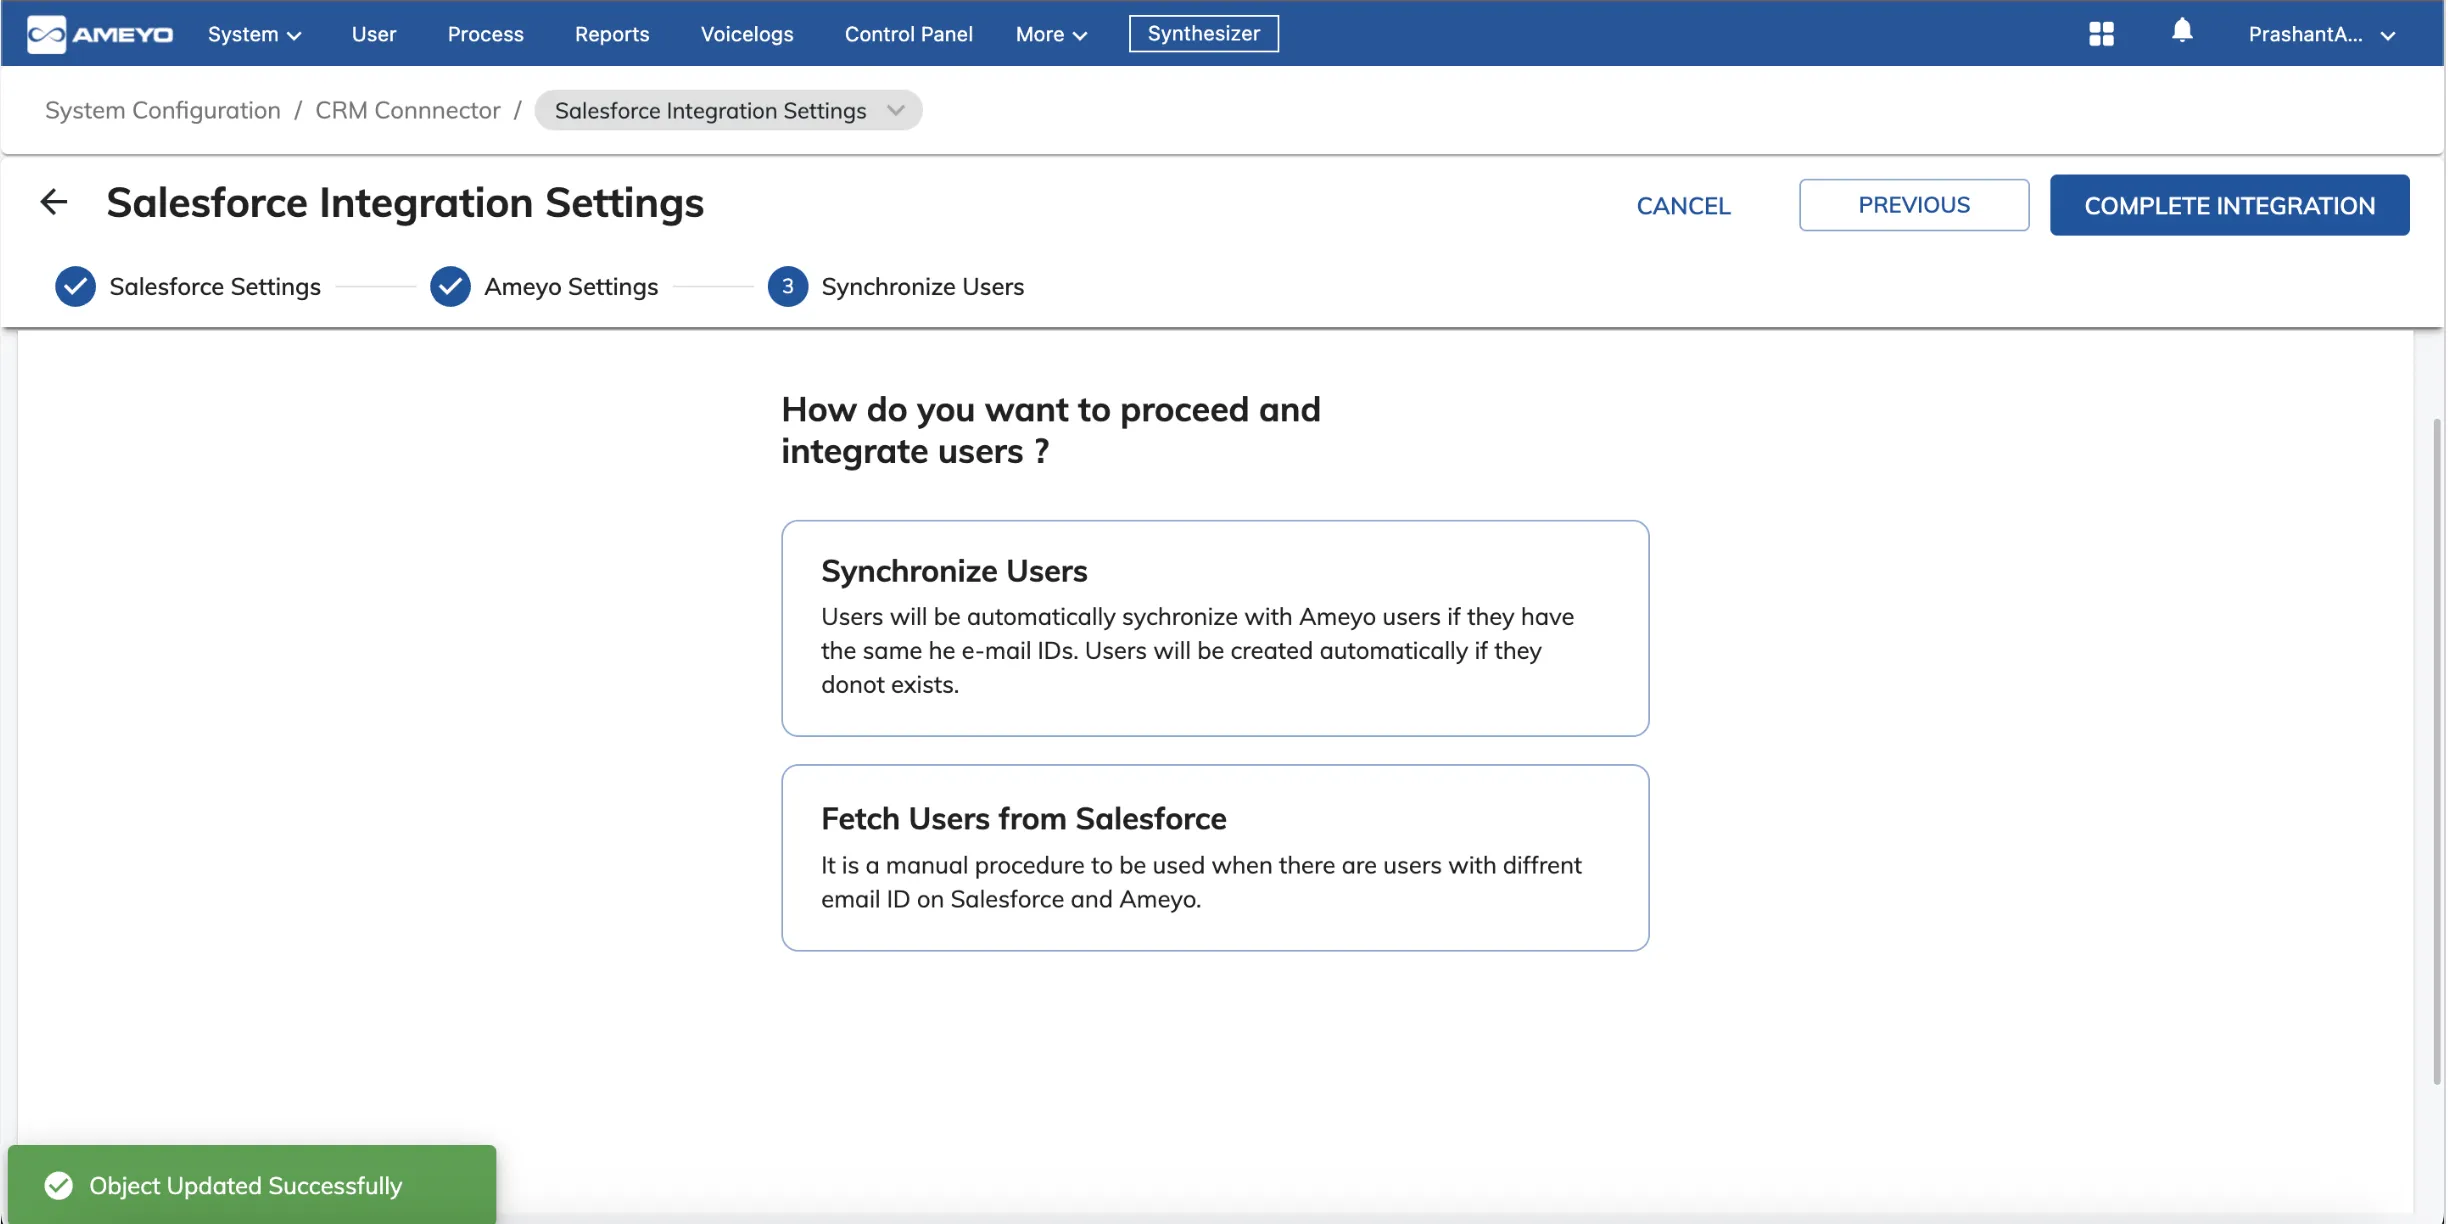
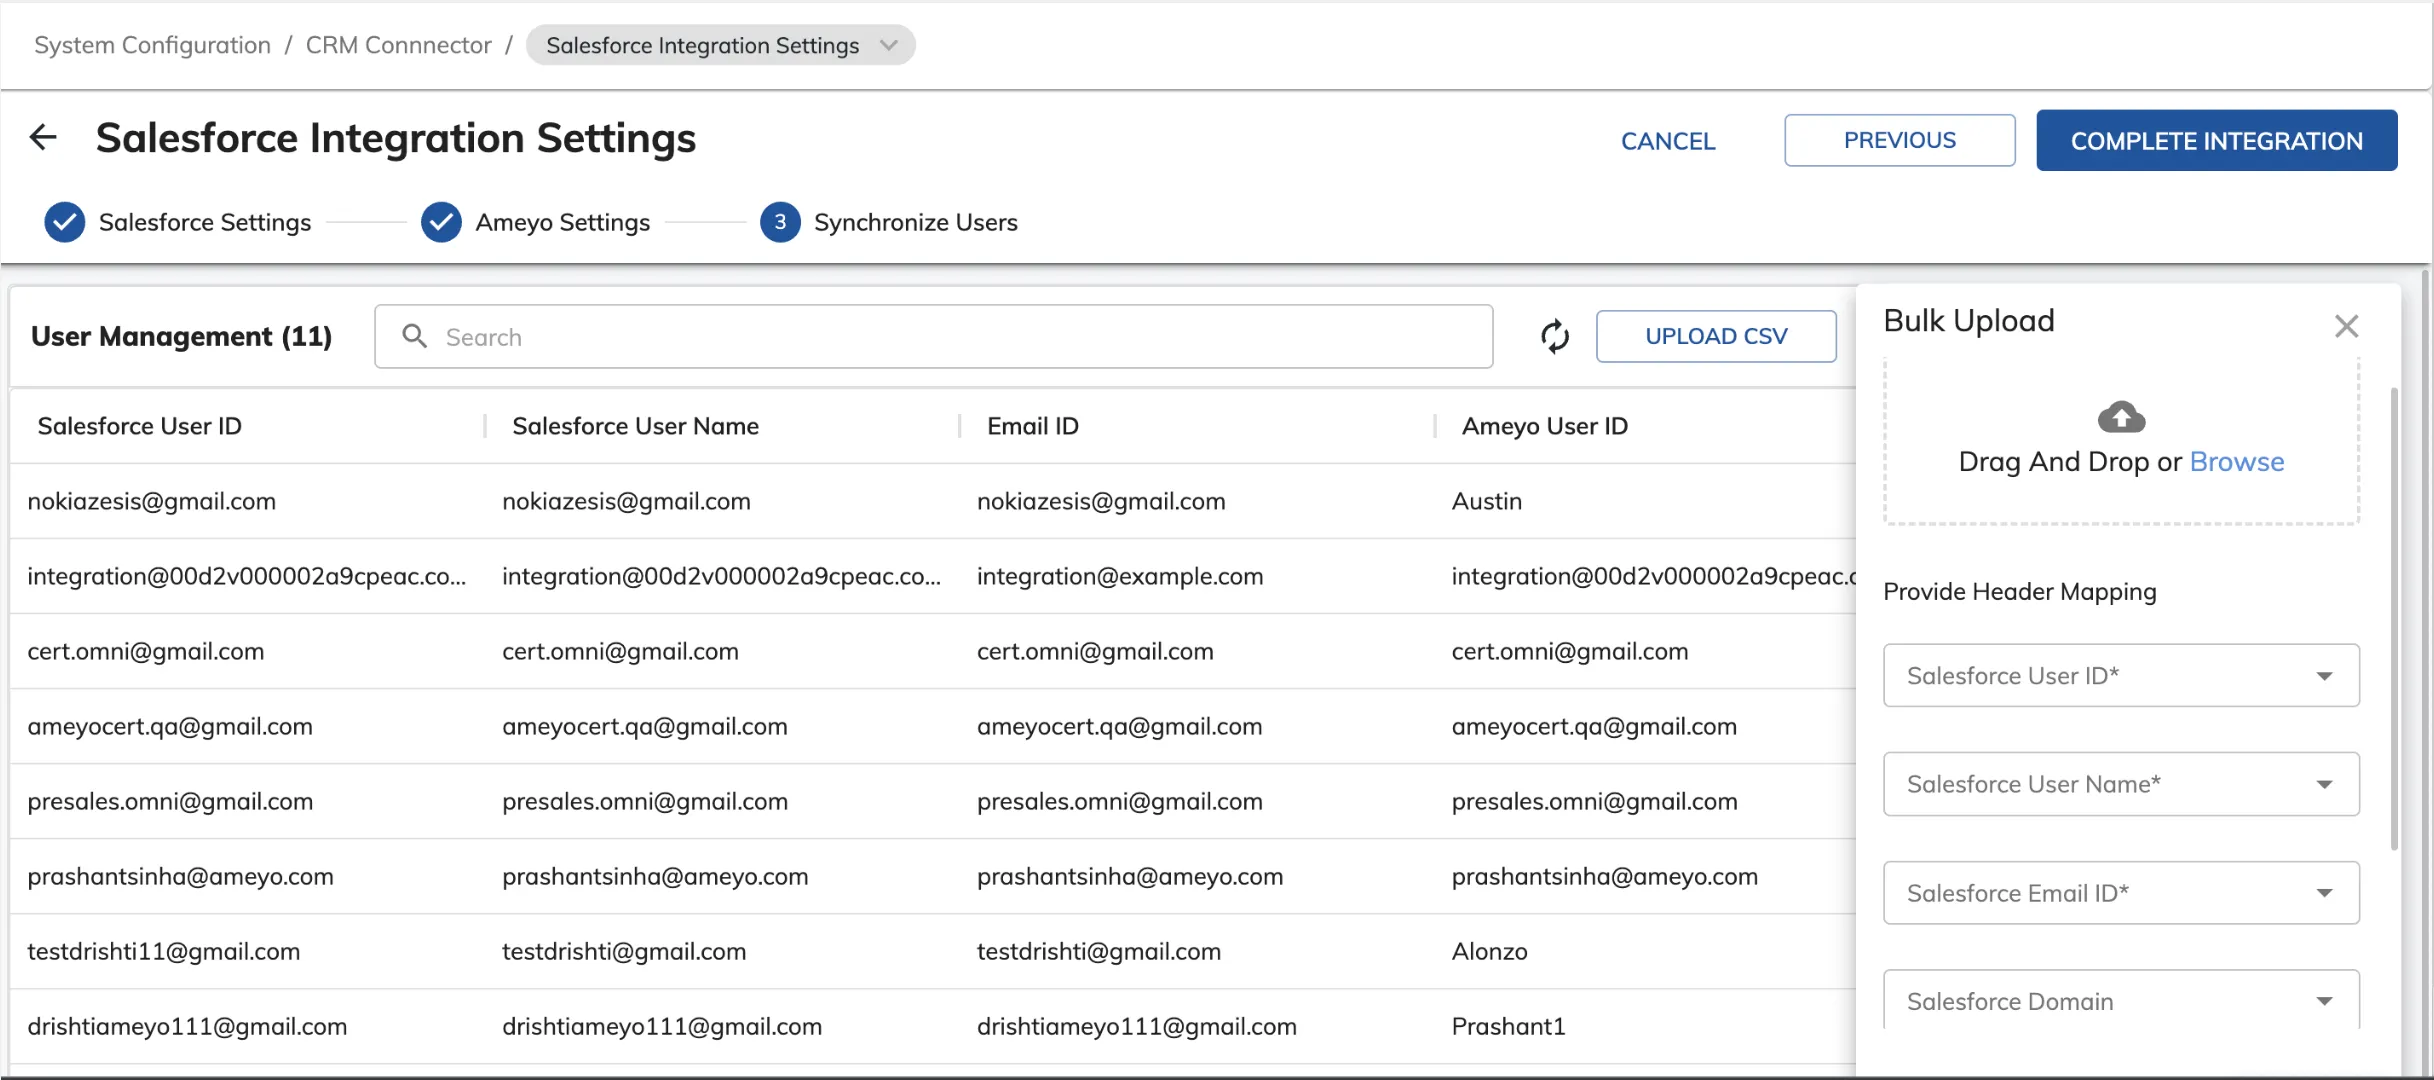
- Synchronize users :- This is for mapping the users of Ameyo and Salesforce that are working with the integration.
- Synchronize Users Automatically :- Users are created automatically synchronize with Ameyo users, if they have the same email - ID’s. Users are created automatically, if they don't exist.
- "Add User" in case a user has to be created from Ameyo and added to the list.
- Extract Users - This extracts the users created in Ameyo in case the Admin needs to refer to the same for creating users in Salesforce.
- Fetch users from Salesforce :- It is a manual procedure to be used when there are users with different email - ID’s on salesforce and Ameyo.
- Now 2 sub sheets are downloaded for SFDC (to be uploaded) and Ameyo users.
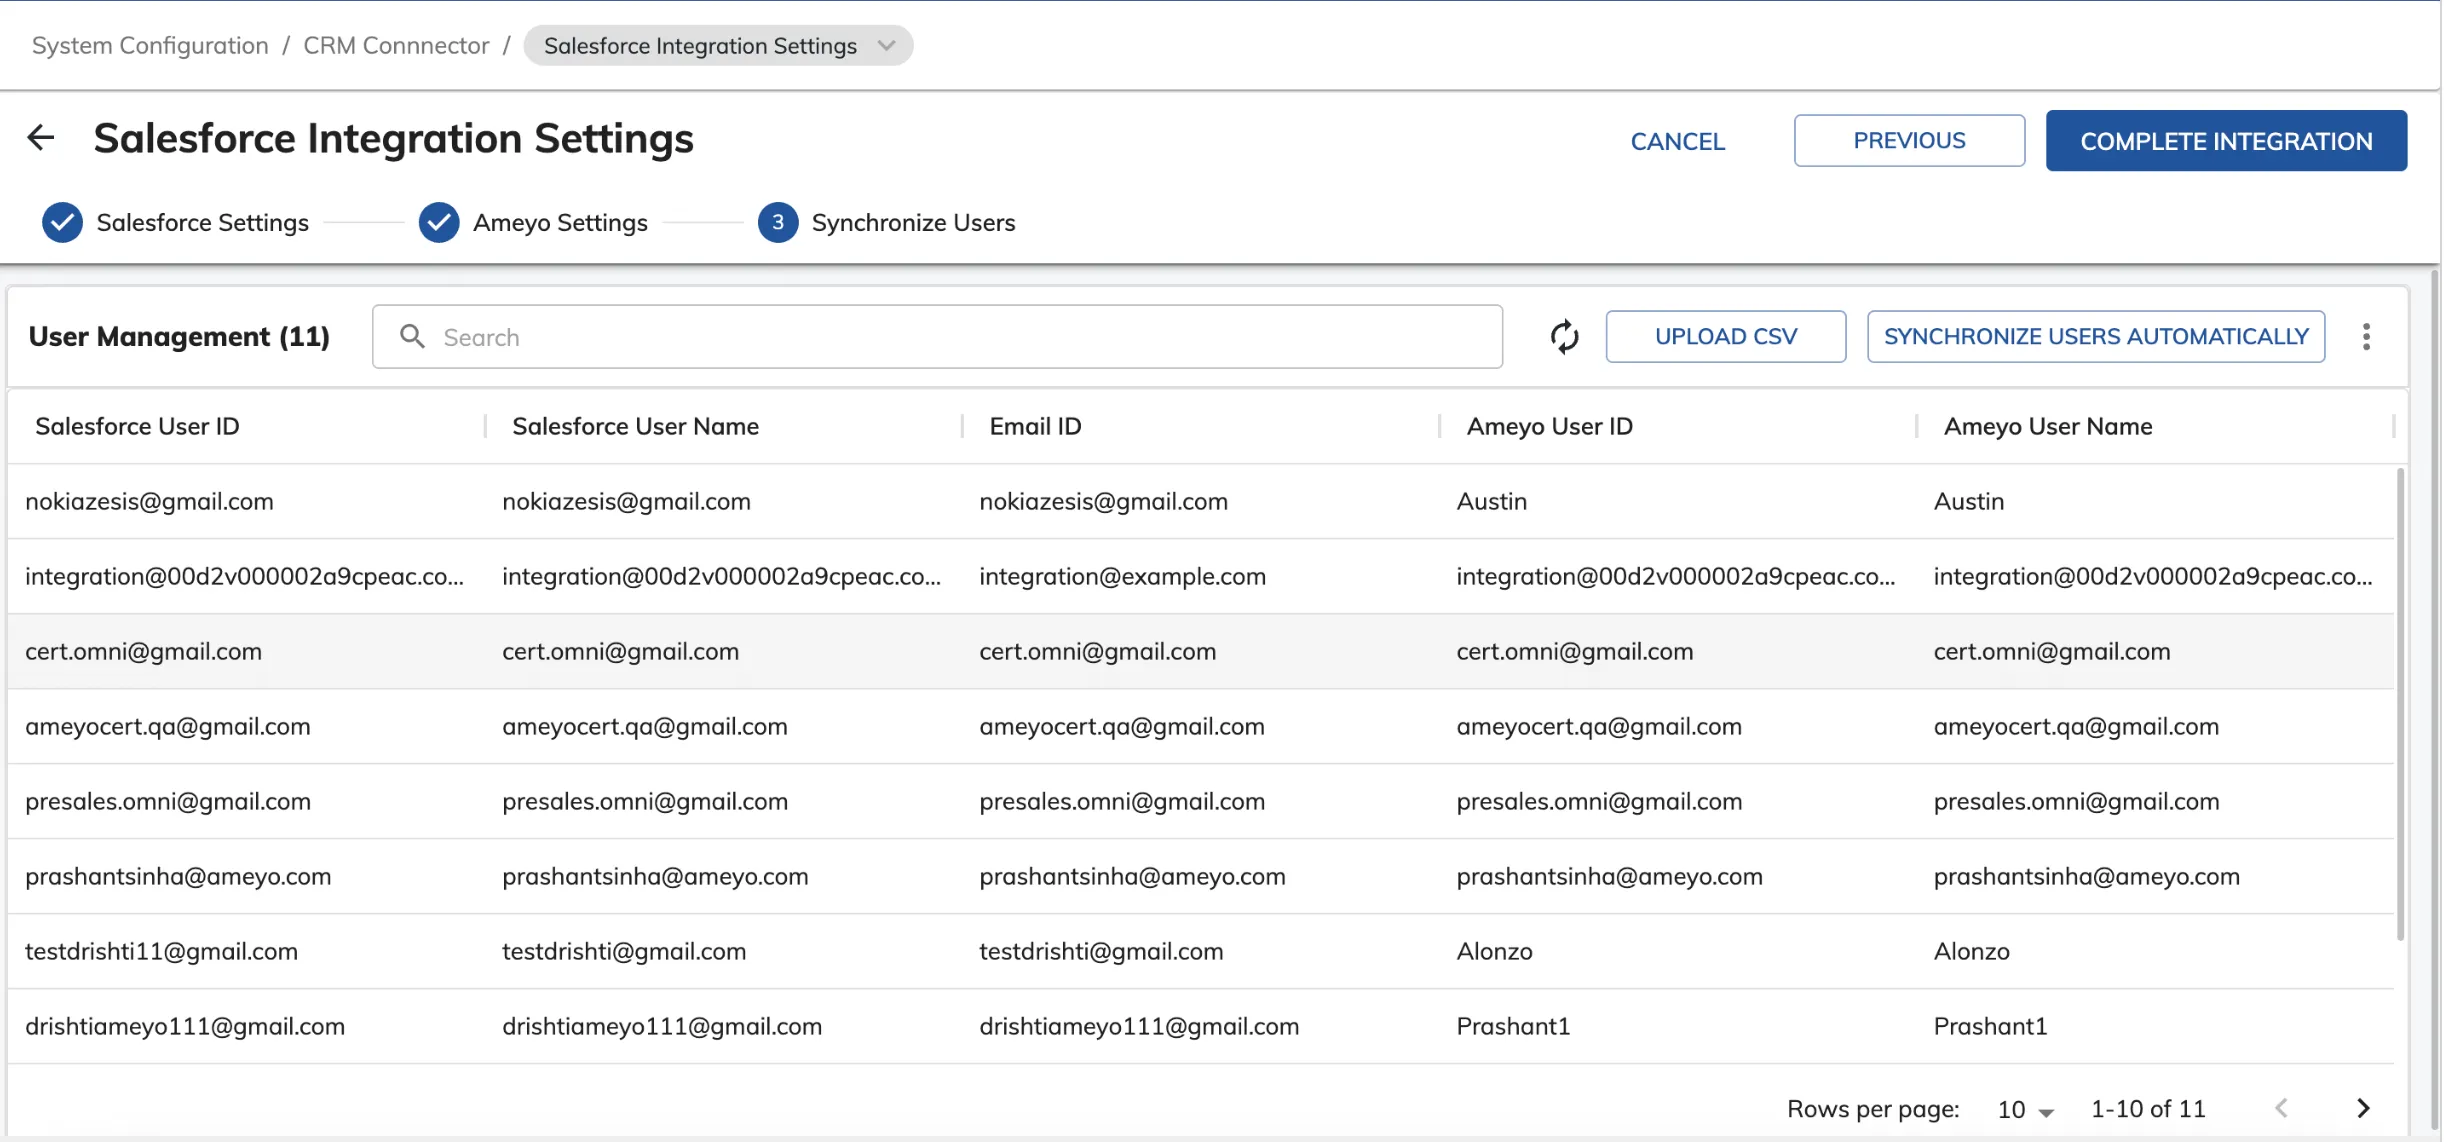
- The user selects the "Bulk Upload" option to upload a CSV that will contain the following fields-
- Salesforce user ID
- Salesforce user Name
- Email ID
- Ameyo user ID
- Ameyo user Name
- The header mapping is provided, in case the CSV is having fields with different names than those mentioned above.
- The upload summary is shown after the upload is completed.
- The bulk update option can also be used to update certain records in the user management list.
Limitations and known facts with feature
- New Setups: This UI-based integration method is primarily recommended for configuring Salesforce integration on new Ameyo setups.
- Default User Role: When using the "Synchronize Users Automatically" option, any new users created in Ameyo will be assigned the "Professional Agent" role by default. To assign a different role (e.g., "Executive"), you must manually edit the user's profile via the Ameyo Admin interface after synchronization.
- Consumer ID and Contact Center ID: For this specific integration method, the consumer_id generated internally will be the same as the contact_center_id you select for the configuration. For example, configuring Salesforce for contact center 10 will result in a consumer_id of 10.
- Compatibility with Old Process: User synchronization from Salesforce to Ameyo is not supported if the Salesforce integration was initially configured using the older, non-UI-based method.
- ID Conflict Prevention: Before configuring, verify that the chosen contact_center_id is not already in use as a consumer_id for any other existing CRM integration within your Ameyo instance. Using an already assigned ID will cause duplicate configuration entries and is strongly discouraged.
- Synchronization After Manual Mapping: If you manually map users (e.g., via Bulk Upload) and subsequently use the "Synchronize Users Automatically" button, errors will appear in the User Upload History for the previously mapped users. This occurs because the automatic sync uses a 'create user' function, leading to duplicate record errors for existing mappings.
Beta Feature: The CRM Integration App was introduced in version 4.13.5 and is currently recommended for new integrations only. Existing Salesforce setups configured via the older backend method should continue using that method until a migration path is officially provided.
Native Salesforce Integration via the Exotel Dashboard (Click2Call)
This section describes the native integration route between the Exotel dashboard and Salesforce, using the Exotel CTI Salesforce Connector. It is separate from the Ameyo CRM Integration App described above — follow this route if you manage your telephony directly from the Exotel dashboard.
Overview
Exotel Salesforce Integration enables the contextual association of calls with Salesforce Objects. It enables you to have Incoming Call intimation, visualize the call details along with call recordings, and provides Click2Call capabilities — seamless integration for enhanced sales productivity and a better experience.
Key Benefits:
- Call Intimations - Get the notification on your Salesforce dashboard whenever an incoming call comes on to your customer-facing Exotel Number or an outbound call is initiated from Salesforce.
- Object Association - In case of an Incoming call, the object to be associated with the call can be changed by the agent during the call.
- Automated Call Log Creation - Ability to create/update a call log and associate the call with it. Automatic call log creation for Missed Calls.
- Click2Call - Initiate a call between you and your customer, directly from Salesforce.
- Call Details - Call Recordings and Call Duration getting automatically added to the call logs.
- User Mapping - Map Exotel Agents to Salesforce Users and enable Click-2-Call.
- Missed call activity - Get the activities created for missed calls so as to reach customers later.
- Masked Calls - Configuration for masked Calls can be done. Phone numbers of the customer can be masked and only the last 4 digits can be shown to the agent during Outgoing and Incoming Calls to maintain the customer's privacy and identity without getting their personal data misplaced.
Configuration
Follow the following prerequisites and steps to configure the integration at both the Exotel and Salesforce end.
Prerequisites
In order to have a successful integration with the Salesforce account, you must complete the following tasks:
- Sign up for an Exotel Account.
- Verify your account through phone or email.
- Get your account KYC verified.
- Purchase an ExoPhone to be used by Salesforce users/agents for inbound and outbound calls.
- From the API section, make a note of Account SID, API Key, and API Token.
Setting up of Exotel and Salesforce Connector Integration
Step 1: Configure Exotel CTI Salesforce Connector
- Login to the Salesforce account.
- Install/Update the Exotel CTI Salesforce Connector for all users, version 1.38.
Add Users to the Call Center
- Go to Setup.
- In the Quick Find field, enter Call Center, then select Call Centers from the result list.
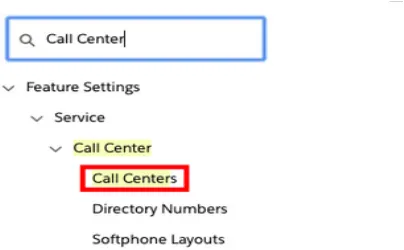
- If you see the Say Hello to Salesforce Call Center page, select Continue.
- Select EXOTEL CTI Adapter.
- Click Manage Call Center Users.
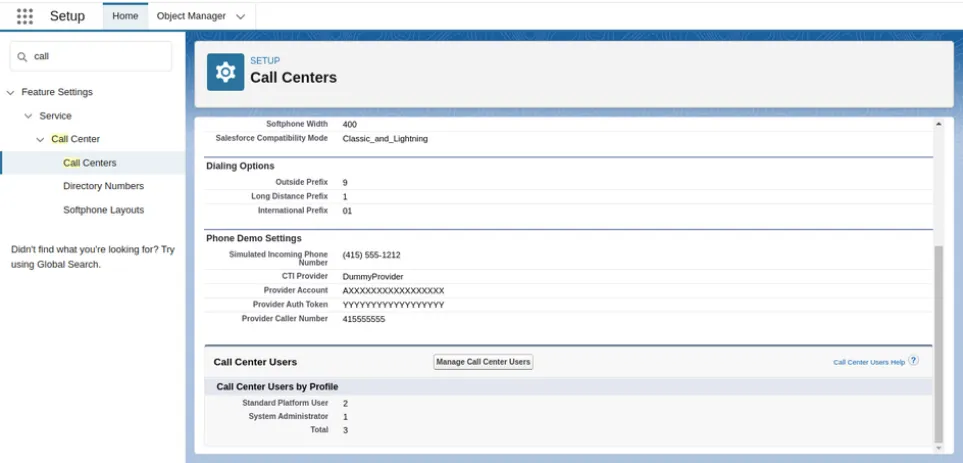
- On the EXOTEL CTI Adapter: Manage Users page, select Add More User.
- Set filters (if desired) and then choose Find.
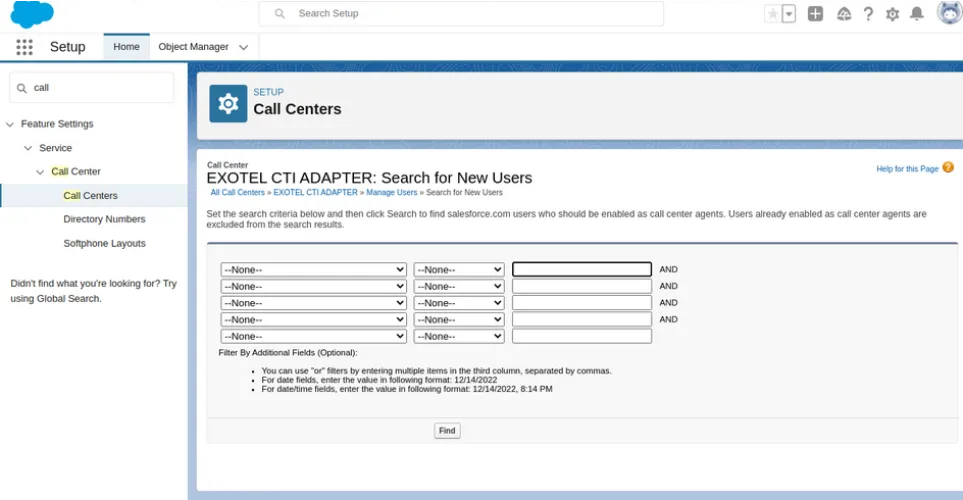
- Select the checkbox next to the user to add, then choose Add to Call Center.
Create the SoftPhone Layout
- Next, we need to create a softphone layout. In the Quick Find box, type Softphone Layouts, then choose Softphone Layouts.
- Choose New.
- Enter a name for the layout, such as ExotelDefault, then select the Is Default Layout checkbox.
- Expand "Display these salesforce.com objects" and select objects that the Exotel CTI Connector should be able to search, for a screen-pop query.
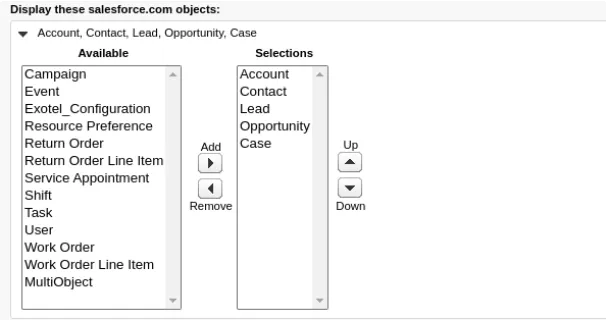
- For each of the objects selected, select the fields that you want to be displayed in case of an Incoming Call.
- Configure the search behavior in the case that one or multiple records are found upon CTI search.
- Click on save.
- Configure softphone layouts for both Inbound and Outbound in the Select Call Type picklist.
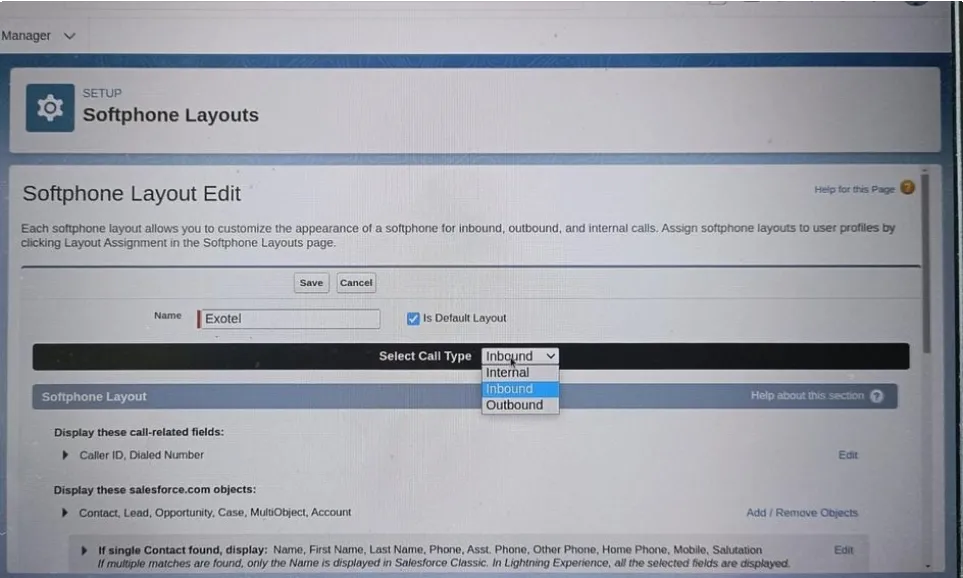
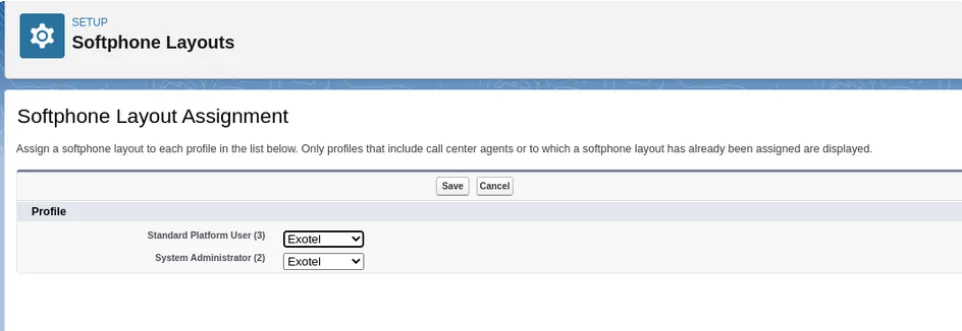
- Assign the created softphone layout for the profiles.
Configuring the Exotel Lightning App
Go to the Exotel Lightning App.
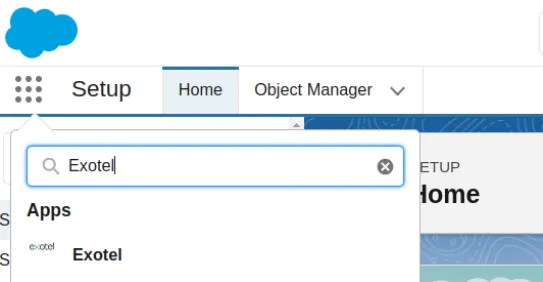
- Configure your Exotel account-related settings in the Exotel configuration. Refer to the below image.
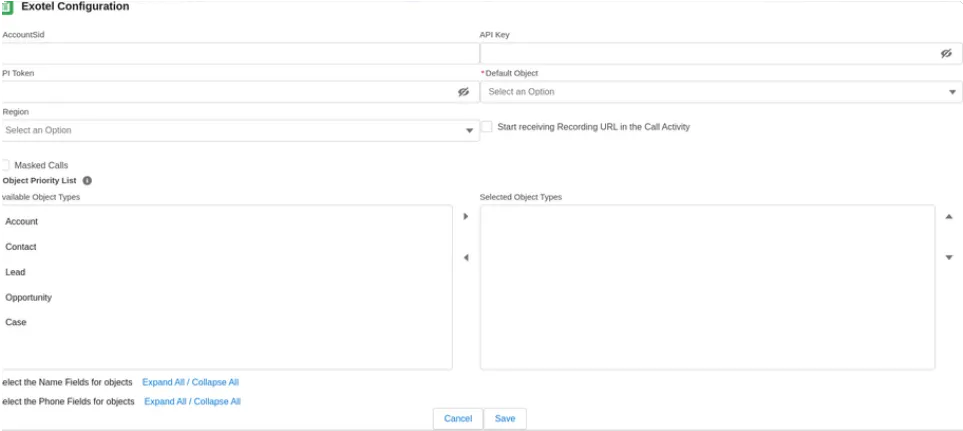
Enter the Account SID, API Key, API Token and Region of your corresponding Exotel account. These details can be found in the Developer Settings section in the Exotel dashboard.
- Default Object: Select the default object from the select dropdown. In case of an incoming call from an unknown number, a new object of type Default Object will be created and the call will be associated with that object.
- Object Priority List: In case of an incoming call when the customer number is mapped to multiple objects, if the agent does not select the object to associate the call to within 10 seconds, objects get automatically assigned based on this priority list. Select the objects based on priority.
For each of the objects selected in the Object Priority List, select the Name Fields and Phone Fields:
- In Phone Fields, select all the fields on which the call needs to be made or received.
- In Name Field, select the field which should be displayed as Name when a call for that record type is made or received.
After adding all the above details, click on the save button and save the Exotel Configuration.
After the Exotel Configuration is done you receive an AccountUid — please take a note of that. It will be used during flow configuration.
Step 2: Configure Salesforce Plugin Call flow
This flow is necessary to support Inbound Calls.
In order to create the Salesforce Plugin Call flow, follow these steps:
- Go to the 'App Bazaar' section and under 'Custom Apps' click on the 'Create' button.
- Provide the App Name and click on OK.
- Add a Greeting Applet.
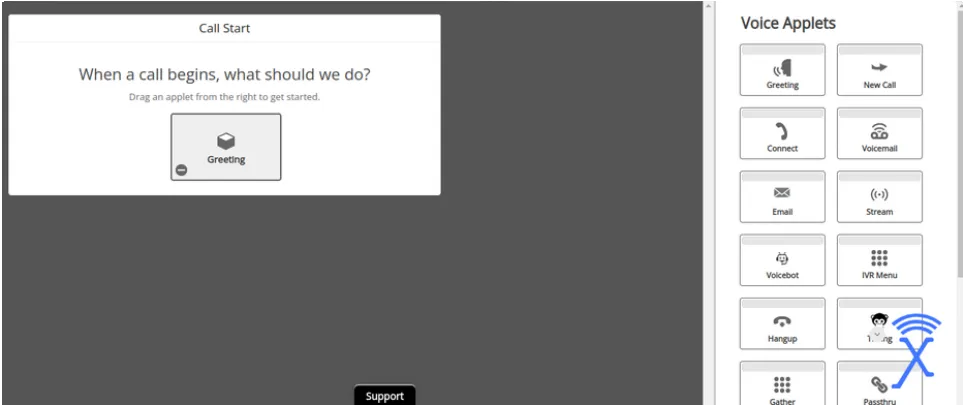
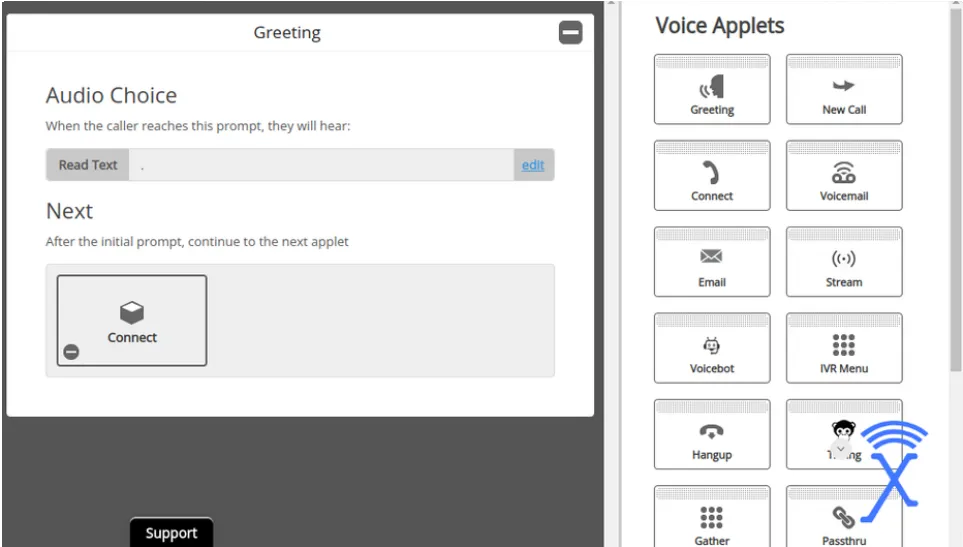
- Add your greeting message and add the Connect Applet. If you don't want any greeting messages, just add a dot inside in the Read Text field.
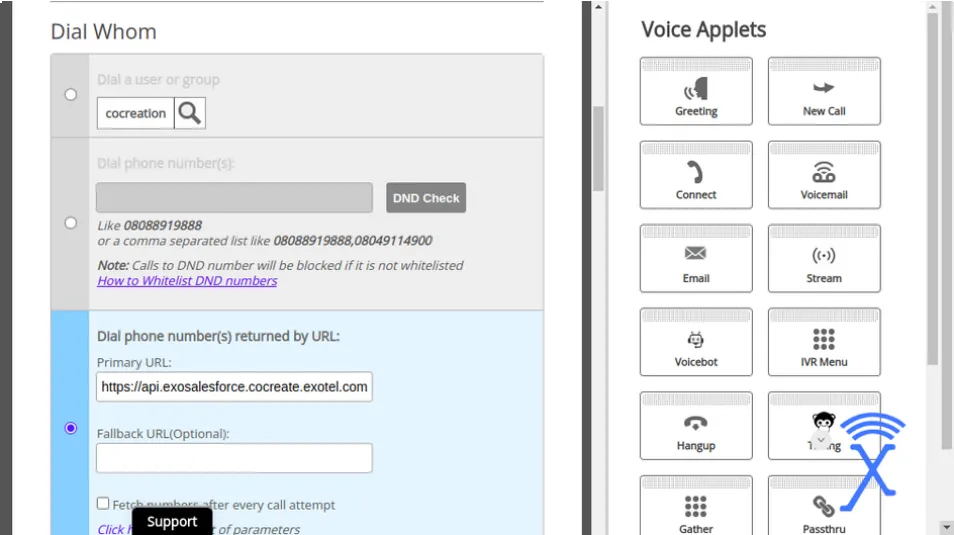
- DialWhom is not supported directly on the Salesforce integration from our end. That said, you can still use this feature by:
- Configuring your own URL in the DialWhom field to define the desired call routing logic, or
- Creating users or groups within Salesforce that can be mapped appropriately for handling the call.
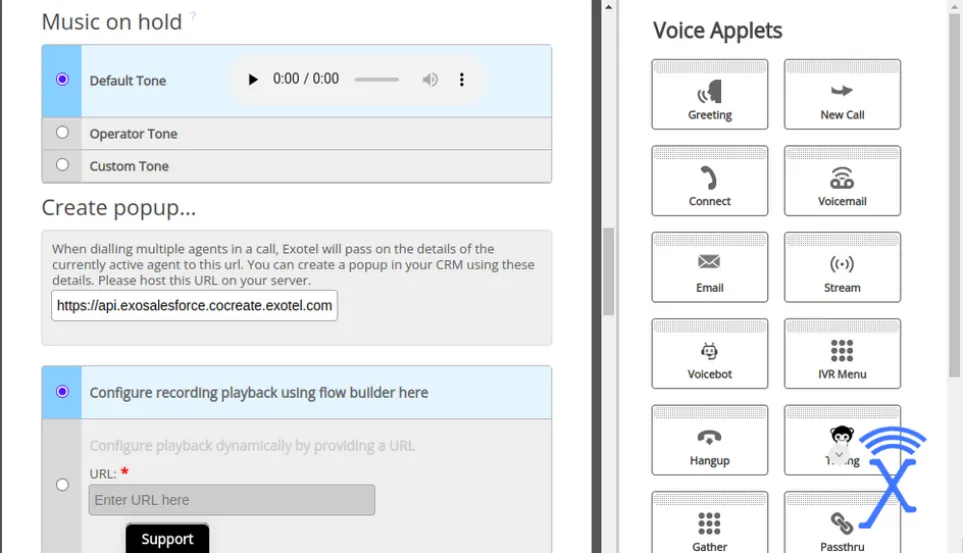
- Under the 'Create popup…' section, enter this URL (modify the Exotel account name in it by your Exotel account name): URL: https://api-exosalesforce.mum1.exotel.com/sfdc/api/inbound/agentpopup?<accountSId>&<AccountUid> E.g: https://api-exosalesforce.mum1.exotel.com/sfdc/api/inbound/agentpopup?AccountSid=1234&AccountUid=1234
- We are using three types of Passthru: Answered, Missed Call, and Not Connected.
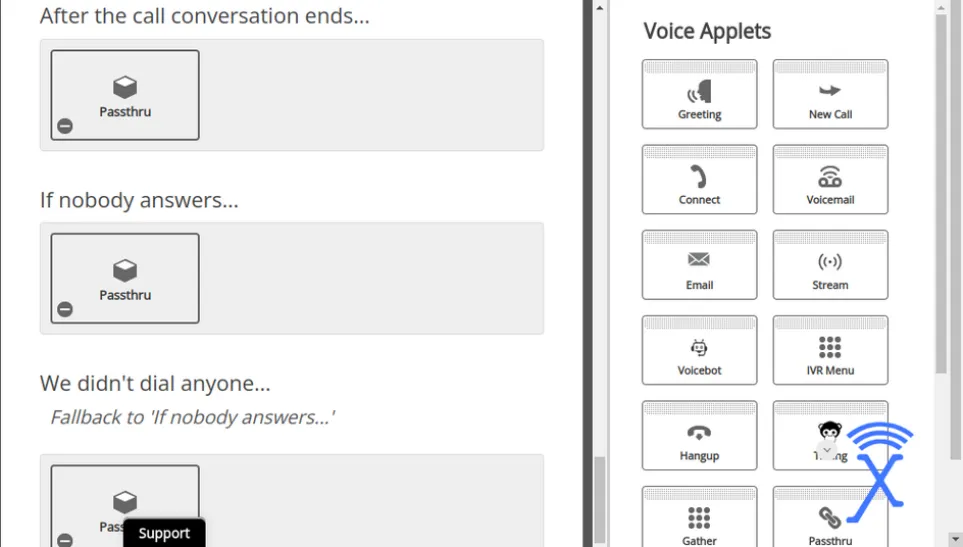
- Answered Passthru: After the Call Conversation ends, add a Passthru. In that passthrough enter this URL (change the CallState). URL: https://api-exosalesforce.mum1.exotel.com/sfdc/api/inbound/passthru?<AccountSid>&<AccountUid>&callState=Answered E.g: https://api-exosalesforce.mum1.exotel.com/sfdc/api/inbound/passthru?AccountSid=1234&AccountUid=1234&callState=Answered
- Missed Call Passthru: In the section 'If Nobody Answers..', select 'Go To' and add a Passthru. Enter the pass-thru URL (change the CallState). URL: https://api-exosalesforce.mum1.exotel.com/sfdc/api/inbound/passthru?<AccountSid>&<AccountUid>&callState=missedCall E.g: https://api-exosalesforce.mum1.exotel.com/sfdc/api/inbound/passthru?AccountSid=1234&AccountUid=1234&callState=missedCall
- Not Connected Passthru: In the section 'If Not Connected..', select 'Go To' and add a Passthru. Enter the pass-thru URL (change the CallState). URL: https://api-exosalesforce.mum1.exotel.com/sfdc/api/inbound/passthru?<AccountSid>&<AccountUid>&callState=notConnected E.g: https://api-exosalesforce.mum1.exotel.com/sfdc/api/inbound/passthru?AccountSid=1234&AccountUid=1234&callState=notConnected
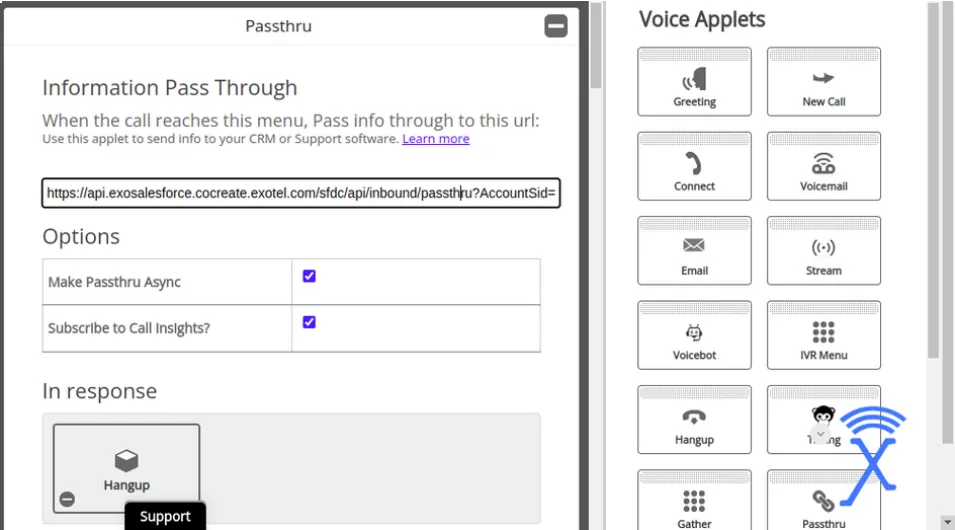
- Save the flow and click on Close.
Step 2.1: Associate the call flow to the ExoPhones
- Go to the ExoPhones section.
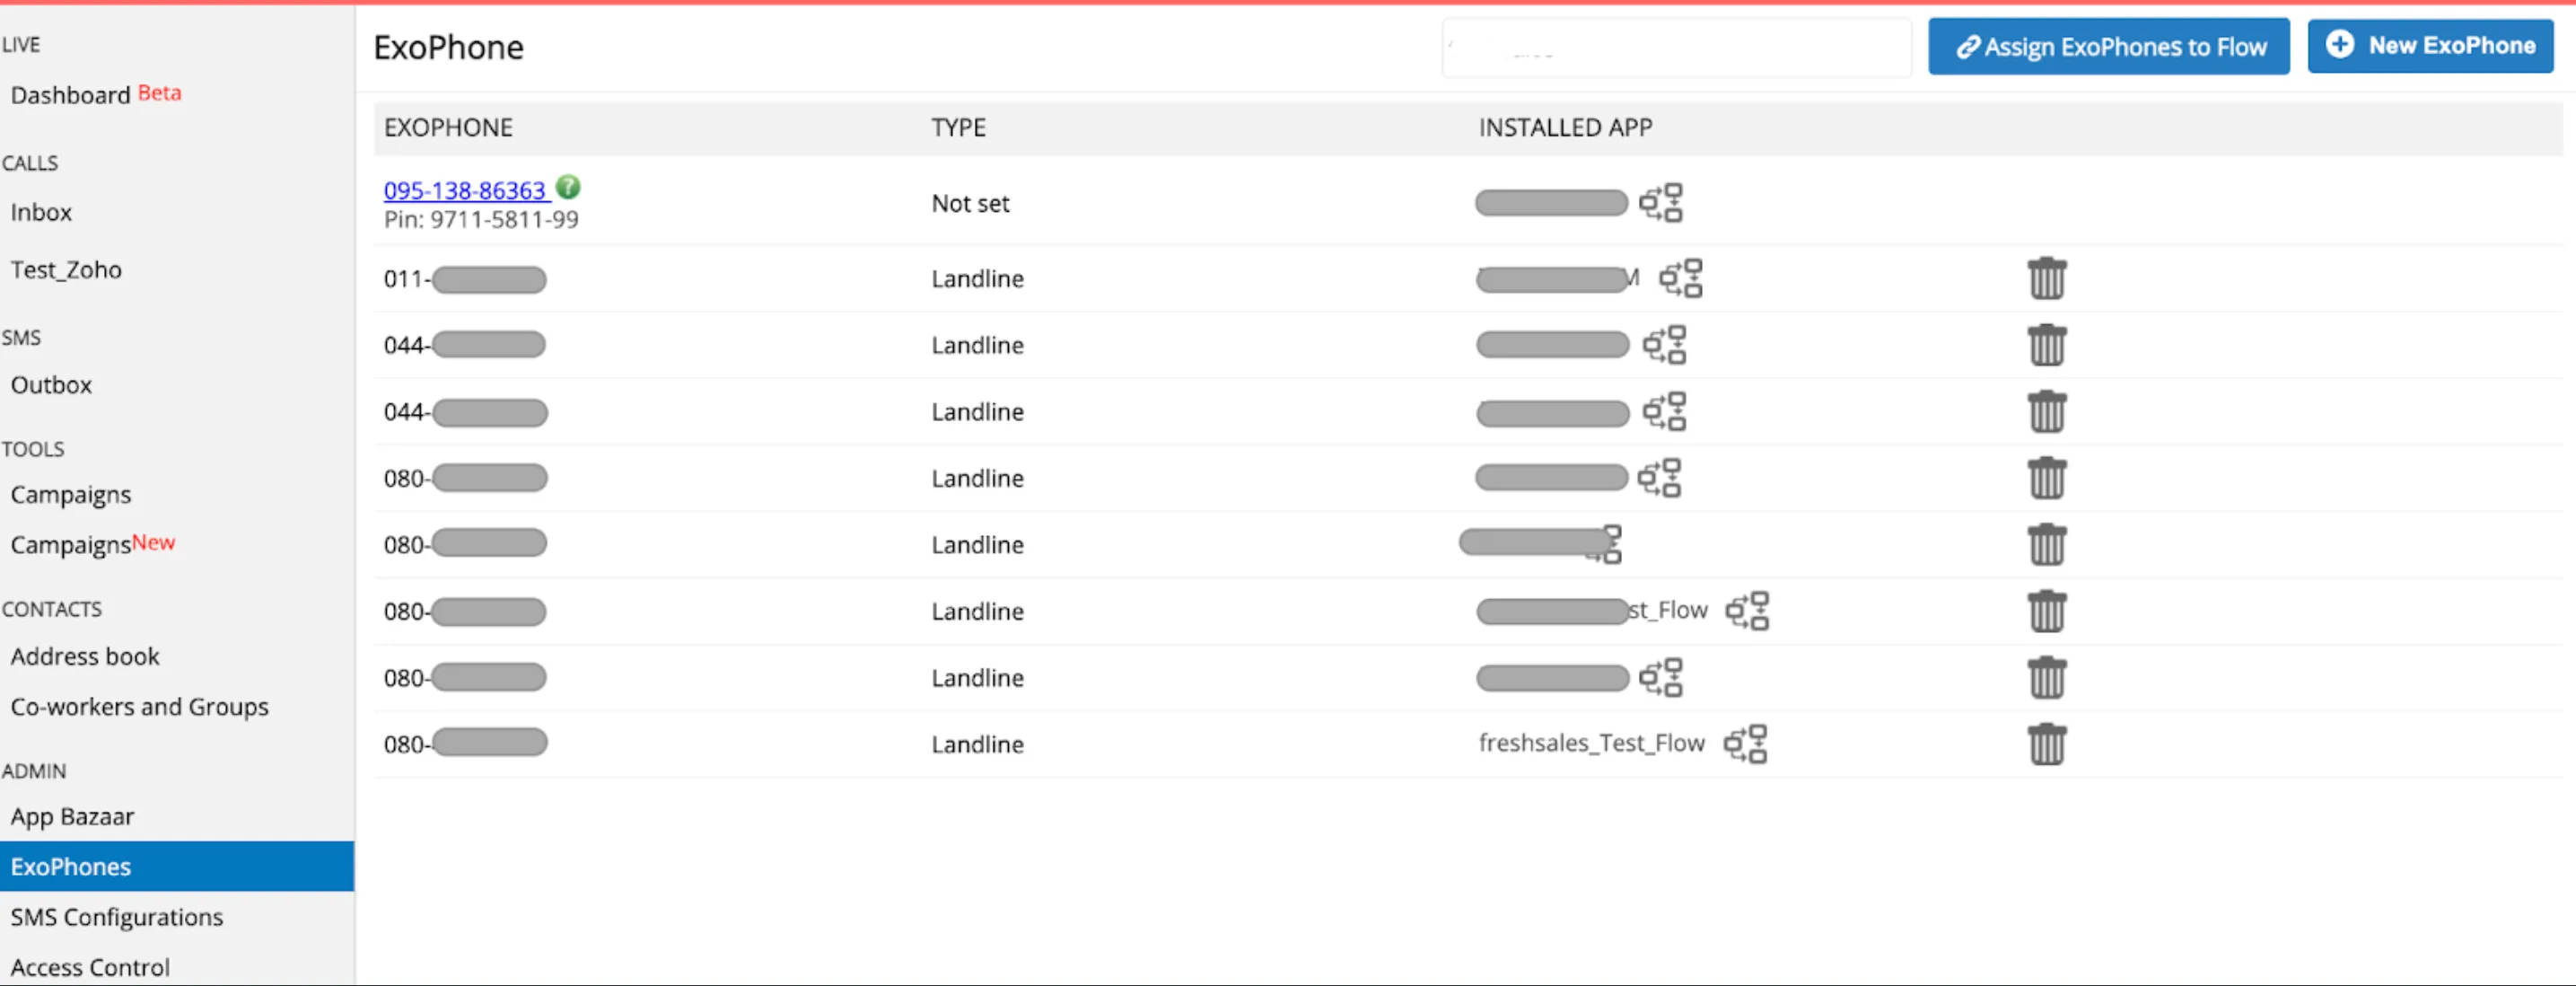
- Click on the button 'Assign ExoPhones to Flow' and select the flow created in Step 2 with the ExoPhone and click on 'Attach Flow'.
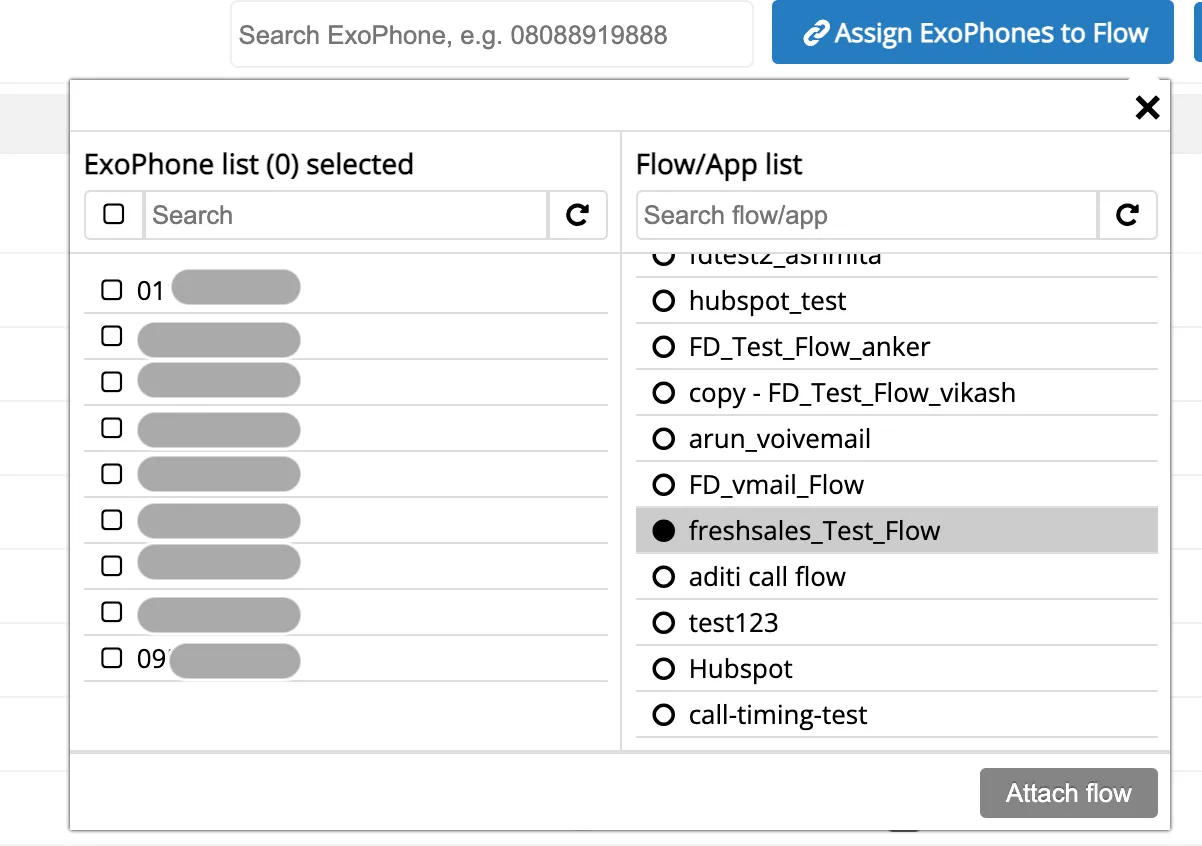
- In the subsequent pop-up, click on OK and you can see the flow getting associated with the ExoPhone.
Step 3: User Mapping
- User Mapping can be done only after the Exotel Configuration is done. Please do the Exotel Configuration and then proceed here.
- All the users added to the call centre will be displayed here.
- Select a virtual number from your Exotel account to associate with the user.
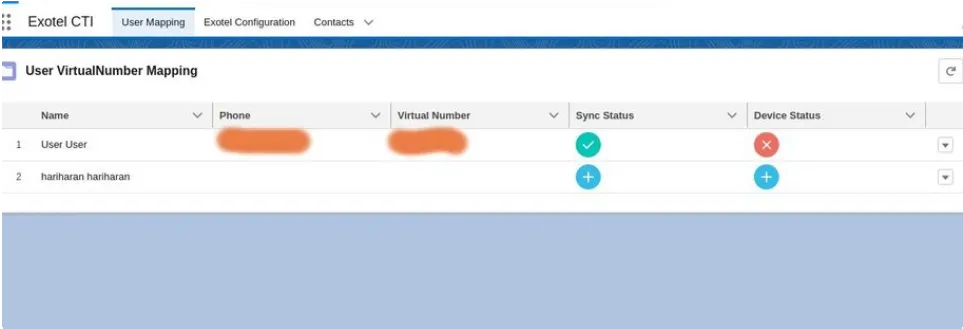
- Click on the chevron (dropdown) to Save/Refresh your agent number with the VN selected in your Exotel account.
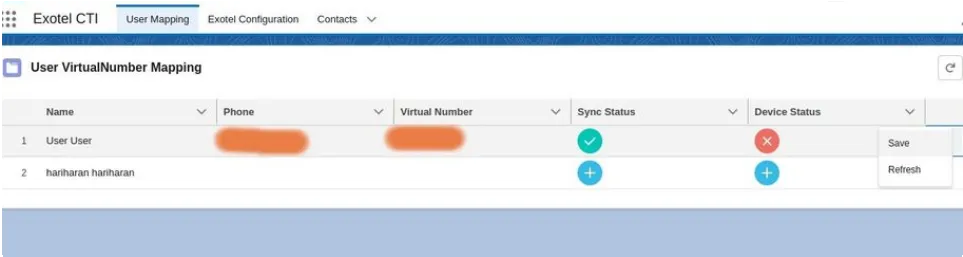
- Users mapped can receive or make calls only after both Sync Status and Device Status are Success.
- If the Device Status is success, verify your phone number by giving a missed call to +91-9513885656 (SGP stamp) / 02249360005 (Mum stamp), based on the stamp where the Exotel account is present.
- Once the verification of the mobile number is done, please click on the dropdown to refresh the agent's device status. If both Sync Status and Device Status are Success, the agent is ready to use the Salesforce Connector to make and receive calls.
SFDC Dialer App - UI screens
Call Activity
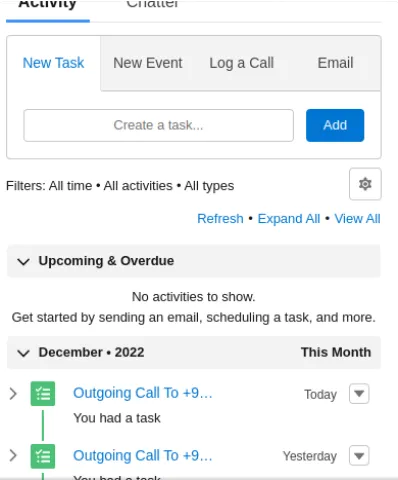
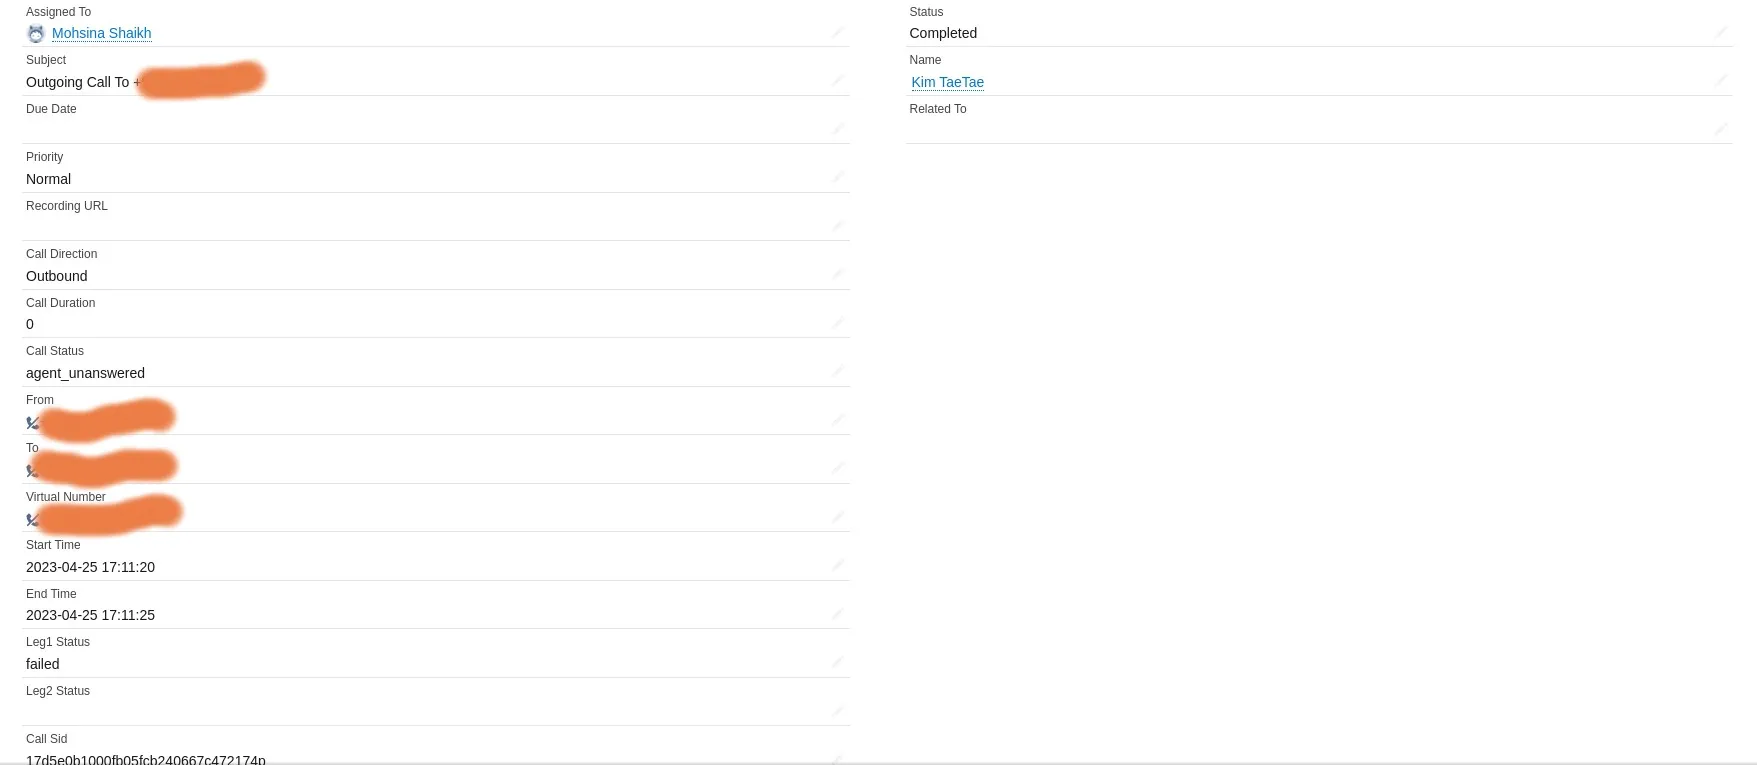
After each call, a task would be added for the Salesforce object associated with the call.
Call Details Screen
After the call ends, an activity gets created with call details as follows:
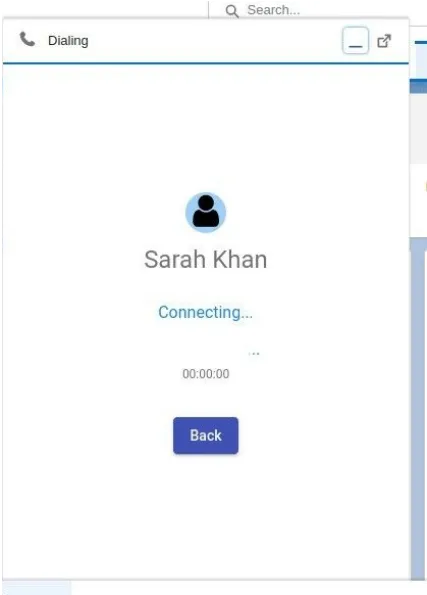
Outgoing Call Pop Up
Incoming Call Popup
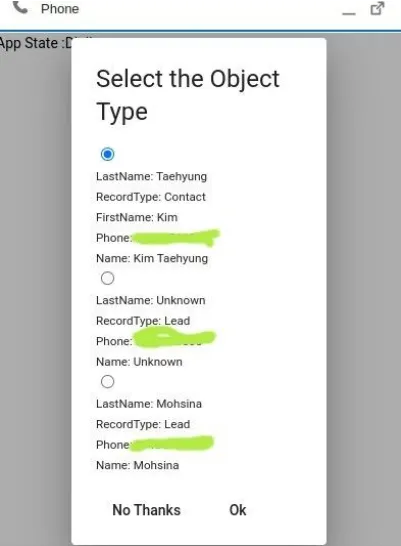
- Whenever an incoming call is received and there is only one matching object, that record is opened.
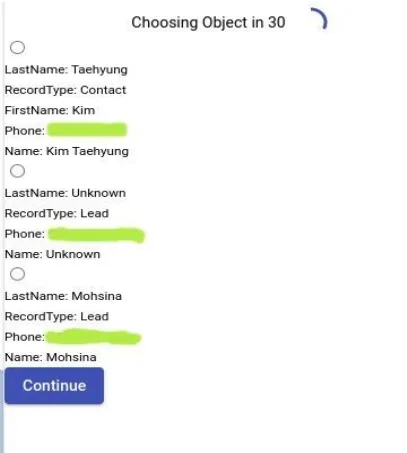
- If there is more than one matching object, the following screen is displayed where an agent can select the object that they want to associate with the call.
- The object type to be associated with the call will be automatically selected based on the priority list configured if the agent does not associate an object type within 10s.
- The Object Type that needs to be associated with the call can also be changed during the call, before the call ends.
- After the selection, the pop up will look like below:
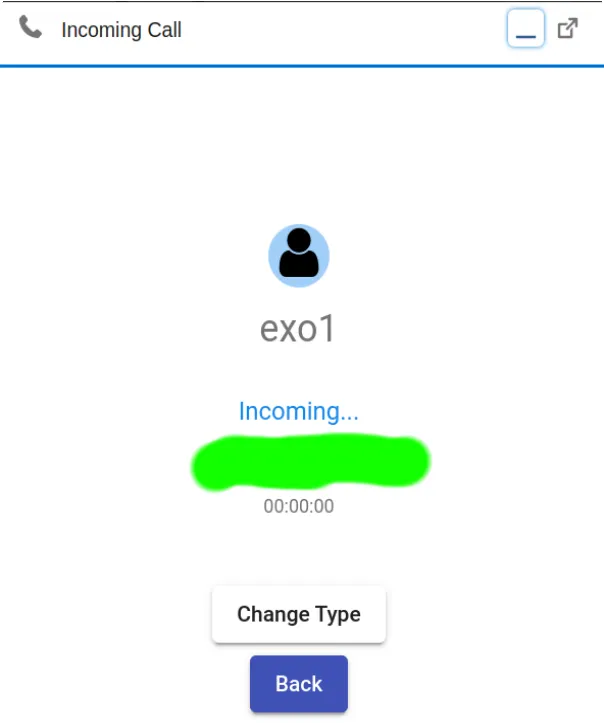
- The object type can also be changed during the call by the agent.
In case of any queries, feel free to reach out to [email protected].
Version History
Version | Enhancement | Release Notes |
|---|---|---|
4.13.5 | New CRM Integration App for simplified UI-based Salesforce setup (beta, new integrations only) | 4.13.5 Release Notes4.13.5 Release Notes |