Ticket Settings
This section defines how tickets (primarily for Interaction Campaigns) are handled.
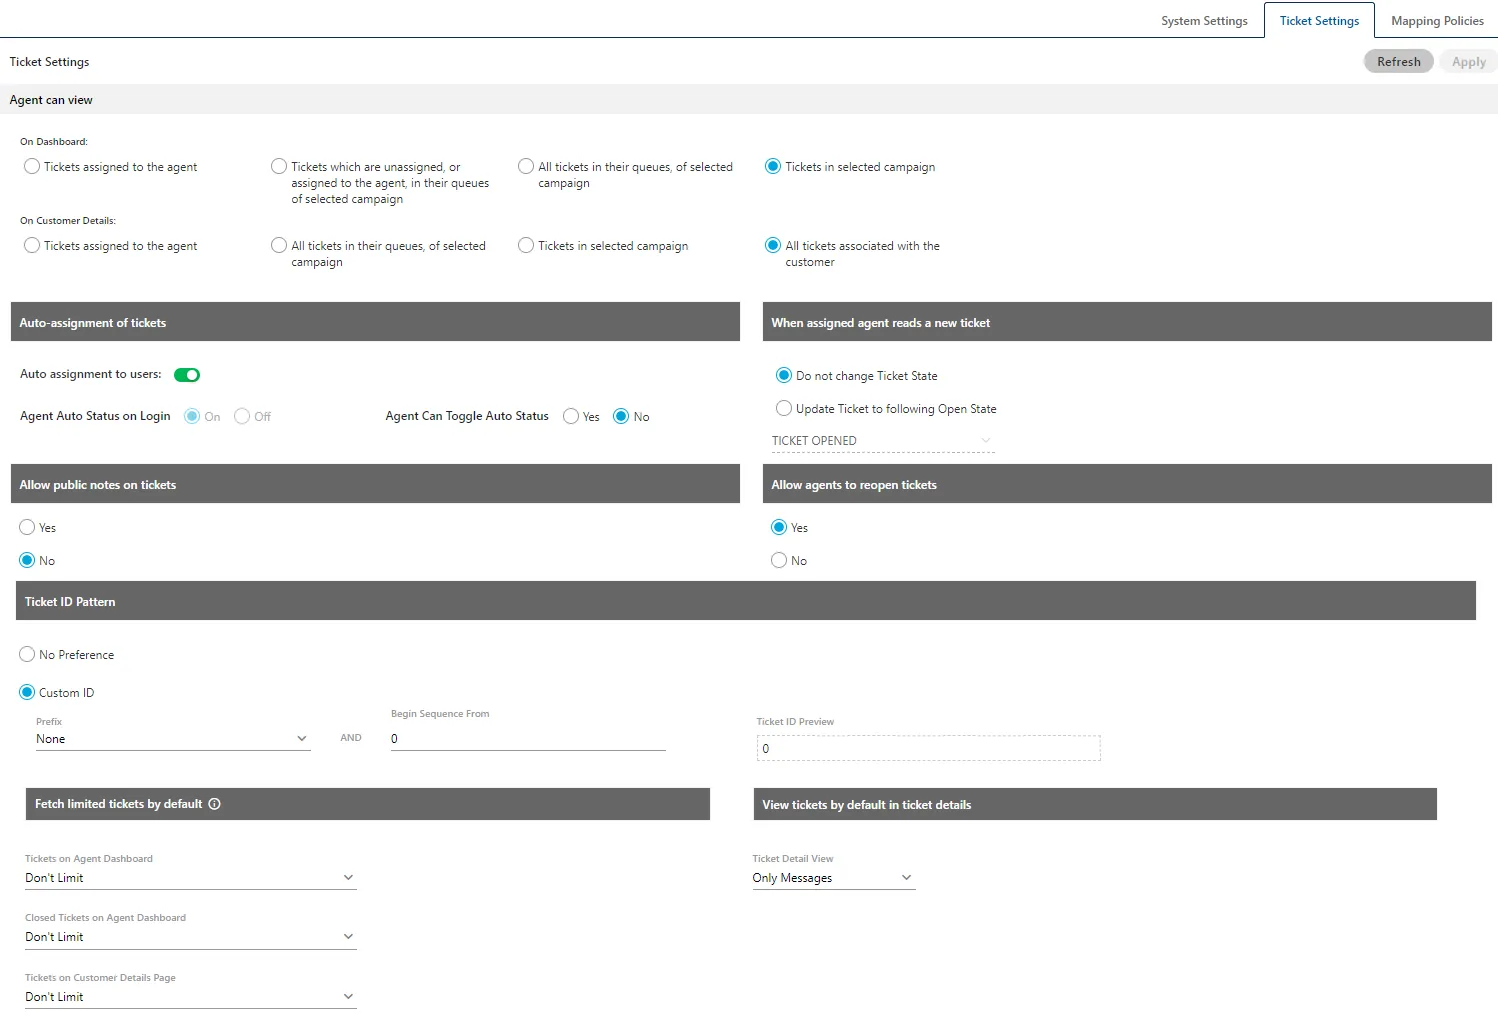
It contains the following settings:
Agent can view: Controls ticket visibility for agents.
- On Dashboard: Select what agents see on their main dashboard (e.g., only their assigned tickets, tickets in their queues, or all tickets in selected campaigns).
- Tickets assigned to the agent: Select it to let the agent view only those tickets that are assigned to him/her.
- Tickets which are unassigned, or assigned to the agent, in their queues of selected campaigns: Select it to let the agent view both those tickets which are unassigned and which are assigned to the agents in their queues of selected campaigns. The tickets assigned to other agents of queues to which he/she is not assigned, will not be displayed to him/her.
- Tickets in queues assigned to the agent in selected campaigns: Select it to let the agent view those tickets in queues which are assigned to the agents in its selected campaigns. It will not show the tickets which are either unassigned or assigned to other agents who are staffed to another campaign, in which he/she was not staffed.
- Tickets in selected campaigns: Select it to view the tickets which are assigned to the agents in the campaigns elected by the agent.
- On Customer Details: Select what agents see when viewing a specific customer's profile (e.g., only their tickets with that customer, or all tickets associated with that customer).
- Tickets assigned to the agent: Select it to let the agent view only those tickets that are assigned to the agent.
- Tickets in queues assigned to the agent in selected campaigns: Select it to let the agent view all tickets in the queue which are assigned to the agents in its selected campaigns.
- Tickets in selected campaigns: Select it to let the agent view the tickets in the selected campaigns.
- All Tickets associated with the customer: Select it to let the agent view all tickets associated with the customer.
Auto-assignment of tickets:
Use these settings to enable or disable automatic ticket assignment to users, and to allow or restrict agents from toggling their Auto-Status in interaction campaigns.

It contains the following options.
- Auto-assignment to users: Toggle on to automatically assign new tickets to available agents.
If this option is enabled, the Administrator also get "Auto-Assignment to users" option at the queue level that can be configured. The Queue-level "Auto-Assignment to users" option will override this auto-assignment option of System-level.
If it is enabled, the agents will be on "Auto-Status On" after their login in Interaction Campaign. The next option "Agent Can Toggle Auto Status" will allow or disallow agent to change this status.
The Administrator can turn off this option to not assign tickets automatically to the agents.
- Agent Auto Status on Login: Select if agents are "Auto-Status On" by default when they log into an Interaction Campaign.
- Agent Can Toggle Auto Status: Choose if agents are allowed to turn their own auto-assignment status on or off.
When assigned agent reads a new ticket:
By default, when the assigned agent reads a new ticket, its state changes to the "Open" internal state. If you want to set an external state (created under the "Open" internal state) as the default when an agent reads a new ticket, use this section to configure those settings. The following options are available here.
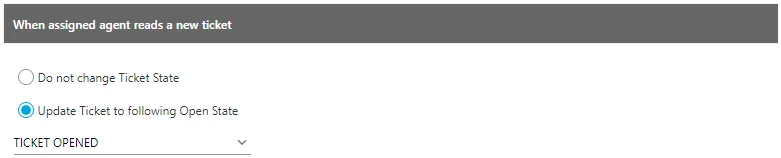
- Do not change Ticket State: The ticket's status remains "New".
- Update Ticket to following Open State: Automatically changes the ticket's status to an "Open" state (e.g., "TICKET OPENED").
Allow Public Notes on tickets: Use this option to enable or disable public notes on tickets. Public notes are visible to all users. The following options are available:
- Yes: Select this to allow public notes on tickets.
- No: Select this to disable public notes on tickets.
Allow agents to reopen tickets:
Use this option to allow or restrict agents from reopening closed tickets. It includes the following choices:
- Yes: Select this to allow agents to reopen closed tickets. No: Select this to prevent agents from reopening closed tickets.
Ticket ID Pattern:
The administrator can now customize the ticket ID number at the system level.

To configure a custom ticket ID, follow these steps:
1. Select "Custom ID" to define a custom ticket ID format.
2. Choose any of the following options as the prefix for the ticket ID:
- NONE: Select this option to exclude any prefix.
- YYYYMMDD: Select this option to use "YYYYMMDD" as the prefix.
- DDMMYYYY: Select this option to use "DDMMYYYY" as the prefix.
- MMDDYYYY: Select this option to use "MMDDYYYY" as the prefix.
Here, DD, MM, and YYYY will be replaced with the corresponding day, month, and year values.

- Custom: Select it to add the provided custom alphanumeric input as the prefix. Upon selecting, it enables an additional text field named "Value" at the bottom. You have to enter an alphanumeric value in it.

- Begin Sequence From: Enter the number from which the ticket ID sequence should start.
Once the custom ticket ID configuration is applied, the system will display only the custom IDs throughout the Ameyo interface. The original ticket IDs will not be visible. For debugging purposes, the actual ticket ID can be retrieved using the corresponding custom ID.
Custom ticket IDs are also included in tickets exported to CSV files from the Agent Dashboard.
Improved Ticket Resolvers for Custom Ticket IDs:
When custom ticket IDs are used for the first time, the Ticket Resolvers in Email Media Profiles correctly append new incoming or reply emails to the same tickets, even after the default ticket IDs are replaced by custom ones.
However, this functionality will not work if the custom ticket ID is changed again or reset to the default format. In such cases, the Ticket Resolvers in Email Media Profiles will no longer append new or reply emails to the same tickets.
Fetch Limited Tickets by default:
If a large number of tickets are present in the system, it may affect performance and cause delays while loading tickets in the Agent Console. To improve performance, the administrator can now define a date range to limit the tickets fetched in the Agent Console.
To configure this setting, navigate to: System → System Configuration → Settings → Ticket Settings → Scroll to the bottom of the page.
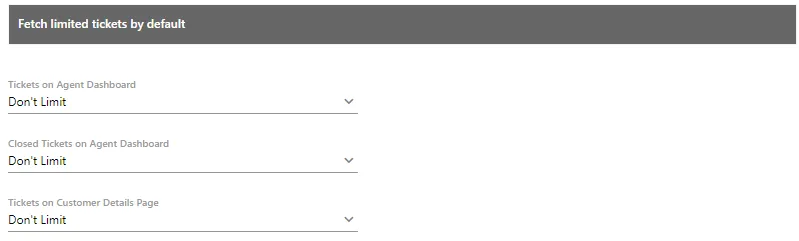
This configuration includes the following three settings.
- Tickets on Agent Dashboard:
This setting allows you to specify the time duration for which tickets will be displayed on the Agent Dashboard. Tickets outside the specified range will not be visible.
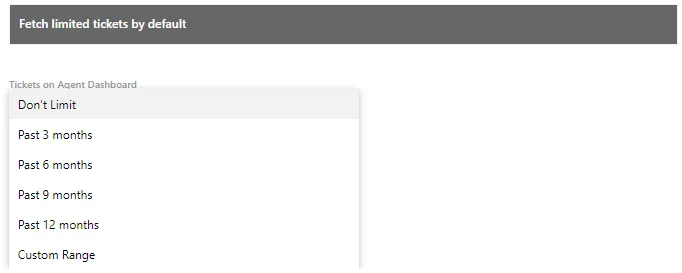
It contains the following options:
- Don't Limit: Displays all tickets without applying a date filter. (Not recommended when a large number of tickets exist.)
- Past 3 Months: Displays tickets created in the last 3 months.
- Past 6 Months: Displays tickets created in the last 6 months.
- Past 12 Months:Displays tickets created in the last 12 months.
- Custom Range: Allows you to define a specific range (in months). When selected, a text box titled "Define Date Range (in months)" appears beside the "Tickets on Agent Dashboard" dropdown. Enter a value between 1 and 12.
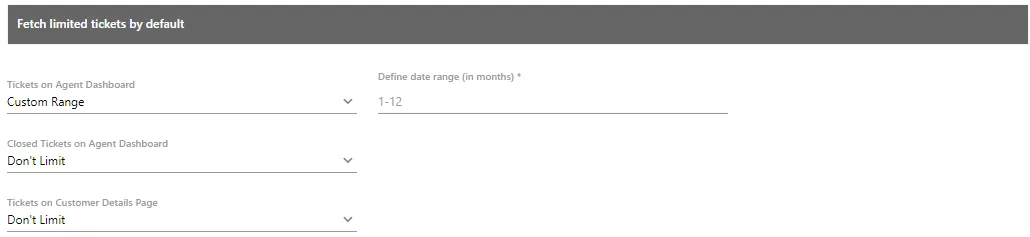
- Closed Tickets on Agent Dashboard: This setting defines the duration for which closed tickets are displayed on both the Agent Dashboard and Customer Page. Tickets outside the selected range will not be visible. The available configuration options are the same as those listed under “Tickets on Agent Dashboard.”
- Tickets on Customer Details Page: This setting controls the duration for which tickets are displayed on the Customer Details page. Tickets beyond the selected date range will not be displayed. It also includes the same options described under “Tickets on Agent Dashboard.”
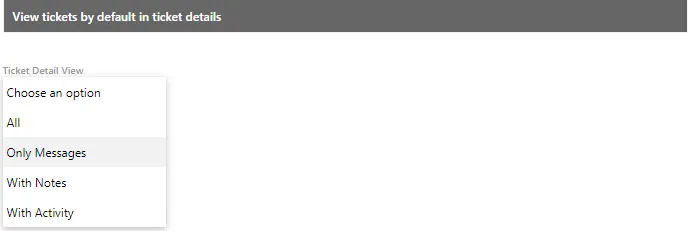
View tickets by default in ticket details:
The administrator can configure the default ticket view that agents see when opening ticket details. This setting determines the initial display of ticket content based on the administrator’s selection. However, agents retain the flexibility to change the view from a drop-down menu as needed.
The administrator can choose from the following four ticket view options:
- All: Displays all transactions and messages related to the ticket.
- Only Messages: Displays only the messages exchanged on the ticket.
- With Notes: Displays messages along with any notes added to the ticket.
- With Activity: Displays all activities performed on the ticket, including messages, notes, and other actions.