Voice Mail (Licensed Feature)
Overview
Voicemail is a licensable feature that allows customers to leave voice messages when agents are unavailable or when calls cannot be connected. This system electronically stores these messages, allowing Administrators and Supervisors to retrieve, listen to, and manage them later.
Note: This is a Licensed Feature. The "Voicemail" tab and configuration options will only be visible if the appropriate license has been procured for your Contact Center.
Voicemails should be configured by the Administrator first at System-level and then at queue-level.
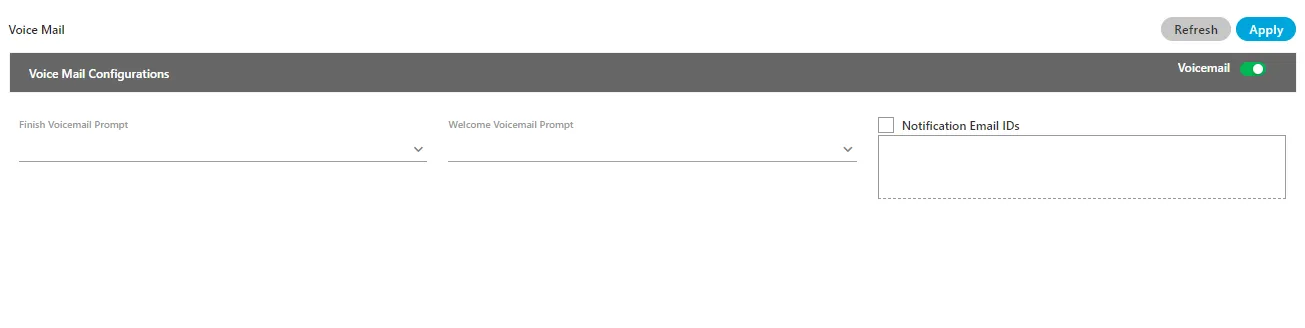
Part 1: System Configuration (Administrator)
Before voicemails can be received, the feature must be enabled and configured at the system level by an Administrator.
Enabling Voicemail
- Navigate to the System Configuration or Voice Mail tab in the Admin Console.
- Locate the Voicemail toggle bar.
- Slide the bar to the Right to Enable the feature.
- If this is disabled, the system will not record any voicemails.
Configuring Notifications
You can configure the system to send email alerts whenever a new voicemail is received.
- Check the "Notification Email IDs" checkbox.
- In the text field, enter the email addresses that should receive alerts.
- Multiple email IDs can be added by separating them with a comma (,).
- Note: Ensure valid email domains (e.g., Gmail) are used as per your system's allowlist.
Setting Voicemail Prompts
Define what the customer hears before and after recording their message.
- Welcome Voicemail Prompt: Select the audio file from the dropdown menu that plays before the recording starts (e.g., "Please leave a message after the beep").
- Finish Voicemail Prompt: Select the audio file from the dropdown menu that plays after the recording is saved (e.g., "Thank you, your message has been recorded").
Save Changes
- Click "Apply" to save the configuration.
- Click "Refresh" if you wish to discard changes.
Part 2: Managing Voicemails (Supervisor)
Once configured, Supervisors can access the "Voicemail" tab in the Manage tab section of a selected inbound campaign, to search, listen to, and manage recordings.
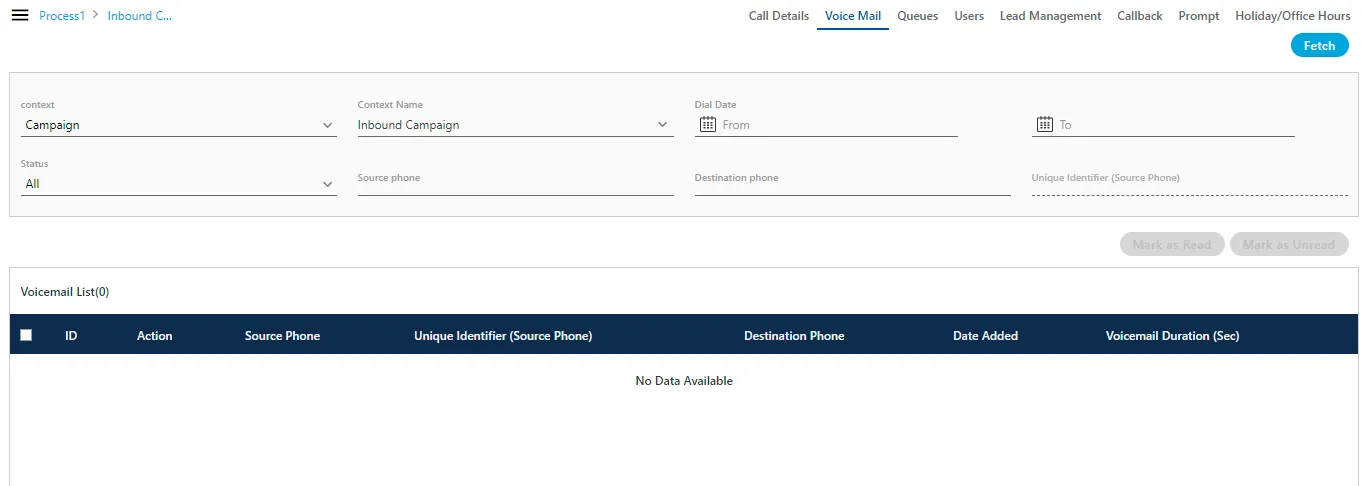
Fetching & Filtering Voicemails
To view voicemails, you must first "Fetch" them based on specific criteria.
Search Criteria:
- Context: Choose the scope of the search.
- User: Fetch voicemails assigned to a specific agent. (Select the specific User from the secondary dropdown).
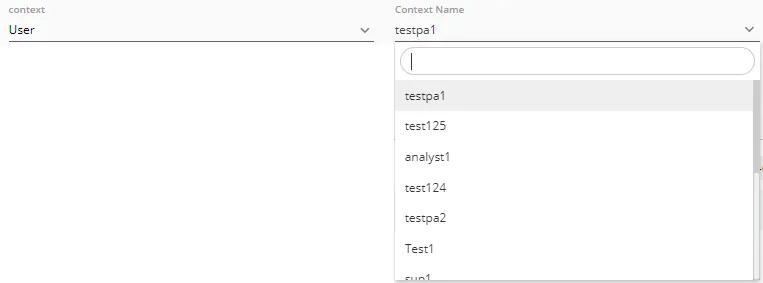
- Queue: Fetch voicemails left for a specific queue. (Select the specific Queue from the secondary dropdown).

- Campaign: Fetch all voicemails for the current campaign.

- Status: Filter by the state of the message.
- All: View both read and unread messages.
- Read: View only messages that have been listened to.
- Unread: View only new/unopened messages.
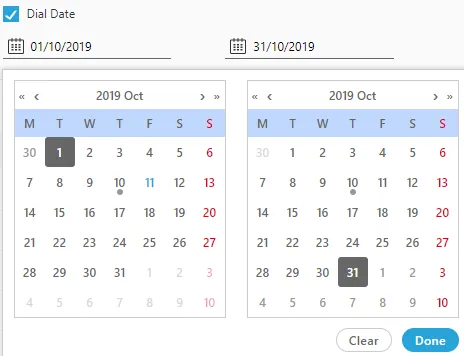
- Dial Date (Optional): Filter by date range.
- Click the "From" and "To" fields to select a date range from the calendar.
- Phone Filters (Optional):
- Source Phone: Enter a number to see voicemails from a specific caller.
- Destination Phone: Enter a number to see voicemails left at a specific dialed number (DID).
Action: Click the "Fetch" button to generate the list.
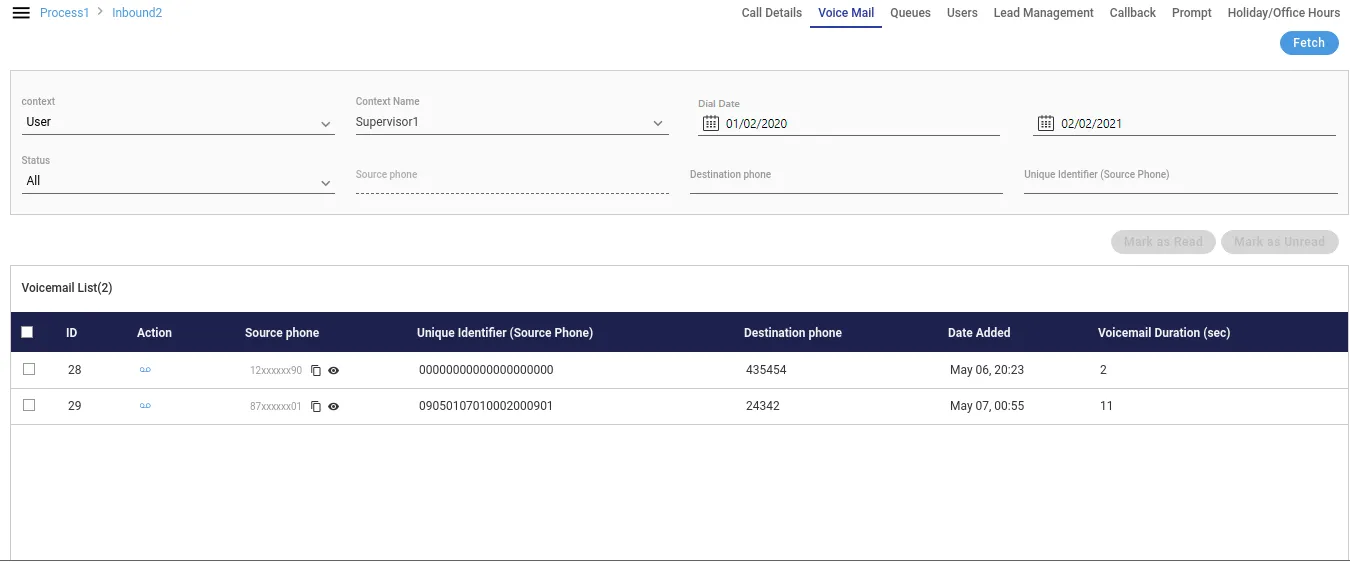
Understanding the Voicemail List
The fetched list displays the following details for each message:
Column | Description |
|---|---|
ID | The unique system-generated ID for the voicemail. |
Unique Identifier | The unique call ID. Note: If number masking is enabled, this may be blank. |
Source Phone | The phone number of the customer who left the message. |
Destination Phone | The specific number the customer dialed. |
Date Added | The timestamp (Date & Time) when the voicemail was recorded. |
Voicemail Duration | The length of the recorded message (in seconds). |
Actions |
|

Actions & Management
Supervisors can perform the following actions on the fetched voicemails:
- Listen: Click the Play Icon in the "Actions" column. A pop-up player will appear to play the Voicelog.
- Download: Click the Download Button in the player or actions menu. Click "Save" to download the audio file to your local machine.
- Mark as Read/Unread:
- Select a voicemail (checkbox) and click "Mark as Read" to indicate it has been reviewed.
- Select a voicemail and click "Mark as Unread" to flag it for future review.
- Delete:
- Select the voicemail(s) you wish to remove.
- Click the "Delete" button.

- Warning: A confirmation pop-up will appear. Click "Yes" to confirm. Deleted voicemails cannot be retrieved.