Exotel Voicebot: User Guide
This document provides a comprehensive, in-depth guide to using the Exotel Voicebot platform. It covers the complete lifecycle of a voicebot, from initial creation and configuration to publishing, monitoring, and continuous improvement.
1. Signing Into Your Portal
Your journey begins at the sign-in page, the secure gateway to your voicebot management portal.
- Portal Access: Navigate to your Exotel Voicebot URL. We recommend bookmarking this for easy access. You can also access the voicebot from your Exolite console by logging in to my.exotel.com or my.in.exotel.com and clicking on the 'Try VoiceBot' icon.
- India: voicebot.mum1.exotel.com
- Singapore: voicebot.exotel.com
- Credentials: Enter your registered Email and Password. For your security, the password field masks your entry. You can click the eye icon to toggle password visibility.
- Password Recovery: If you've forgotten your password, click the 'Forgot Password?' link to securely reset it via an email link.
2. Creating a New Voicebot
This section details the process of bringing a new conversational AI assistant to life, from the initial concept to a functional bot ready for configuration.
2.1 The "Bot Building" Page
This is your primary creation canvas. You have two main approaches to start:
1. Create from a Custom Prompt: This method offers maximum control and is ideal for unique or complex use cases.
- How it works: In the main text area, you describe your ideal bot. A highly effective prompt is specific and structured, defining the bot's core attributes.
- Best Practices for a Strong Prompt:
- Define the Persona: Don't just say "sales bot." Describe it: "Create a friendly, persuasive, and confident—but never pushy—sales assistant for our electronics store."
- List Core Capabilities: Detail what the bot should be able to do. For example: "It must be able to ask conversational questions to understand a customer's needs and budget, explain product benefits in simple language, and suggest add-ons or upgrades where it makes sense."
- Set Constraints and Rules: Specify what the bot should not do. For example: "It should never promise discounts that are not available. It must handle objections professionally without being argumentative."
- Enhance Prompt Feature (Coming Soon): If your initial idea is broad, click 'Enhance Prompt'. The AI will analyze your input and suggest a more structured, detailed prompt that is optimized for the platform.
2. Choose a Template (Coming Soon): Templates are the fastest way to get started, providing pre-built prompts for common business needs.
- How it works: Select a template like Sales Representative or Appointment Scheduler. The prompt box will be automatically populated with a proven, well-structured prompt for that use case. You can then use this as a starting point and edit it to fit your specific requirements.
2.2 Build a Bot using Audio and Files.
With the text prompt, you can now upload the files below to give LLM more context and build a better bot in one go.
- Supported File Formats: The bot can use documents and audio and text files.
- Documents: PDF, DOCX, TXT.
- Audio/Media: MP3, WAV, M4A.
- File Constraint: The maximum file size supported for uploads is 100 MB.
- Use Cases:
- PDF/DOCX/TXT: Upload FAQ documents, policies, or agent/customer script.
- MP3/WAV/M4A: Upload recordings of exemplary agent calls to understand common customer queries.
- Action: Click "Attach Files" or "Upload Audio".
Once your prompt is ready and your files are uploaded, click "Build Bot" to create the bot and move to the configuration editor.
3. Editing and Refining Your Bot
Once a bot is created, the Build Bot editor allows you to fine-tune every aspect of its personality, logic, and voice. This is where you will spend time refining and improving your bot.
3.1 The AI Agent Tab: The Bot's Brain
This tab controls the core logic and conversational style.
- Identity: This is the bot's persona description. Why it's important: This field is constantly referenced by the AI during a conversation to maintain a consistent tone, personality, and style. A well-defined identity (e.g., "You are Adis, a helpful and patient support agent") prevents the bot from sounding generic or robotic.
- Objective: This section lists the primary, high-level goals of the bot. Why it's important: Clear objectives guide the bot's decision-making. If an objective is "Book an appointment," the bot will prioritize actions and questions that lead to that outcome. List them in order of priority.
- Behavior: These are the specific, step-by-step instructions or Standard Operating Procedures (SOPs). Why it's important: This is where you define the exact conversational flow. For example: "OPENING PHASE" - Start the call with "Hi, this is Aditi calling from BankBazaar. How are you today?". Do not proceed until the user responds. This level of detail ensures the bot follows your business processes precisely.
3.2 The Configuration Tab: Voice and Language
This tab controls how your bot sounds to the user.
- Language: Select the languages your bot needs to understand and speak (e.g., English, Hindi).
- Voice: Choose a voice model from the dropdown menu.
- How to Choose a Voice: The voice is a critical part of the user experience. Consider your brand's identity. A luxury brand might choose a calm, professional voice, while a youth-focused brand might prefer a more energetic and cheerful one.
- Changing the Voice: You can change the voice at any time. Simply select a new option from the list and save the configuration. We recommend testing the new voice with a few sample phrases to ensure it aligns with your expectations.
3.3 The Advanced Tab: Versioning and System Controls
This tab is for technical management.
- Version Information: Every time you save a major change, you can create a new version. Why it's important: Versioning is your safety net. You can have a stable, live version (v1 (Stable)) handling customer calls while you work on and test a new version (v2). If the new version has issues, you can instantly roll back to the stable version without any downtime.
4. Testing Your Bot
Thorough testing is the most critical step before making your bot live. The Talk to Bot page provides a safe environment to interact with your bot and identify areas for improvement.
- Initiating a Test:
- Phone Call: The most realistic test. Enter your phone number and select the Bot Number. The system will initiate a live call so you can hear exactly what your customers will hear, including audio quality and latency.
- Web Call (Coming Soon): This will allow for quick tests directly from your browser.
- What to Test For:
- Conversational Flow: Does the conversation feel natural?
- Accuracy: Does the bot understand you correctly? Does it provide accurate information from its knowledge base?
- Handling Errors: What happens when you say something unexpected? Does the bot recover gracefully or get stuck?
- Voice and Tone: Does the chosen voice sound right for the conversation?
5. Bot Lifecycle Management
This section covers the process of making your bot live, deactivating it, and deleting it.
5.1 Publishing Your Bot
"Publishing" means making your bot active and ready to handle real calls.
- How to Publish: Navigate to the Build Bot > AI Agent tab for the bot you want to publish. Find the Activation Status toggle and switch it to 'Active'.
- What happens: Once active, the bot is officially live. Any calls made to the phone number assigned to this bot will be answered by the voicebot. Ensure you have completed thorough testing before this step.
5.2 Deactivating a Bot
You can temporarily take a bot offline without deleting it.
- How to Deactivate: Go to the AI Agent tab and switch the Activation Status to 'Inactive'.
- What happens: The bot will no longer answer calls. This is useful for performing maintenance, making significant configuration changes, or temporarily pausing a campaign.
5.3 Deleting a Bot
This is a permanent action to remove a bot and its associated data from the platform.
- How to Delete: (Note: This is a standard feature. The exact location might be on a main bot list page, next to the bot's name, often under a three-dot menu.)
- Important: Deleting a bot is irreversible. All configurations, history, and analytics associated with it will be permanently lost. Proceed with caution and ensure you have backed up any necessary information.
Voicebot Campaigns: Outbound Calling at Scale
A voicebot campaign, as the name suggests, is basically enabling bots to have a conversation with customers at scale. This means that instead of live agents or an IVR, bots will be calling hundreds or even thousands of customers. This is possible through conversational AI, where bots are trained to have a conversation with customers — that is, to understand the customer's intent and give responses. A voicebot can be used for both inbound and outbound calls, but in the context of campaigns, we are referring to outbound calls only.
Use Cases
Voicebot campaigns are used to replace traditional IVR calls. Voicebots can address all conventional IVR campaigns (voice blast), such as:
- Announcements
- Payment reminder
- Sales qualification
- Customer support
- Enable secure payment over voice
Benefits of a Voicebot
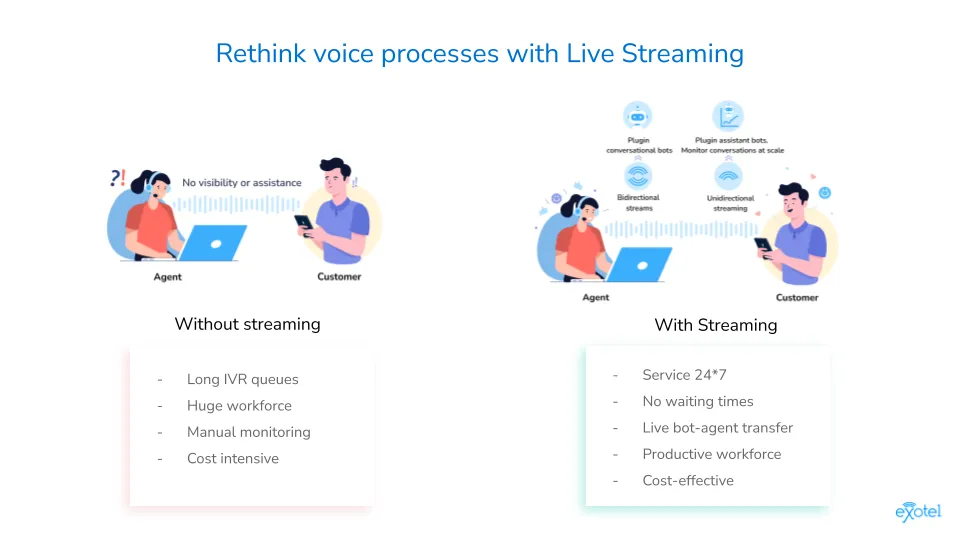
- Better CX: A voicebot is conversational in nature. It means it would provide human-like conversation with customers. In IVR calls, customers are not required to input any digits from their keypad or wait in an IVR queue. It provides a better user experience when they are talking to a voicebot, as bots can understand the spoken words and respond accordingly.
- Faster resolution time: Achieve cost-efficiency, agent productivity, higher conversions and CSAT scores by automating voice. Stream voice to and from voice bots that offer customer support, announce news, qualify leads, send reminders and much more.
- Cheaper: Businesses can save the manpower cost of having live agents. Bots can solve almost 80% of general queries and can be trained easily, whereas agents can be used to resolve complex queries or nurture high-value generating leads.
How to Use an Exotel Voicebot Campaign
Prerequisite
- Websocket URL: Once you create a voicebot, you will get a websocket URL of the voicebot.
Step 1: Create a call flow and set up the Voicebot applet
Go to App Bazaar and create a custom app. You could start the call flow with a greeting or IVR and then connect to the voicebot. Add the Voicebot applet to start the voicebot journey in the call flow.
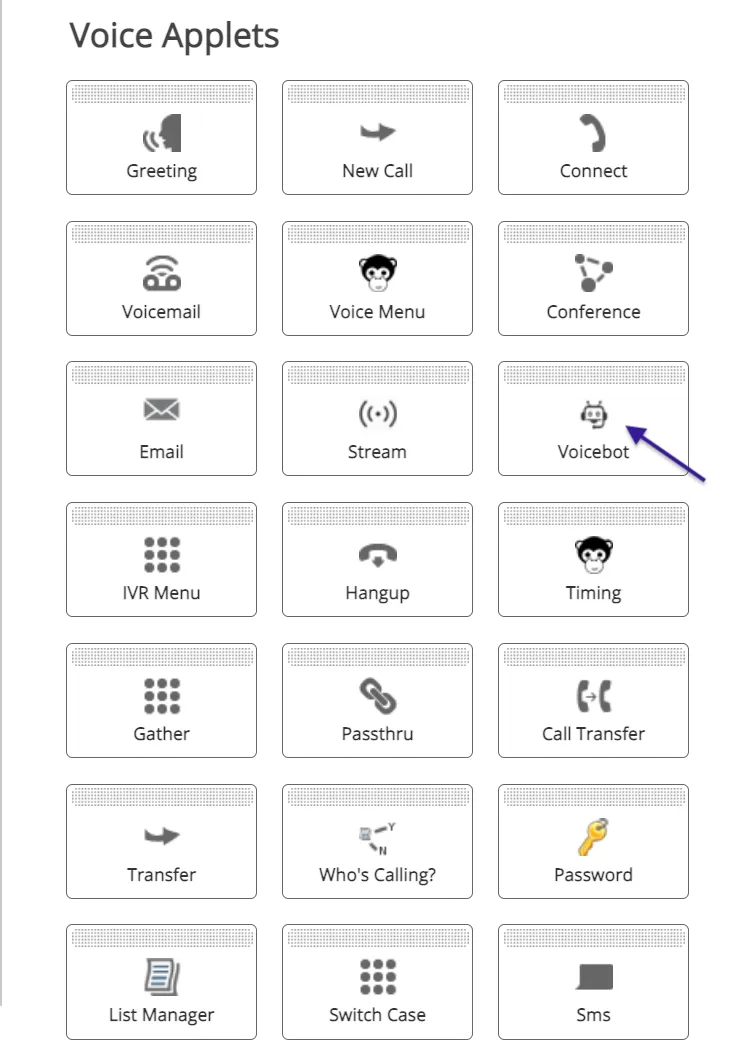
Step 2: Configure the voicebot
The applet takes 4 parameters:
- URL — This is the URL to which Exotel will stream the voice media. You can either specify a wss endpoint or an HTTP endpoint. If you specify an HTTP/HTTPS endpoint, Exotel expects the HTTP endpoint to return a WSS URL in its response. There are two ways to put this:
- Static method: A ws(s) endpoint can be entered here, but it will remain the same for every call that you are going to make using this flow. e.g. ws://127.0.0.1:5001/media
- Dynamic method: You can enter an HTTP(s) URL which can return different ws(s) endpoints based on the use-case. e.g. https://yourdomain.com — this URL must return a ws(s) endpoint.
- Custom parameters (Optional) — Custom parameters along with the endpoint. There are some validations that need to be followed while providing custom parameters:
- The maximum number of custom params that are allowed is 3.
- Format of these params will be like this: ws://127.0.0.1:5001/media?param1=value1¶m2=value2¶m3=value3 (In the dynamic case, HTTP(s) should return the ws(s) URL in the above format.)
- The total length of the params (the parameter portion of the above URL) shouldn't be more than 256 characters.
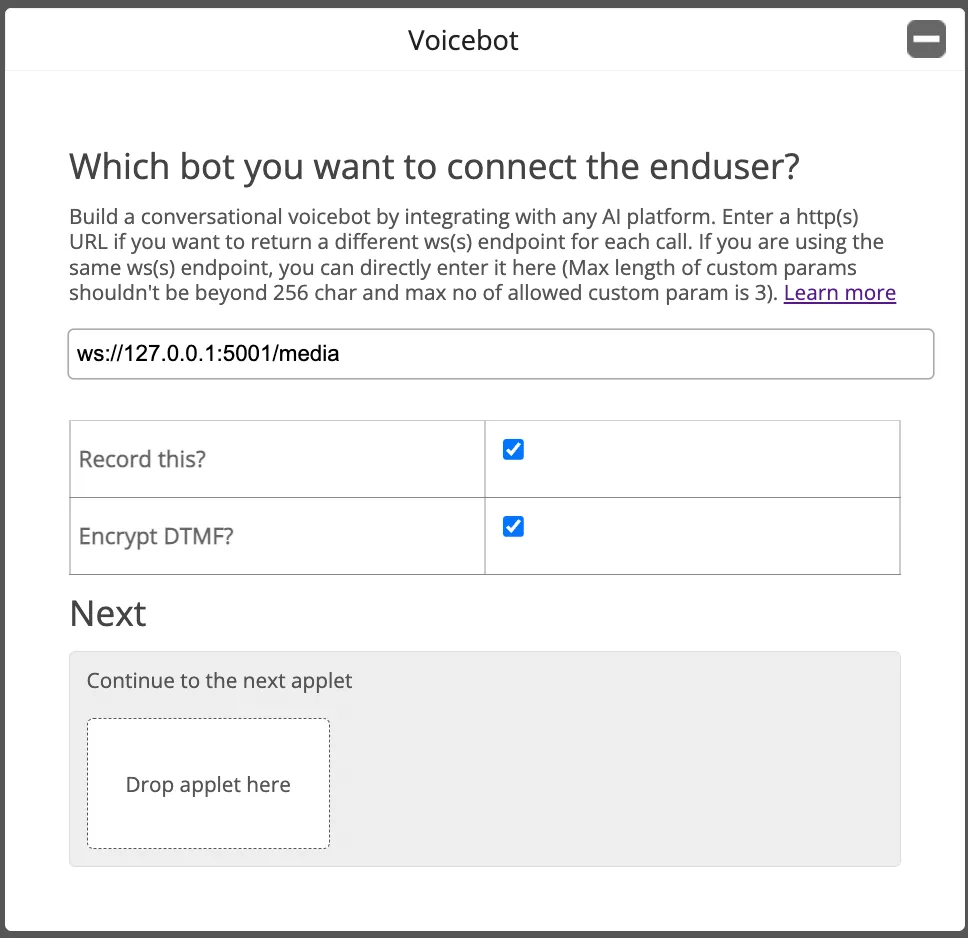
- Record — This checkbox gives the option to record the conversation and generate a recording URL, available in the passthru applet after the voicebot applet.
- Encrypt DTMF: Digits accepted in the flow will be encrypted.
Step 3: Save the call flow
Step 4: Create a call campaign (using Dashboard)
Go to Campaigns and navigate to Create Call Campaigns. Fill in the required details such as Lists, VN (virtual number), etc., select the call flow you have created, and create the campaign.
How It Works
Voicebot campaigns work almost the same way as call campaigns. The campaign will trigger the call (PSTN) to contacts from the virtual number (VN) provided while creating the campaign. Once the user picks up the phone call, the call flow will start and it will trigger the voicebot based on your call flow setup. For example, if you have an IVR setup before the voicebot, the IVR will be triggered first and, based on the IVR input, the voicebot will be triggered. Once the call flow reaches the voicebot (ws URL), the control is shifted to the voicebot and the bot journey (voicebot leg) will start. After the conversation ends, the control will come back to the call flow again.
Examples
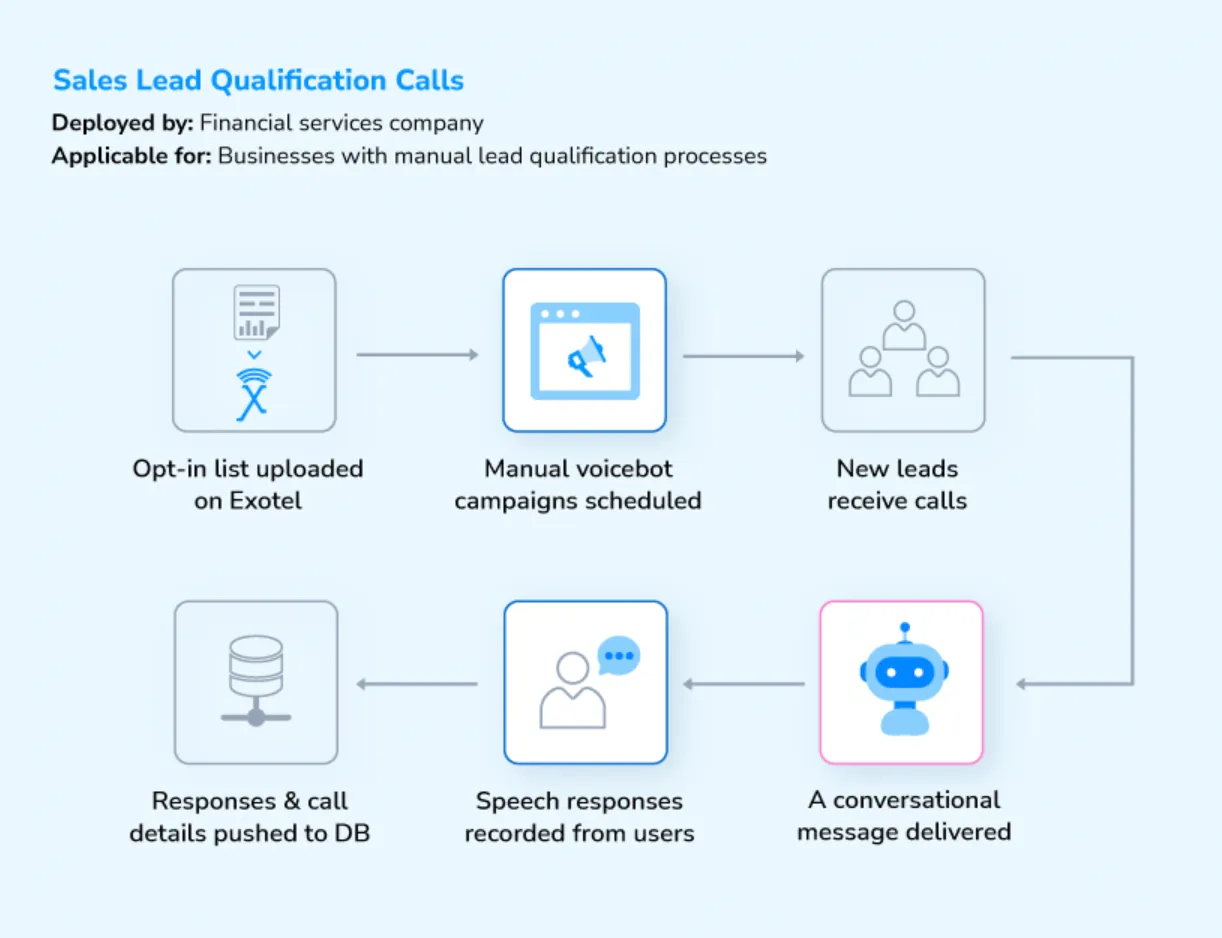
1. Sales Lead Qualification Bot
A leading financial services company performs the first level of lead filtration with a conversational voice bot. The human-like bot asks a set of qualifying questions, and customer speech responses are captured and pushed to the database for lead scoring and qualification.
Manual lead qualification is time and resource-intensive. Automating this process helps manage the sales force better to focus on sales closures.
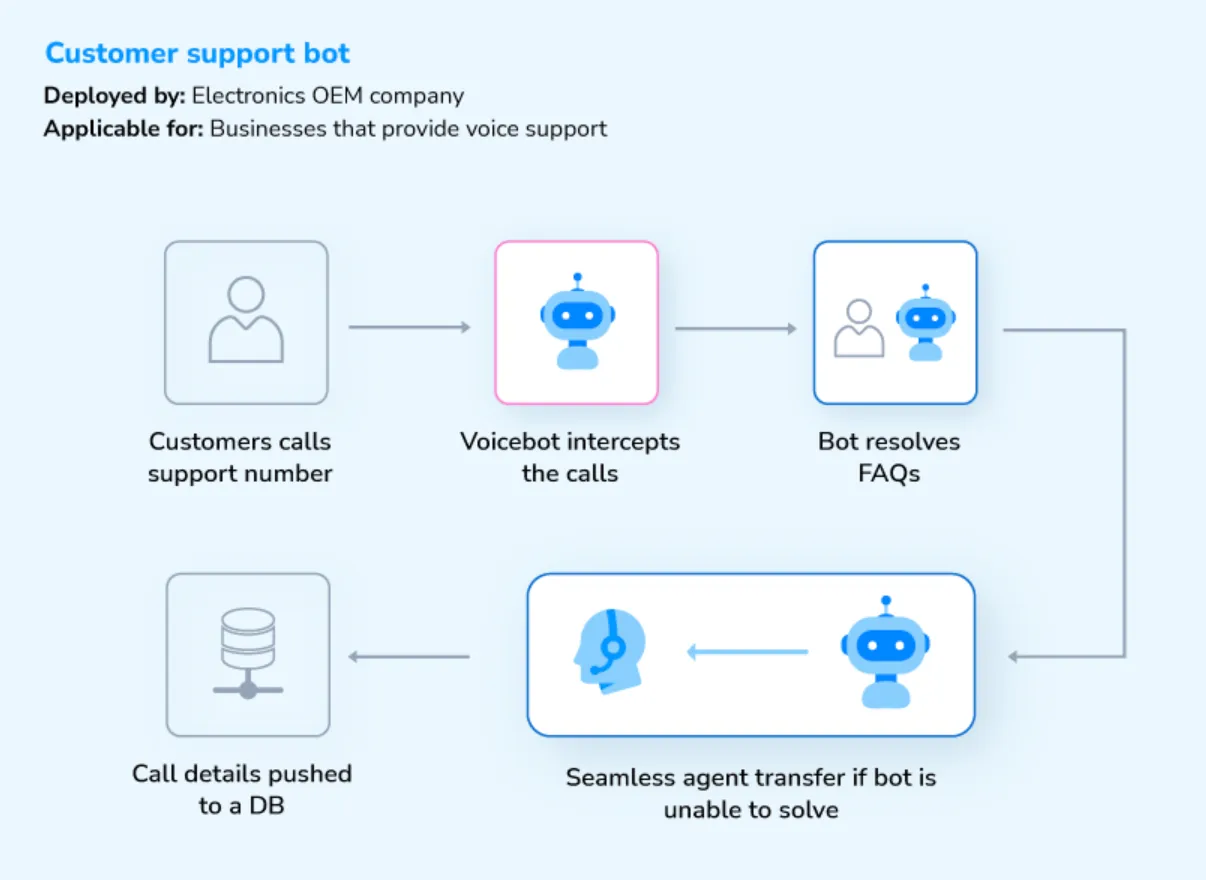
2. Customer Support Bot
A global electronics OEM company automates its voice support with intelligent bots as the first line of defense. These bots handle the most common questions to resolve queries faster, save time and boost agent productivity. Furthermore, when the queries asked are beyond bot capability, the calls are seamlessly transferred to agent groups for manual support, ensuring superior customer experiences.
3. Enable secure payments over voice — The Voicebot applet supports DTMF encryption to protect any customer-sensitive data like PIN, card number, etc. This enables payments to be done safely over PSTN calls without any internet. This has been experimented with Tonetag for 123UPI payment.
6. Detailed Analytics: Monitoring Performance
The Analytics dashboard is crucial for understanding how your bots are performing and identifying areas for improvement.
6.1 Summary Dashboard: The 30,000-Foot View
This dashboard provides a blended, high-level overview of your entire voicebot ecosystem.
- Total Calls (All Bots):
- What it measures: The total volume of calls handled by all your active bots in the selected time frame.
- Why it matters: This is a fundamental measure of customer engagement and bot workload. A sudden spike might correlate with a marketing campaign, while a drop could signal a technical issue.
- Overall Resolution Rate:
- What it measures: The percentage of total calls that were successfully concluded by the bots without needing to escalate or failing.
- Why it matters: This is your primary ROI metric. A high resolution rate means your bots are effectively handling inquiries, reducing the load on human agents and lowering operational costs.
- Total Duration:
- What it measures: The cumulative time in hours and minutes that users have spent interacting with your bots.
- Why it matters: Helps in understanding overall system usage.
- Active Bots:
- What it measures: A real-time operational status of your bots, categorized as Healthy, Warning, or Critical.
- Why it matters: This is a proactive monitoring tool. A 'Critical' status could indicate a major outage, allowing you to react quickly.
6.2 Bot Analytics: The Deep Dive
Select a specific bot to perform a granular analysis of its performance.
A. The "Bot Effectiveness" Tab (Did it work?)
This tab focuses on conversational outcomes.
- Resolution Rate:
- What it measures: The percentage of calls this specific bot handled successfully.
- What to do: If this rate is low, investigate the Unresolved Call Breakdown chart to understand why.
- Unresolved Call Breakdown (Pie Chart):
- What it measures: The reasons why calls failed. This is your primary diagnostic tool.
- Interpreting the Data:
- User Hung Up: A high percentage may indicate user frustration, long bot monologues, or high latency. Listen to these call recordings in the "Interaction History."
- Bot Misunderstanding: This directly points to a problem with the bot's knowledge or prompt. The bot is failing to understand the user's intent. Refine the prompt or add more relevant information to its knowledge base.
- User Escalation Request: Users are explicitly asking to speak to a human. This is normal, but if the rate is high for simple queries, it means the bot isn't building user trust.
- Technical Failure: This indicates a problem with an external system, like a CRM or API that the bot relies on. Check your integration logs.
- Goal Completion & Topic Analysis:
- What it measures: The success rate for specific tasks the bot is designed to handle (e.g., "Order Status," "Make a Payment").
- What to do: This helps you pinpoint which specific tasks the bot is struggling with. If the "Order Status" topic has a low success rate, focus your improvement efforts on that part of the conversation flow.
B. The "Bot Performance" Tab (How well did it work?)
This tab focuses on technical and conversational quality metrics.
- Average Latency:
- What it measures: The time (in milliseconds) from when a user stops speaking to when the bot begins its response.
- Why it matters: High latency (e.g., over 1000ms) creates unnatural pauses and a poor user experience, often leading to users hanging up or interrupting the bot.
- Avg Confidence Score:
- What it measures: The AI's average confidence (from 0 to 1) that it accurately transcribed what the user said.
- What to do: A score consistently below the threshold (e.g., 0.8) indicates a speech-to-text problem. This can be caused by poor line quality, background noise, or complex user accents.
- Interruption Rate Trend:
- What it measures: The percentage of turns where the user spoke over the bot.
- Why it matters: A high rate is a strong indicator of a flawed conversational design. It often means the bot's responses are too long, it's not providing opportunities for the user to speak, or its latency is too high.
- Tool Success Rate / Tool Use (API) Performance Analysis:
- What it measures: The success rate of any external API calls the bot makes (e.g., fetching customer data from your CRM).
- What to do: If this rate is low, it points to a problem with an integrated system, not the bot itself. Your technical team should investigate the API's performance.
7. Interaction History
This section is your repository of all conversations, allowing you to perform detailed, call-by-call analysis.
- How to Use It: Use the search and filter functions to find specific interactions. For instance, filter for all calls with an "Unresolved" outcome and a reason of "Bot Misunderstanding." Then, listen to the recordings and read the transcripts for those calls to find patterns in the failures. This ground-level data is invaluable for refining your bot's prompt and knowledge.
8. Generating and Managing Reports
The Reports dashboard is a powerful self-service tool for extracting raw interaction data. It allows you to generate detailed logs for specific time periods, which can be used for in-depth analysis, compliance audits, or sharing with stakeholders.
8.1 Overview of the Reports Dashboard
The dashboard is organized into two main parts: a generator to create new reports and a log to manage and download previously generated reports. This provides a simple, centralized workflow for all your data extraction needs.
8.2 How to Generate a New Report
Follow these steps to generate and email an Interaction History report.
Step 1: Configure the Report
- Navigate to Reports from the main left-hand menu.
- In the Report Configuration section, select the parameters for your report.
- Report Type: Choose the type of report you wish to generate. Initially, this will be set to "Interaction History Reports."
- Date Range: Click on the date field to open a calendar view. You can select a precise date range for the data you need. For convenience, you can also use predefined quick-select options like "Last 7 days," "Last 30 days," etc.
- Important Note: The report will contain the latest data available, with a delay of up to 30 minutes from the current time.
Step 2: Configure Email Recipients
- In the Email Configuration section, enter the email addresses of the recipients.
- In the Email ID field, you can enter a single email address or multiple addresses separated by commas (e.g., [email protected], [email protected]).
Step 3: Generate and Send the Report
- Once you have configured the report and recipients, click the Generate and Send Report button.
- The report generation process will begin immediately. You will see the new report appear at the top of the Generated Report Requests log with a status of "In-Progress."
- When the report is complete, the system will automatically send an email with a download link to all specified recipients.
8.3 Managing and Downloading Reports
The Generated Report Requests section provides a complete history of all the reports you have created, and you will also receive an email once the report generation is done.
- Tracking Report Status: This table allows you to monitor the status of all your reports. The key columns are:
- Generated reports: The filename of the report once it's completed (e.g., Interaction_History_Report_2025_10_16.xlsx).
- Requested Date and Time: The exact timestamp when the report generation was initiated.
- Status: The current state of the report generation job.
- In Progress: The report is currently being generated.
- Completed: The report is ready, and the download link is active.
- Failed: The report could not be generated.
- Download Status: This column contains the link to download the report file.
- Downloading a Report:
- Once a report's Status changes to "Completed," a "Download" link will appear in the Download Status column.
- Click this link to download the report directly to your computer.
- The report will be in .xlsx format, compatible with Microsoft Excel, Google Sheets, and other spreadsheet software.
- Navigating the Log: If you have a long list of reports, you can use the pagination controls at the bottom of the table to navigate through the pages or change the number of results displayed per page.
9. Common Troubleshooting Scenarios
Use this guide to diagnose and resolve common issues with your voicebot.
- Problem: The bot frequently misunderstands users.
- Diagnosis: Check the Bot Analytics > Bot Effectiveness > Unresolved Call Breakdown chart. If "Bot Misunderstanding" is high, this is your issue. Also, check the Avg Confidence Score; if it's low, the issue is with speech recognition.
- Solution:
- Refine the Prompt: Make your instructions in the Behavior and Objective fields more specific.
- Improve Knowledge Base: Upload more detailed FAQs or documents related to the topics the bot is failing on.
- Address Low Confidence: A low confidence score may not be solvable via prompts. It may relate to the telephony line quality of your callers.
- Problem: Users interrupt the bot a lot or hang up mid-conversation.
- Diagnosis: Check the Bot Analytics > Bot Performance > Interruption Rate Trend. If it's high, users are getting impatient. Check the Average Latency. If it's over 1000ms, that's a likely cause. Also check the Unresolved Call Breakdown for "User Hung Up."
- Solution:
- Shorten Bot Responses: Edit the Identity or Behavior prompts to encourage shorter, more concise responses.
- Break Up Long Monologues: Instruct the bot to pause and ask for user confirmation (e.g., "Does that make sense so far?") after delivering a key piece of information.
- Investigate Latency: If latency is the issue, it may require technical investigation.
- Problem: The bot fails to get information from our system (e.g., "I couldn't look up your order").
- Diagnosis: Check the Bot Analytics > Bot Performance > Tool Success Rate. If it's low or has an "Alert" status, your external API is the problem.
- Solution: This is a technical issue outside of the bot's configuration. Your development team needs to check the health and responsiveness of the integrated API service.
10. Best Practices for Continuous Improvement
A voicebot is not a "set and forget" tool. The best voicebots are continuously improved based on user interaction data.
- Start with the "Why": Begin your review at the Unresolved Call Breakdown chart. This tells you why calls are failing.
- Listen to Calls: For your top failure reason (e.g., "Bot Misunderstanding"), go to the Interaction History. Filter for these calls and listen to at least 5-10 recordings. You will quickly identify patterns.
- Form a Hypothesis: Based on your review, form a hypothesis. For example: "The bot is failing to understand questions about our warranty because 'warranty' isn't mentioned in its prompt or uploaded documents."
- Edit and Version: Make a specific change to your bot to address the hypothesis. Save this as a new version.
- Test and Publish: Thoroughly test the new version before publishing it.
- Measure and Repeat: After the new version has been live for a week, compare the analytics. Did the percentage of "Bot Misunderstanding" calls decrease? If so, your change was successful. Now, pick the next biggest problem and repeat the cycle.
11. Conclusion
This guide provides a comprehensive framework for creating, managing, and optimizing your Exotel Voicebot. By leveraging detailed configuration options, thorough testing, and data-driven analytics, you can build powerful conversational AI experiences that enhance customer satisfaction and drive business efficiency. Remember that continuous improvement is key to long-term success.