LSQ IP-PSTN Connector
This Exotel connector enables a LeadSquared agent to receive incoming calls, visualize the call details, and provide make outbound calls on the LSQ dashboard through the Exotel Softphone.
Note - The agent’s leg is on VoIP. If you want to refer to the PSTN-PSTN calling connector for LSQ, please refer here.
You can also integrate multiple instances/accounts of Exotel -( eg: if multiple contact centers are in different regions you can now configure each of them as separate tabs. One for an Indian region, one for an international region, etc.)
Integration features
- Click to Call - Place outbound calls to customers from LeadSquared directly.
- Call pop-up - All calls take place in a call pop-up that has all information related to the call. The agent will be able to pick up or reject incoming calls from this popup.
- Call Log - All call details are sent to LSQ once the call is terminated
- Call Timer - This will enable users to make calls only during preset timings.
Prerequisites
In order to have a successful integration with the LeadSquared account, you must complete the following tasks:
- Sign up for an Exotel Account in the Mumbai Region
- Ask the account manager to enable VoIP calling for your account.
- Verify your account through phone or email.
- Get your account KYC verified.
- Purchase ExoPhone(VN) to be used by LeadSquared users/agents for outbound calls.
- Lead must be created in LeadSquared CRM.
Installation/ Configuration - LeadSquared portal
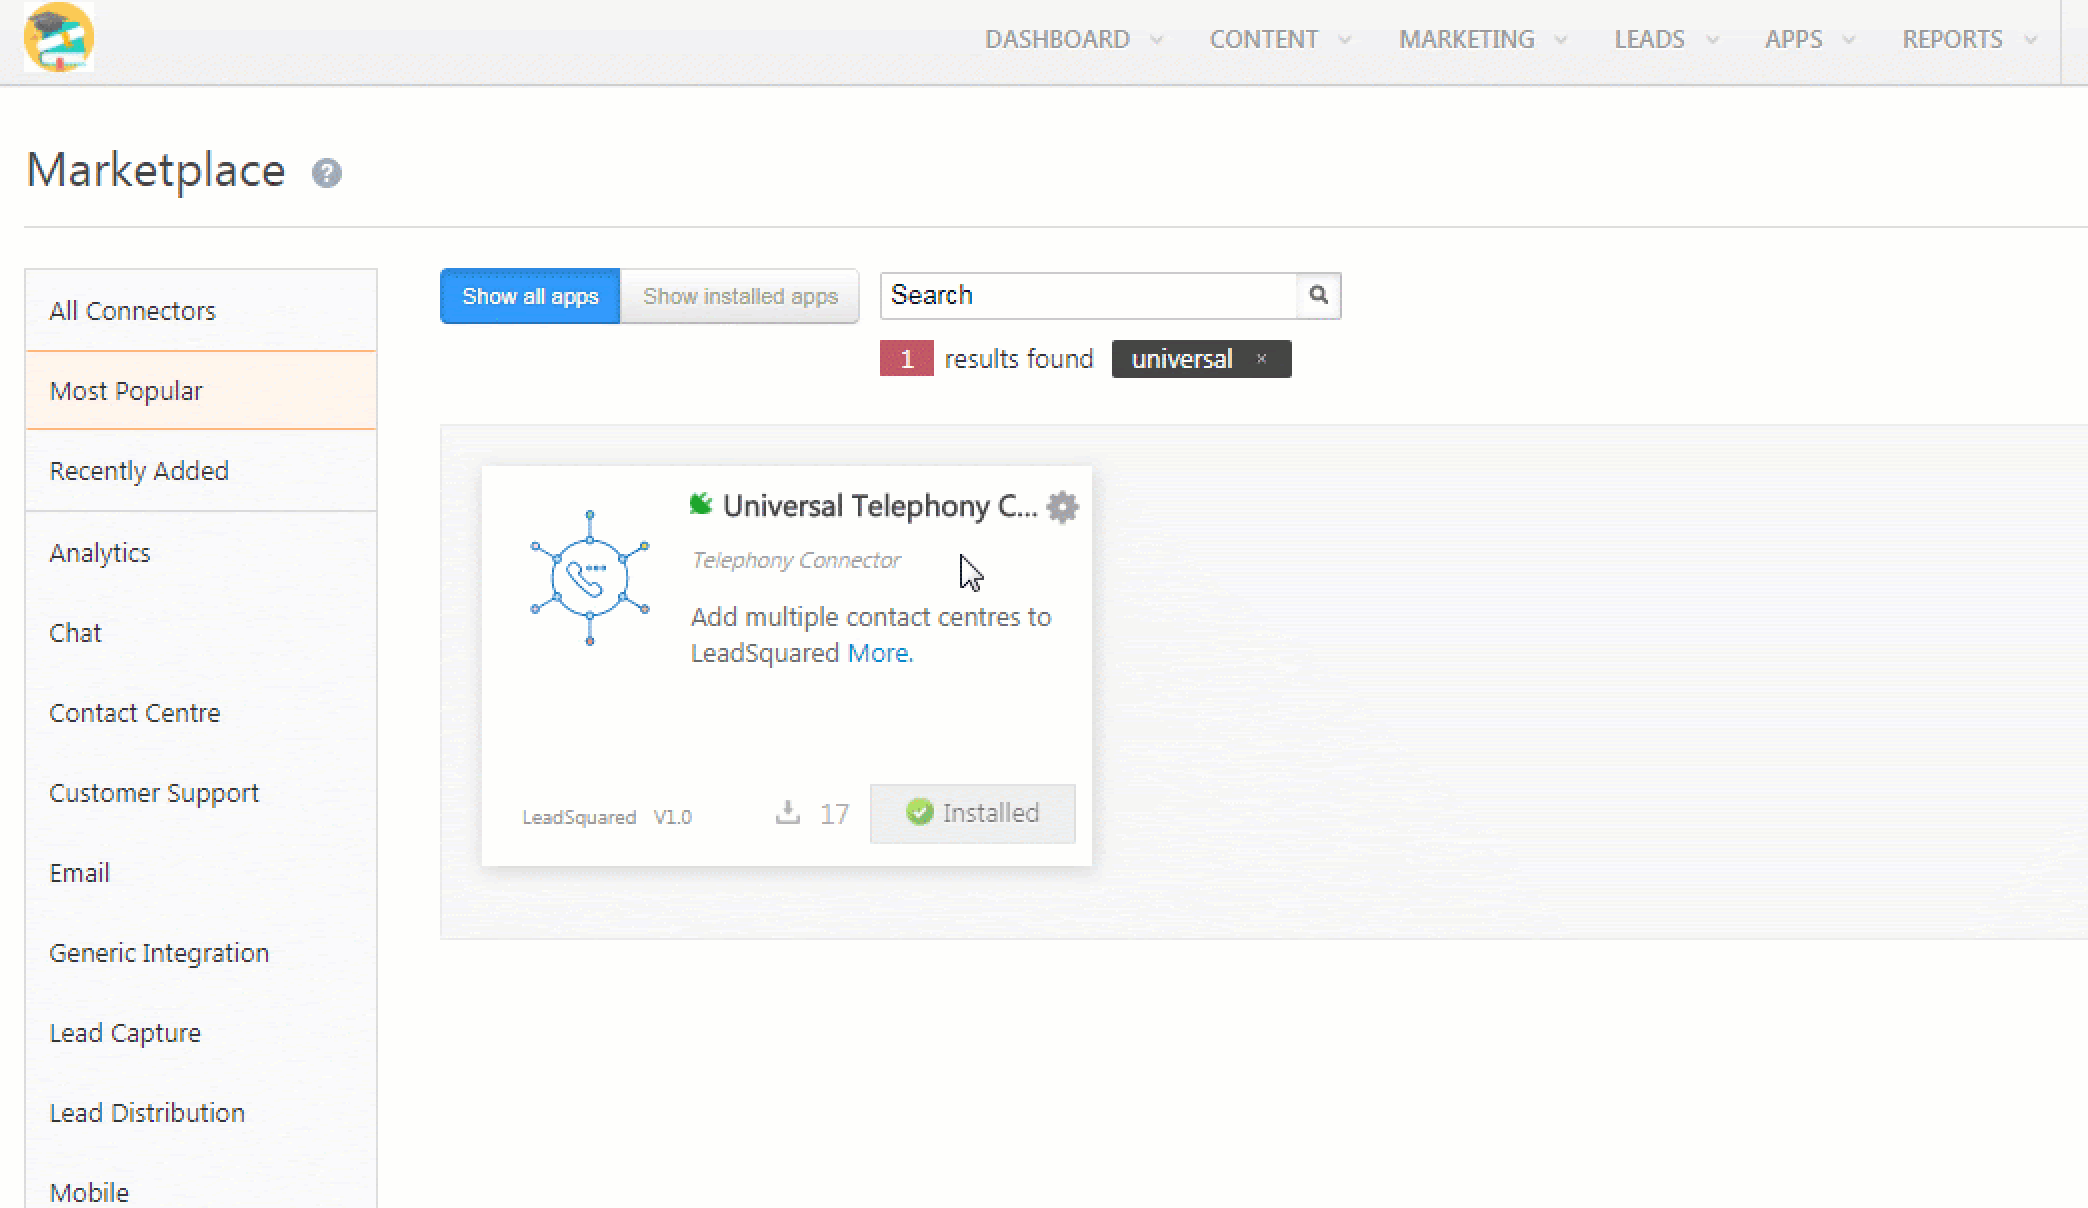
Navigate to Apps>Apps Marketplace on the LeadSquared portal, search for the Universal Telephony Connector, and click Install
Add/ Modify connector
- Hover the cursor over the settings ⚙ icon and click Configure.
- Click the Add New Connector button.
- Enter a name for the new connector, then click Add.
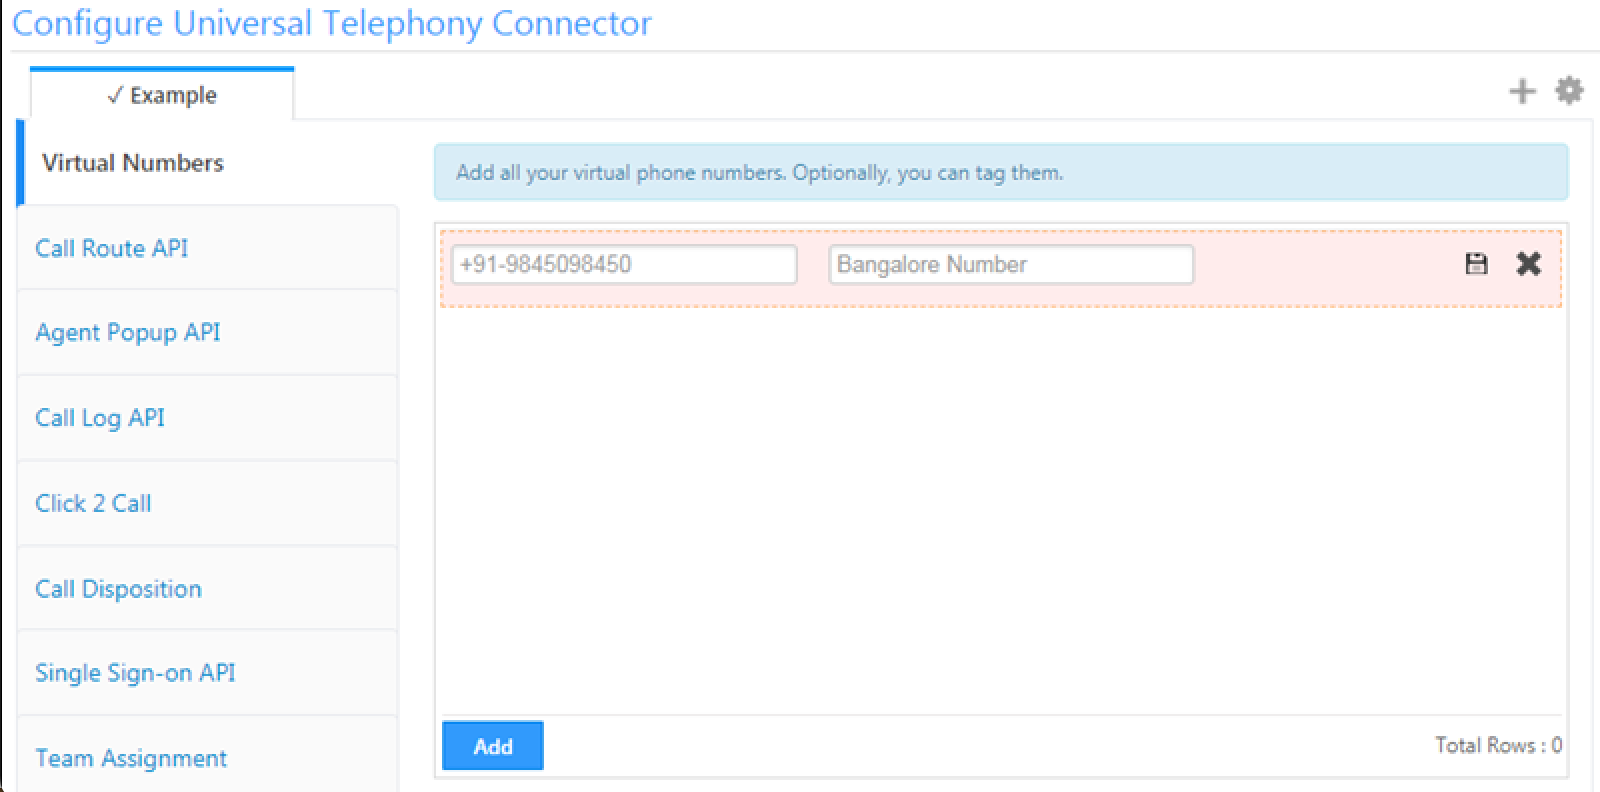
Virtual Number
- Copy the VN purchased from the Exotel portal, and add the same in the Virtual Number field (prefix with country code followed by - eg: +91-)
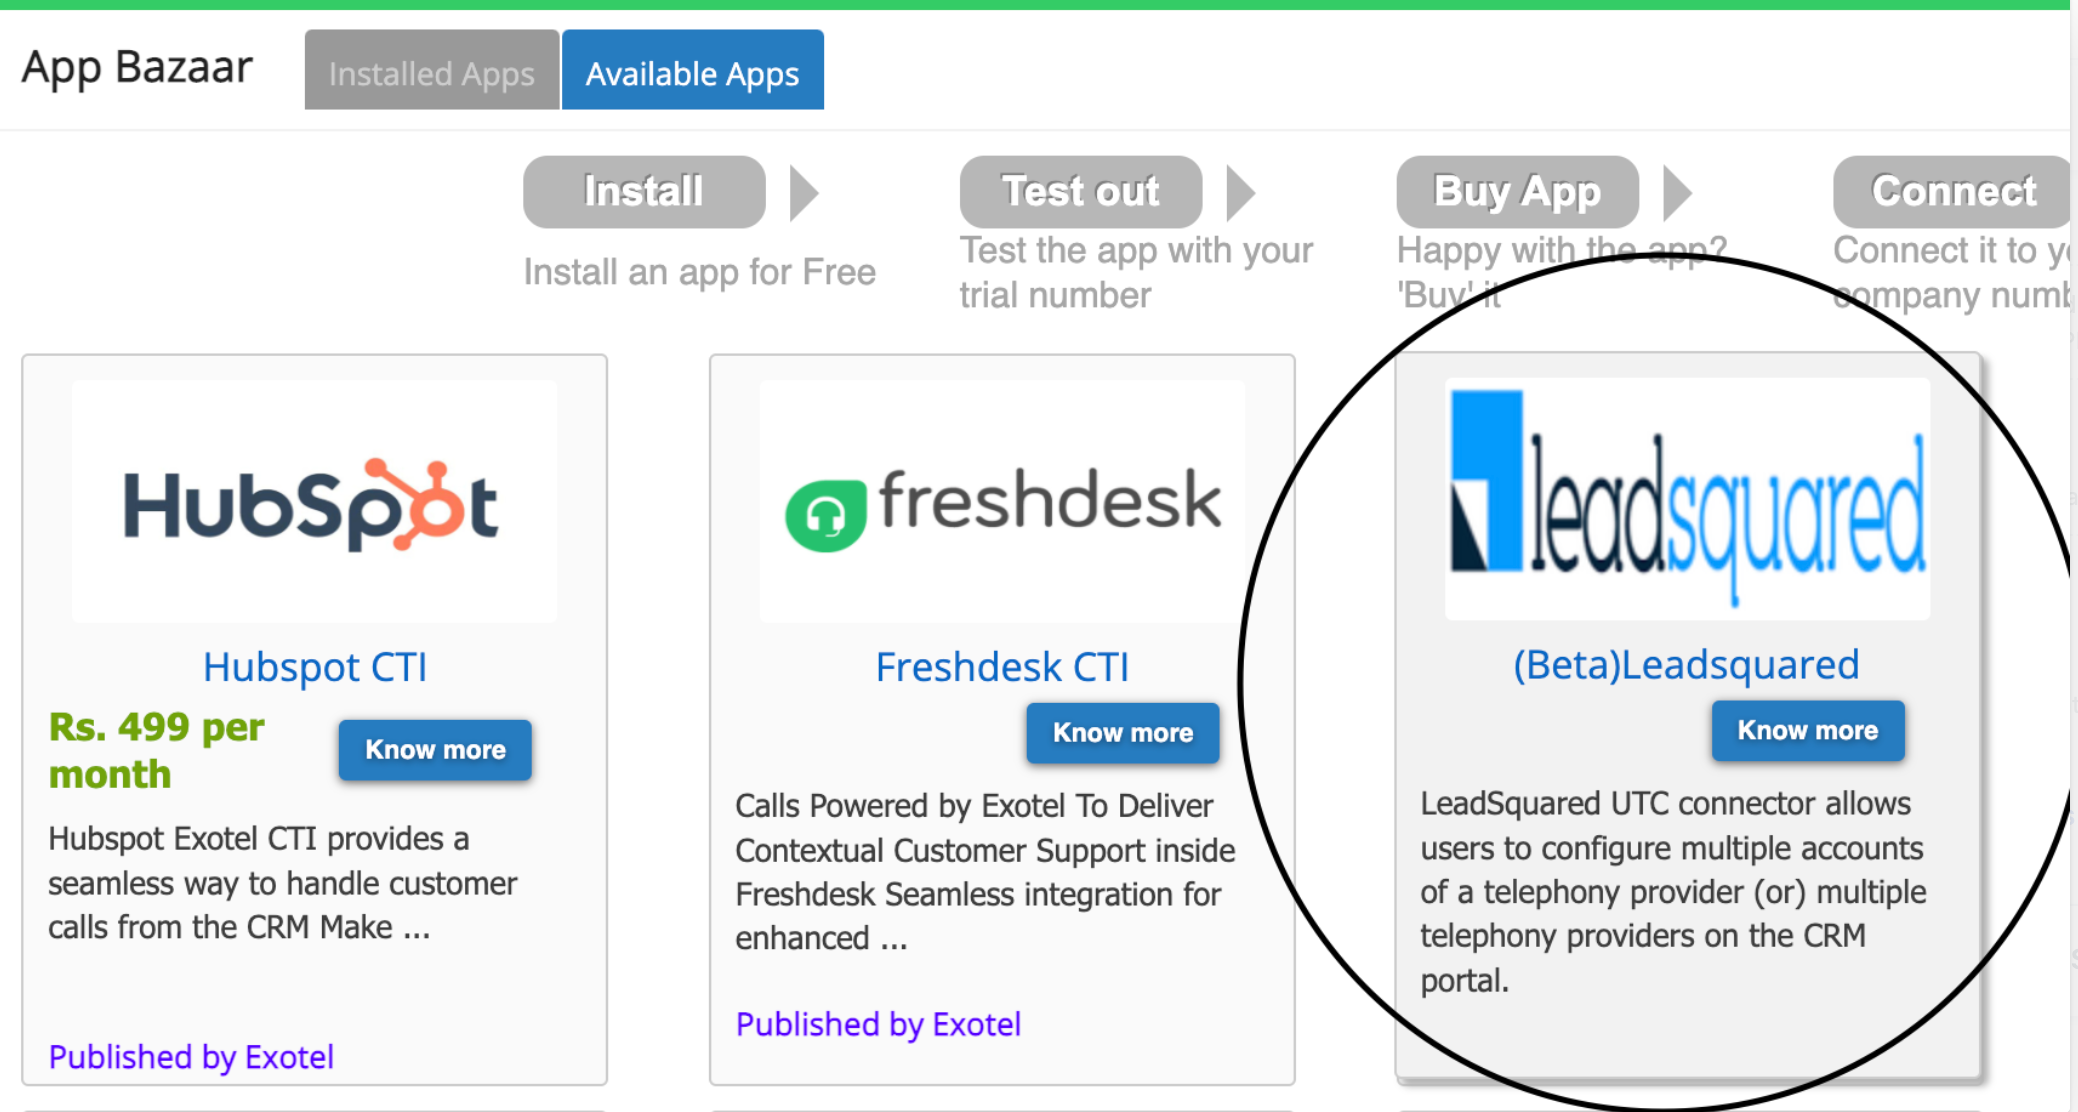
COC-Config - Connector config / Call timer
- This can be configured via the Leadsquared app available on https://my.exotel.com/{AccSID}/apps#available-apps Click on “Know More” and then “Install”.
- Configure the parameters that are shown -
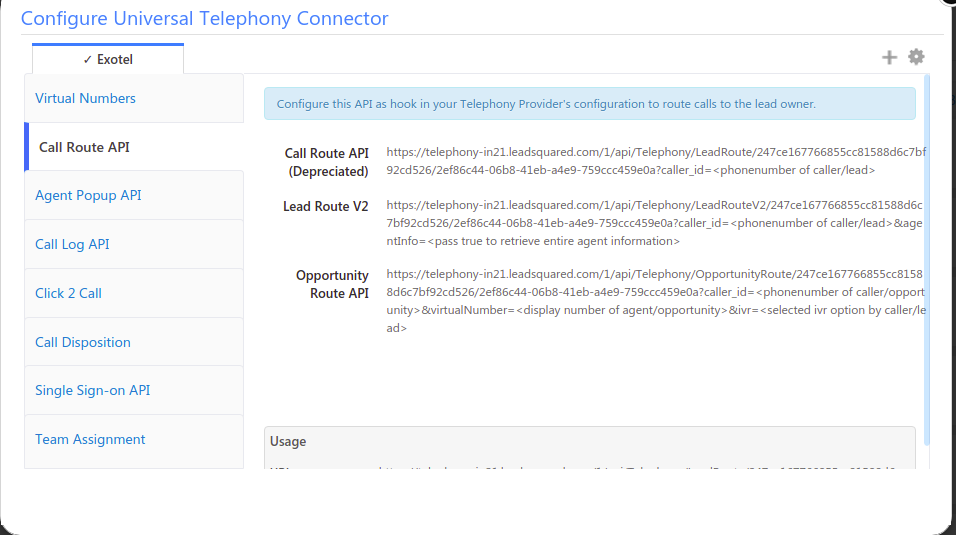
- Call Route URL - To be copied from Leadsquared UTC connector >> Lead Route V2 (Screenshot below)
- Pop-up URL - To be copied from Leadsquared UTC connector >> Agent pop-up API (Screenshot below)
- Call Log URL - To be copied from Leadsquared UTC connector >> Call Log API
- Call Start Timer - Time in format HH:MM:SS. Allow calling from this time of the day. Default Value = 00:00:00
- Call End Timer - Time in format HH:MM:SS. Stop calling at this time of the day. Default Value = 23:59:59
- Call Allowed Days - Select the days that you want to allow calling on.
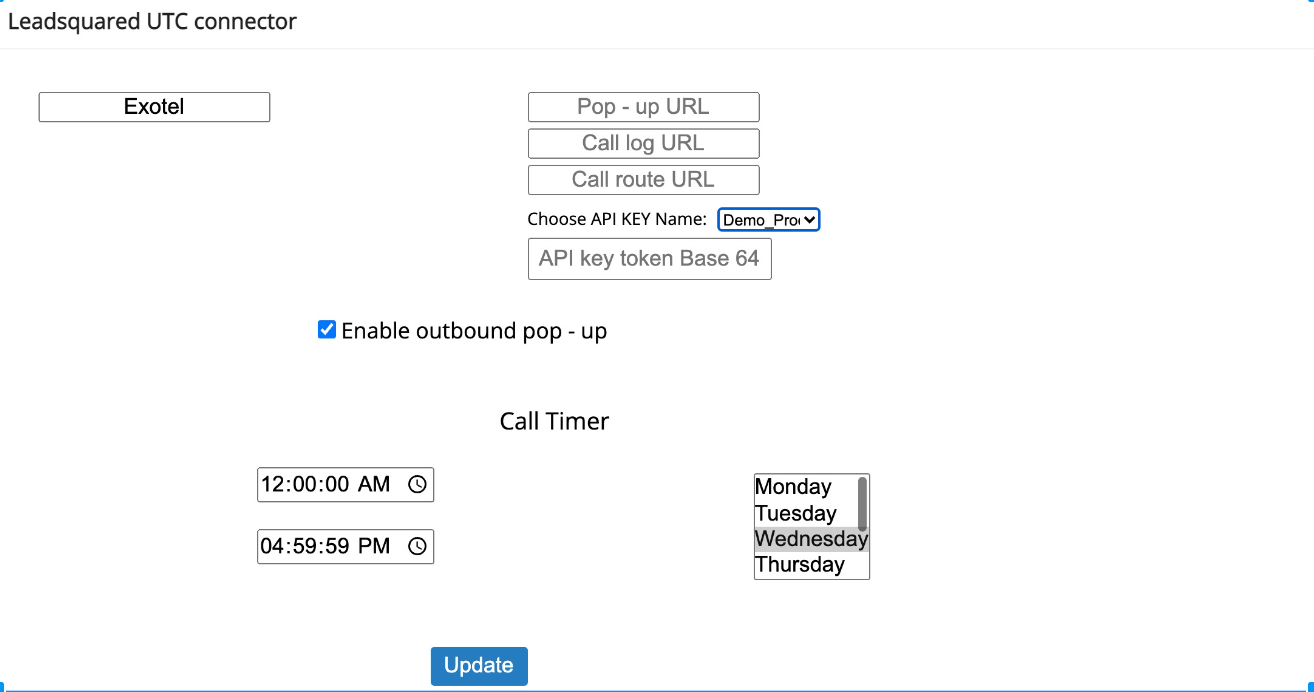
Parameters to be filled on the Exotel Dashboard
Note: API key token Base 64 value will be fetched only on clicking 'update'. The same value needs to be copied onto the Leadsquared connector Click to call settings.
a) Call Route URL
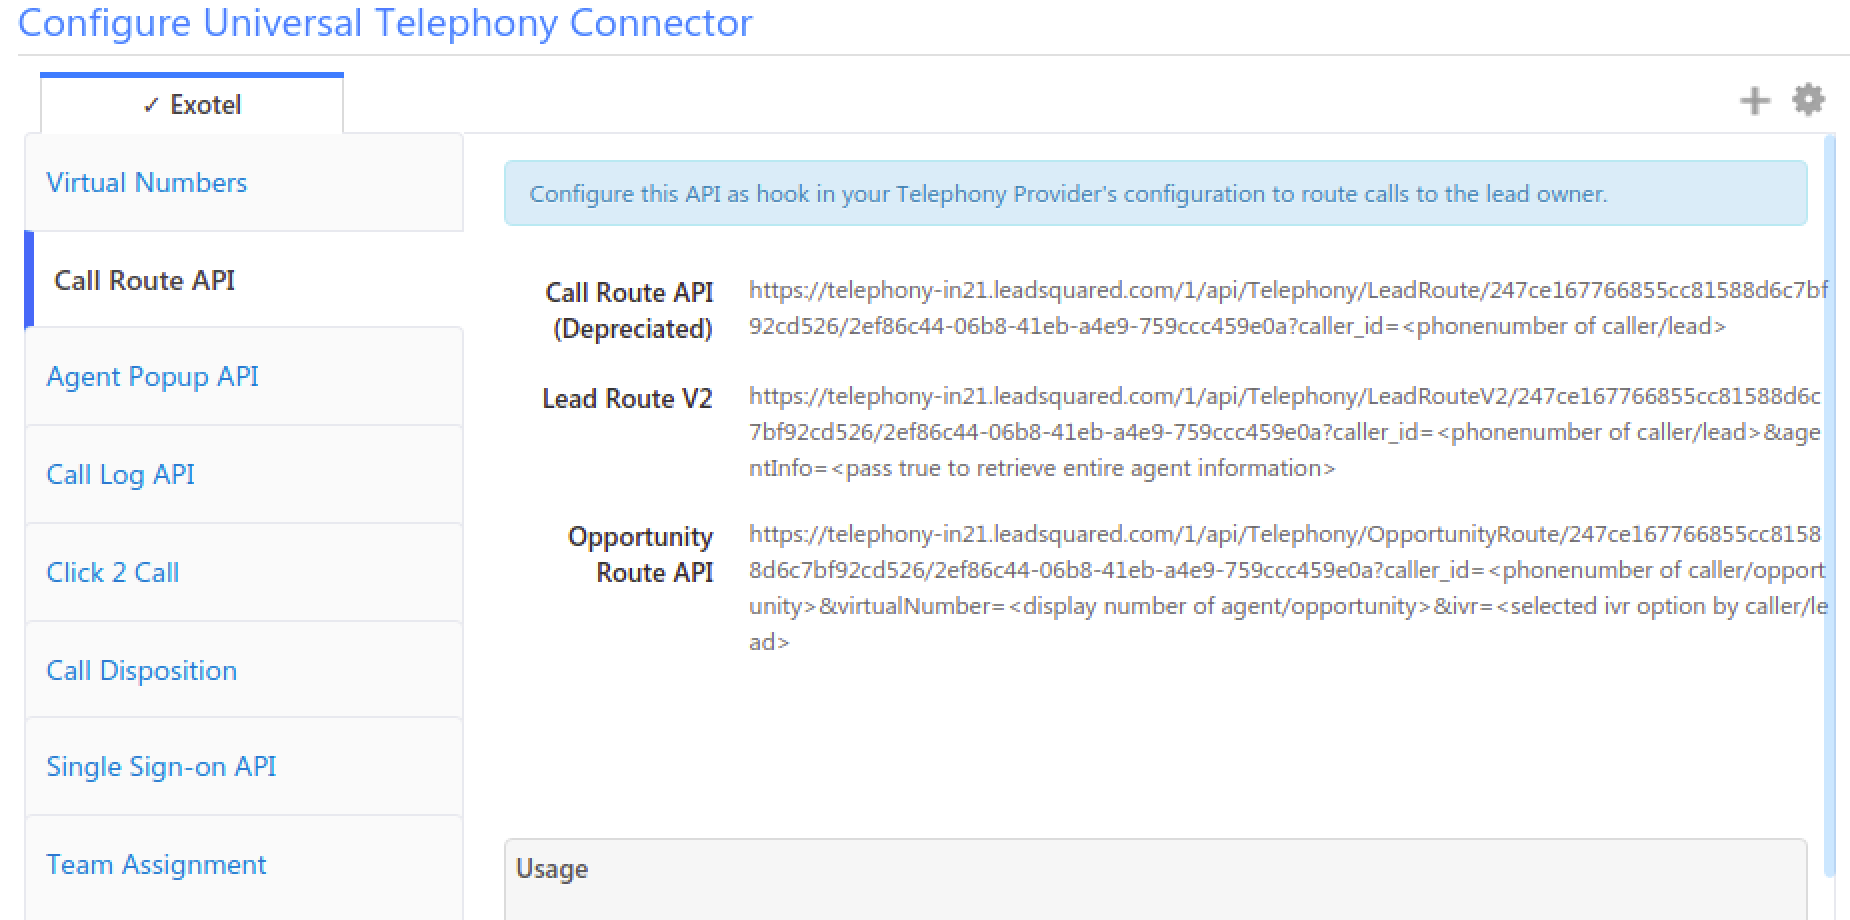
Copy the URLs from the above fields from the LSQ dashboard. Steps a,b,c
Kindly configure the LeadRouteV2 URL. Do not use Call Route API which is depreciated. Only configure the URL without query parameters (?caller_id=<phonenumber of caller/lead>&agentInfo=<pass true to retrieve entire agent information>) as mentioned
eg: The call route URL for the above screenshot would be
https://telephony-in21.leadsquared.com/1/api/Telephony/LeadRouteV2/247ce167766855cc81588d6c7bf92cd526/2ef86c44-06b8-41eb-a4e9-759ccc459e0a
b) Pop-up URL
- Click on the ‘Enable’ checkbox and save, the remaining options as pre-configured on the LSQ portal.
- Enable the "Show Phone Call Popup" checkbox in Leadsquared User profile settings(https://in21.leadsquared.com/Settings/MyProfile)
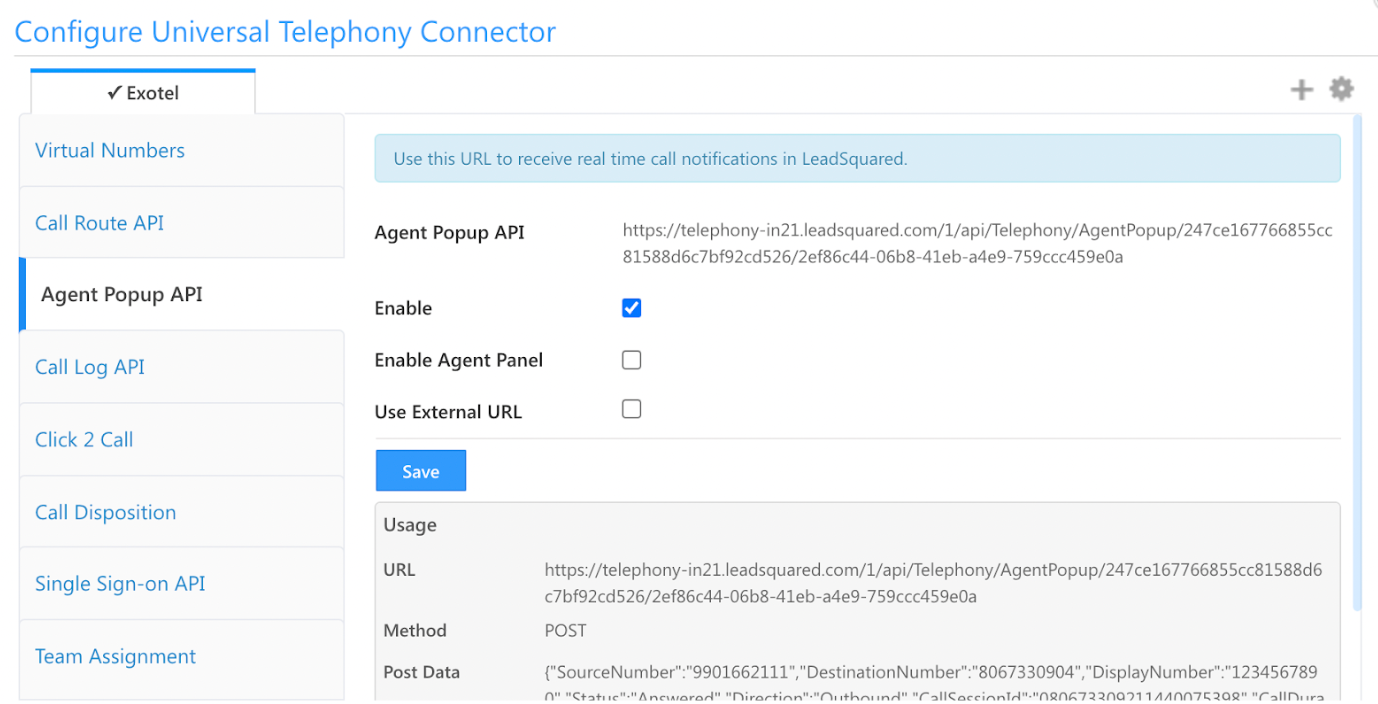
c) Call Log URL
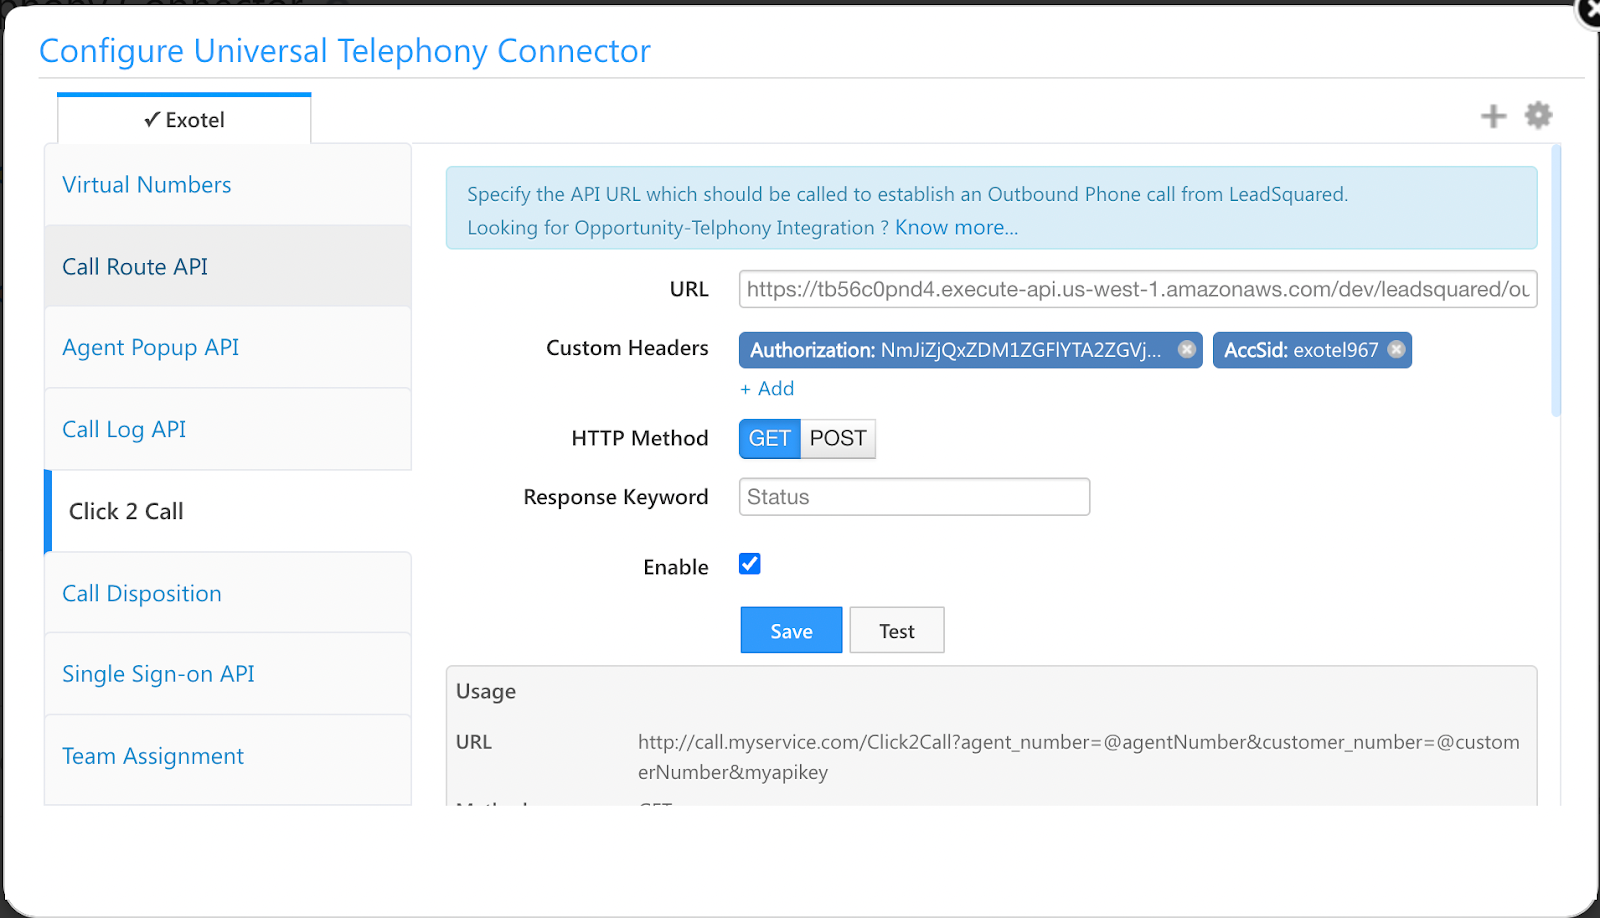
3. Configure the Click to Call URL in the UTC configuration.
a. URL - https://api.lsq.cocreate.exotel.com/v1/leadsquared/outbound/call/connect?AgentNumber=@AgentNumberWithCC&CustomerNumber=@PhoneNumberWithCountryCode&VirtualNumber=@VirtualNumberWithCC&AgentId=@{User:TelephonyAgentId,}
b. Custom Headers -
- Authorization - Base64 value of Exotel API token/ key (available under “Choose API KEY Name: “ on the Leadsquared app on Exotel Appbazaar once the configuration is updated).
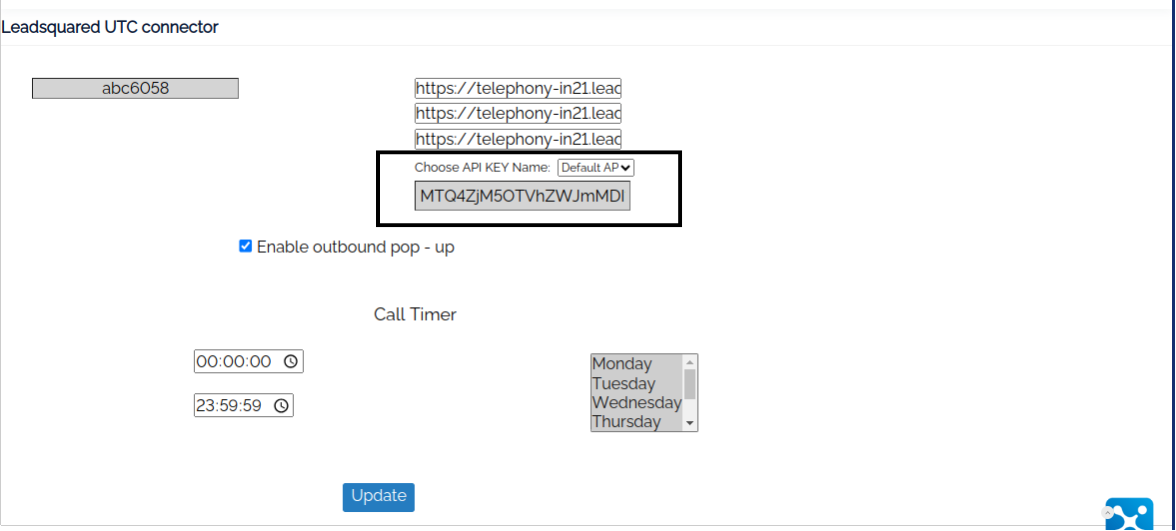
ii. AccSid - Exotel Account ID (available on the Leadsquared app on Exotel Appbazaar)
c. HTTP Method - GET
Call flow configuration for Inbound calls - Exotel portal
- Login to Exotel acc (https://my.in.exotel.com/ for MUM stamp or https://my.exotel.com/ for SGP stamp)
- Navigate to Admin panel >> App Bazar
- Click on Custom Apps (+ Create) to add a new flow
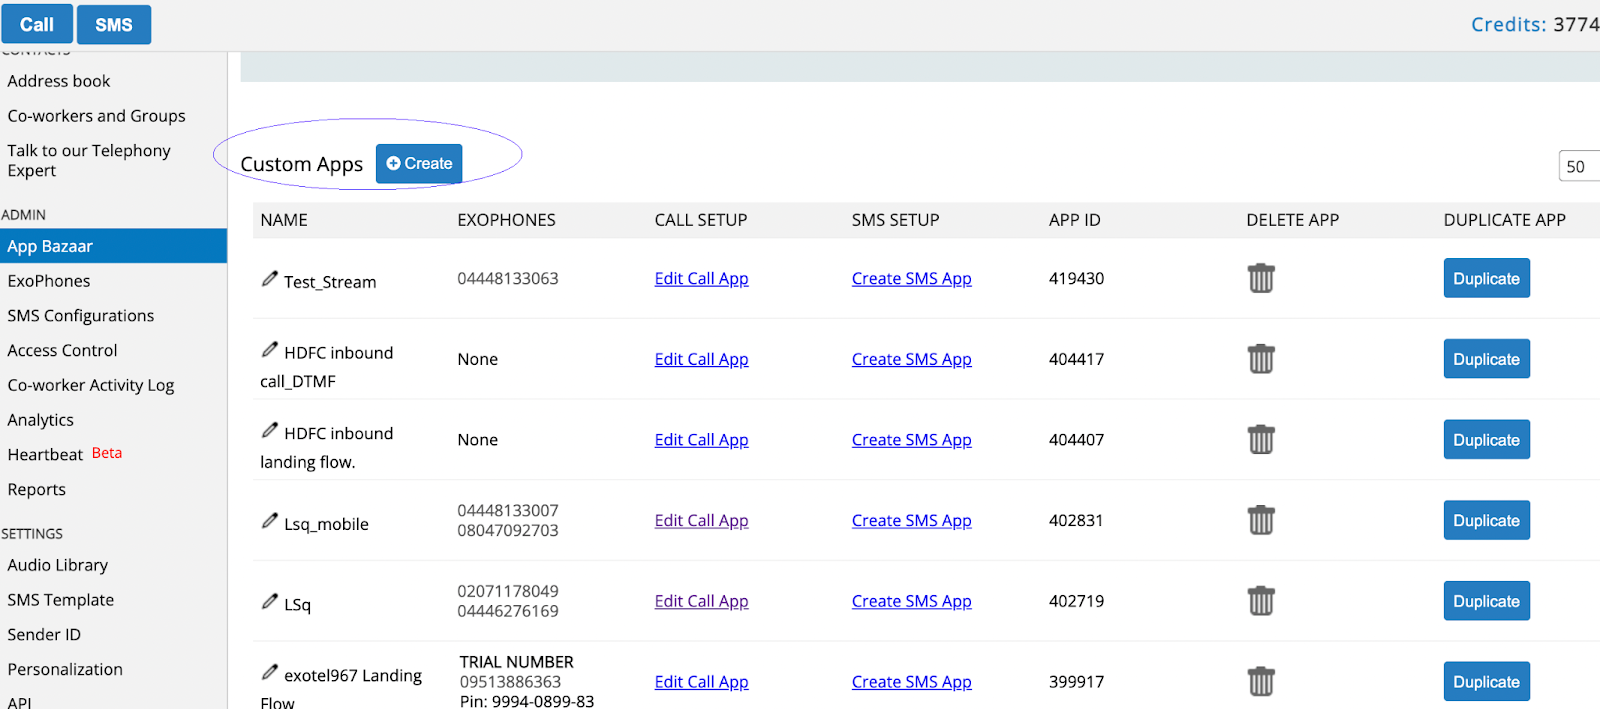
- Add an ‘App Name’ and create a new flow
- Call Start >> Add a Connect applet to begin the call flow
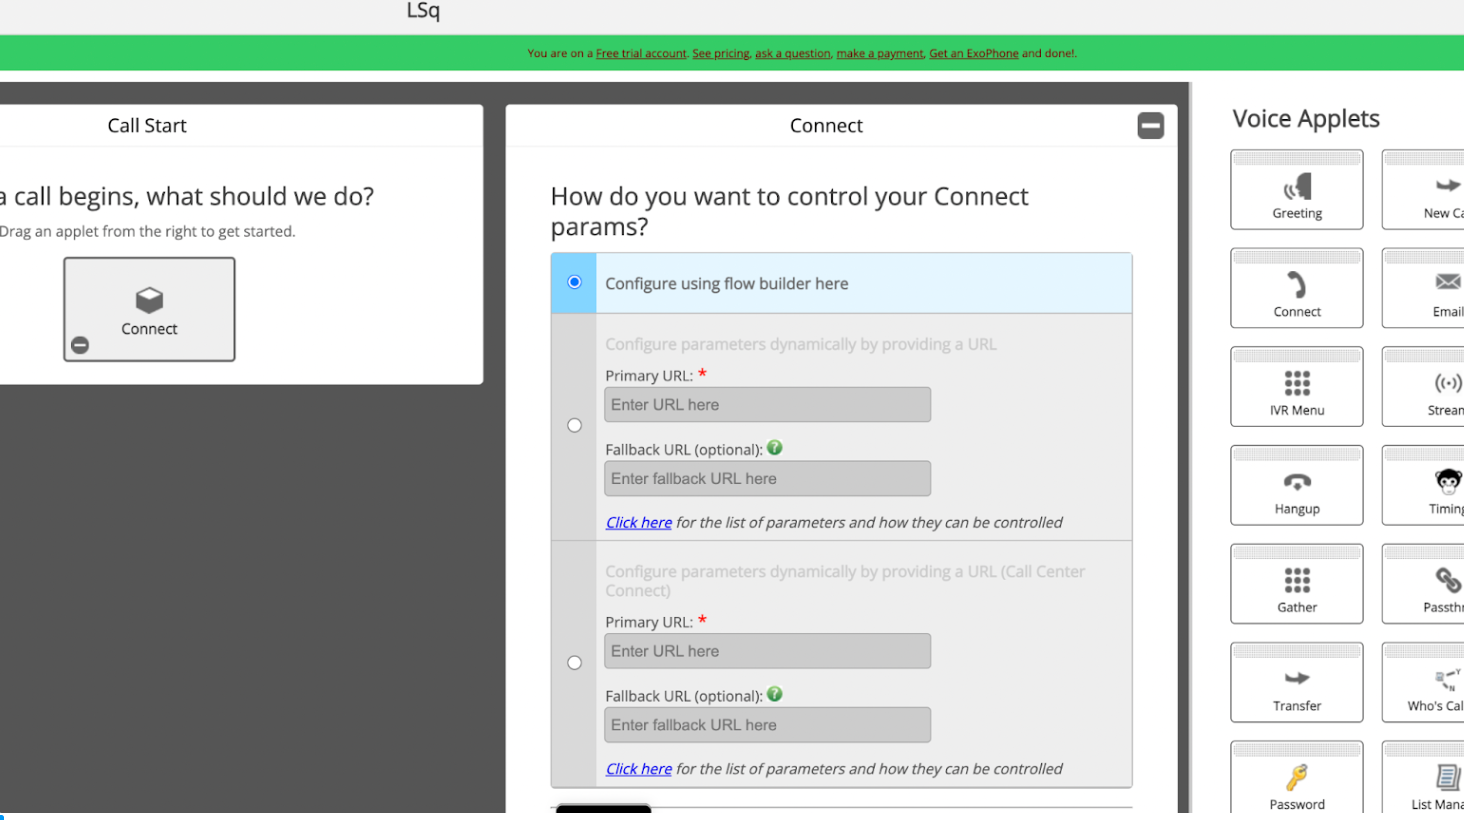
- Connect Applet - Select the ‘Dial phone number(s) returned by URL’ radio button. Enter the primary URL - https://api.lsq.cocreate.exotel.com/v1/leadsquared/inbound/call/dialwhom?AccSid={AccSID}
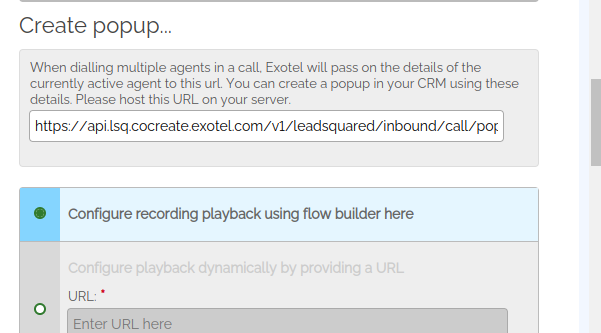
Create popup - To enable pop-up on the Leadsquared portal - https://api.lsq.cocreate.exotel.com/v1/leadsquared/inbound/call/popup?AccSid={AccSID}
7. Add a Passthru Applet in the “Call conversation ends” section
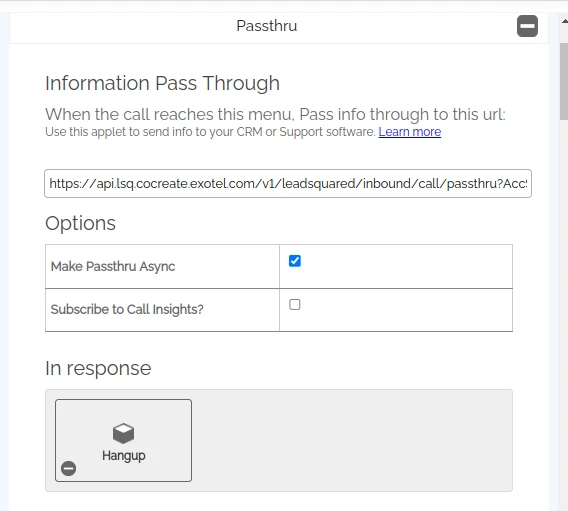
a. Passthru URL - https://api.lsq.cocreate.exotel.com/v1/leadsquared/inbound/call/passthru?AccSid={AccSID}
b. Make Passthru asynchronous (☑)
8. Add a Passthru Applet in the “If nobody answers” section
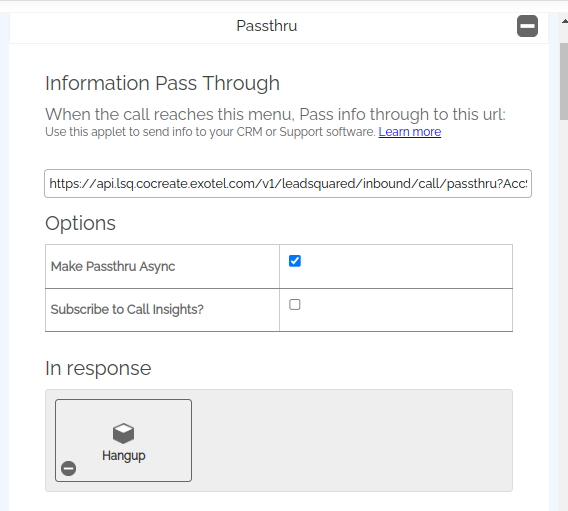
- Passthru URL - https://api.lsq.cocreate.exotel.com/v1/leadsquared/inbound/call/passthru?AccSid={AccSID}
- Make Passthru asynchronous (☑)
The above call flow setup can only handle calls from existing leads that are created and available in LeadSquared. To handle new callers whose data is not available in LeadSquared, please add the below to the existing call flow. The idea is to route the new callers to the groups available in Exotel. We will also send those call details to LeadSquared based on which a new lead will be created on LeadSquared post-call completion.
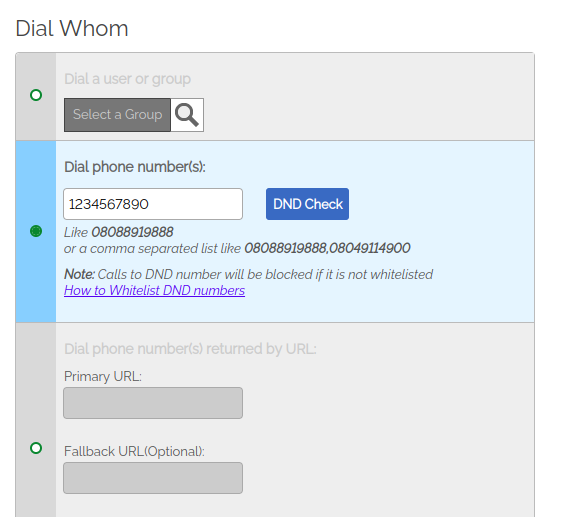
3. You can also route the calls to a common customer care number by selecting “Dial phone number(s)” and providing the customer care number in the field.
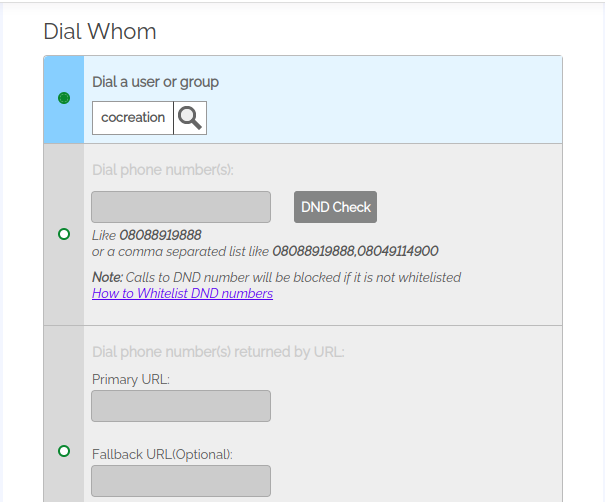
2. In Dial Whom of 2nd connect applet, choose a group to dial.
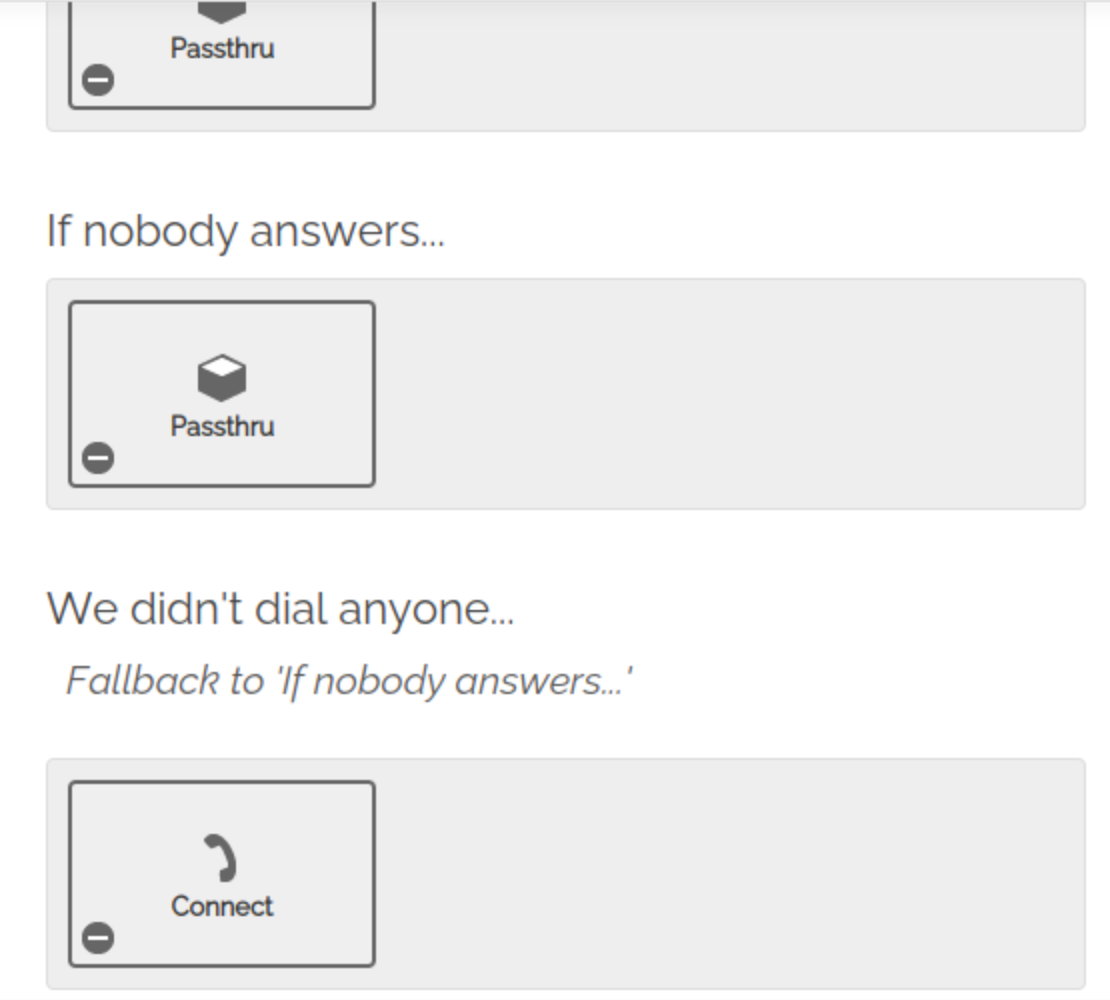
Place the 2nd connect applet in the “We didn't dial anyone...” section as mentioned below.
4. Configure both agent popup and passthru with the below URLs as same as it’s configured in the 1st connect applet to send popup data and call logs to Leadsquared.
- Create popup - https://api.lsq.cocreate.exotel.com/v1/leadsquared/inbound/call/popup?AccSid={AccSID}
- Passthru Applet (Call conversation ends) - https://api.lsq.cocreate.exotel.com/v1/leadsquared/inbound/call/passthru?AccSid={AccSID}
- Passthru Applet (If nobody answers) - https://api.lsq.cocreate.exotel.com/v1/leadsquared/inbound/call/passthru?AccSid={AccSID} Changes need to be made in LSQ
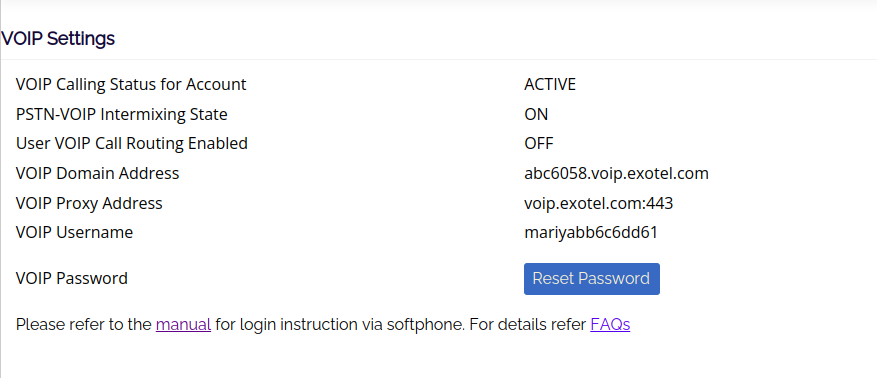
On Exotel, Reset the password for every user in the VoIP settings page. SGP - my.exotel.com/voipinfo MUM - my.in.exotel.com/voipinfo
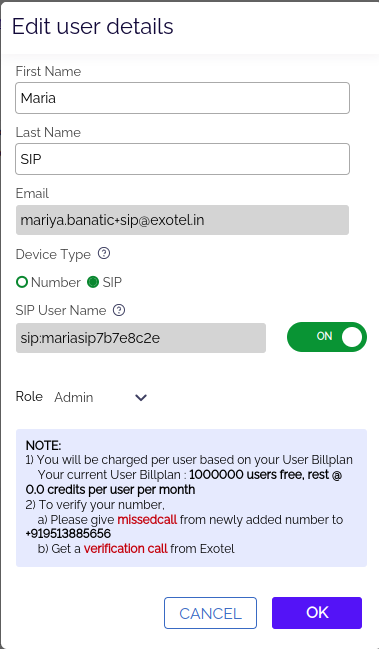
Switch the Device type to SIP for all users on the “Co-workers and Groups” under the “Manage” section page as mentioned below.
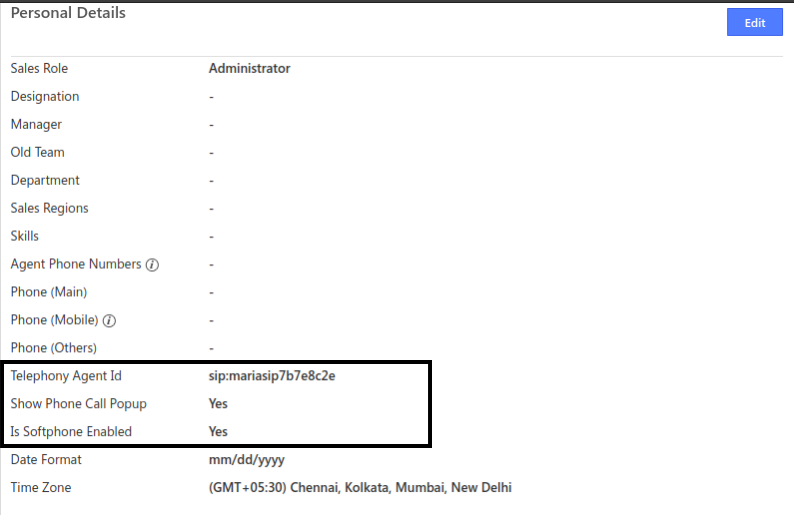
If the users are doing it themselves, on the LSQ page, go to “My Profile”, edit the “Telephony Agent ID” and add the SIP ID of the user there. Enable both the “Show Phone Call Popup” and “Is Softphone Enabled” to “Yes” in the same settings page mentioned below.
SIP ID Format=> sip:<VOIP Username>, Example - sip:mariyabb6c6dd61
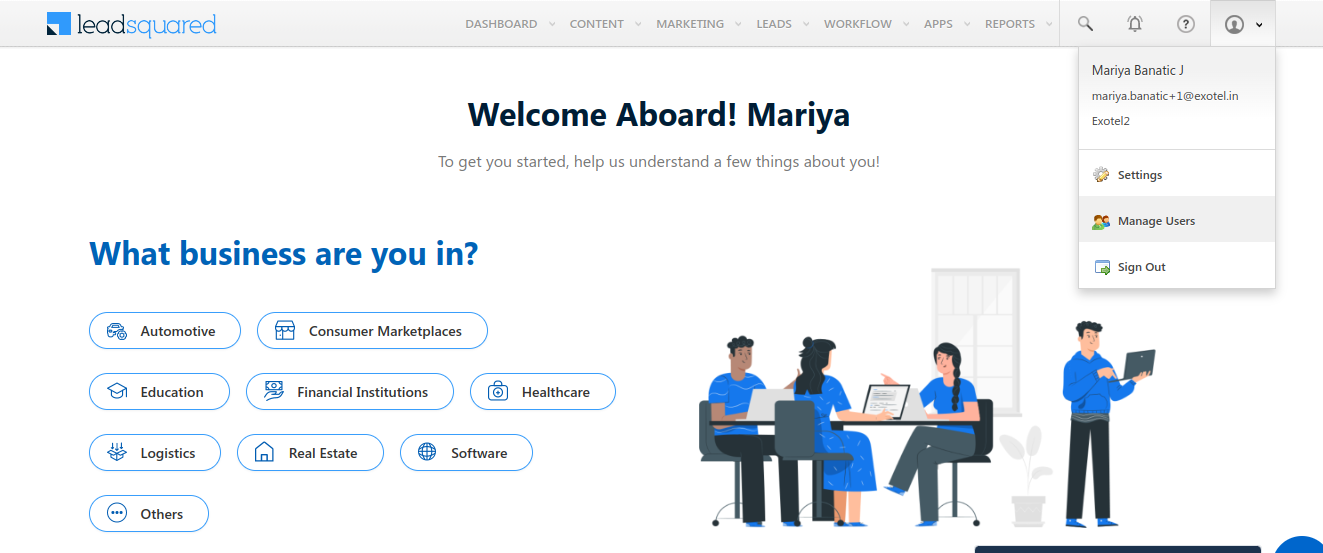
If the admin is doing it for all the users, click on the Profile icon, and click on “Manage Users”.
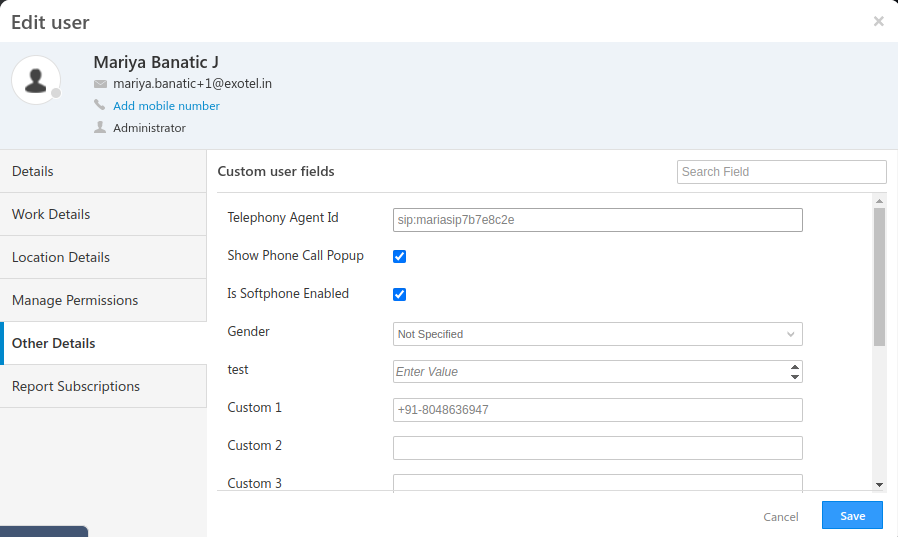
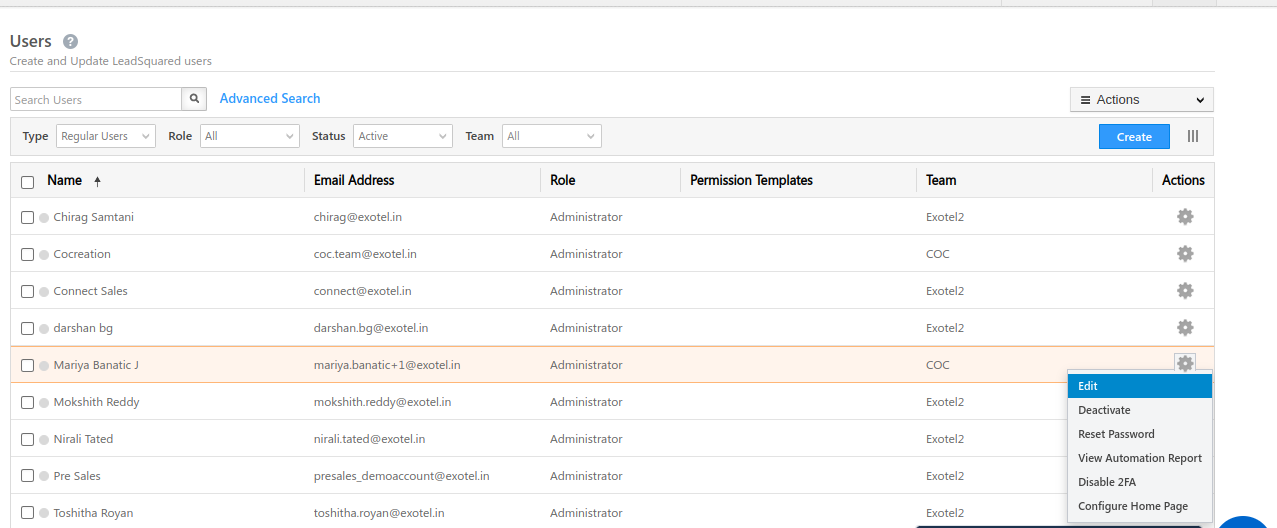
Click on the Gear icon and “Edit”. Go to “Other details” and click on “Edit”. Here you can add the SIP ID of the user and enable Softphone.
Add the configuration for the Softphone
- The admin needs to go to the UTC connector, click on settings, and then “Configure”.
- Navigate to “Agent Popup API” > “Agent Panel Settings”.
- Toggle the “Enable Agent Panel” to Yes.
- Add the Panel URL - Softphone | Exotel
- Panel Permissions - Add the text “allow=microphone”
- Give a Panel Title that will be visible in the dialog in its closed state.
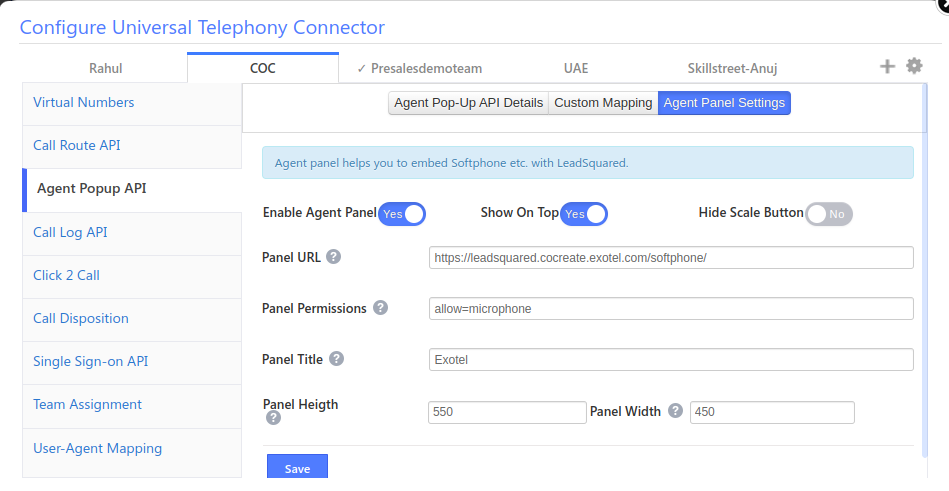
For more information, kindly refer to the “Agent Panel Settings” section mentioned her.
- Click on “User-Agent Mapping” on the menu on the left.
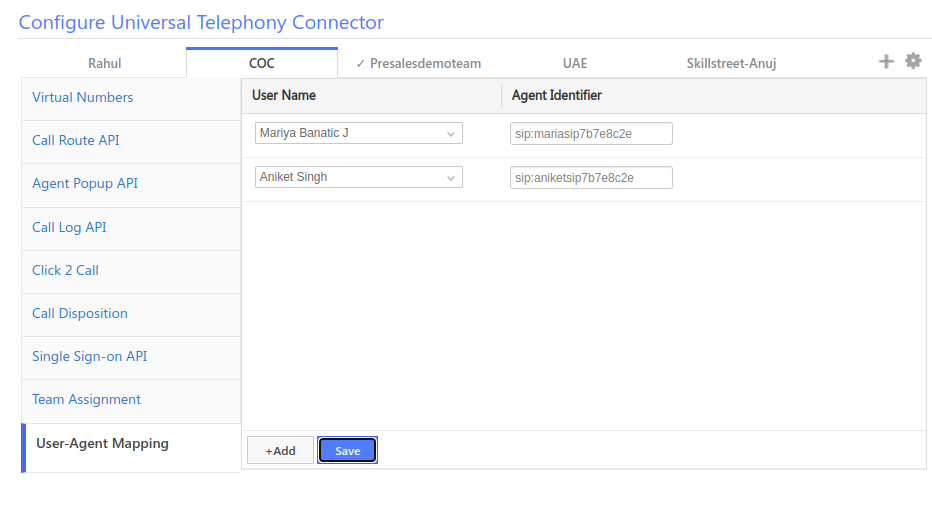
Add all the users that you want to enable VoIP calling for and add the SIP ID in the “Agent Identifier
Login to the Softphone
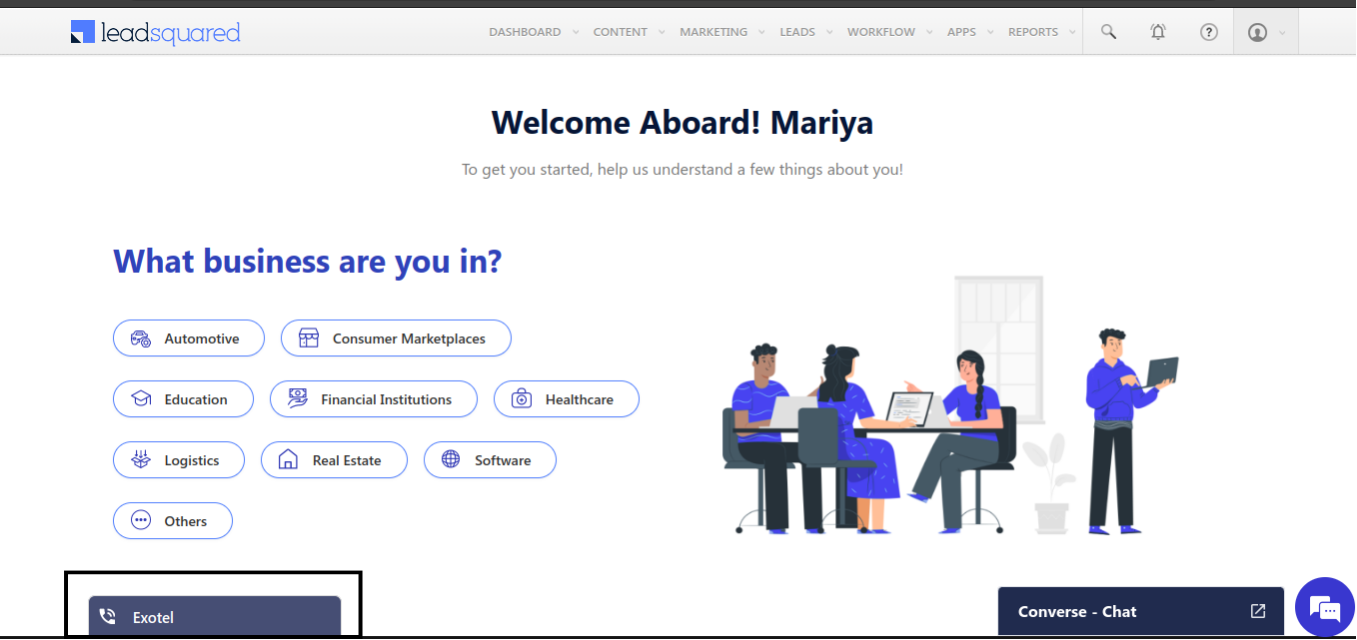
Open the respective softphone that you can find at the bottom.
SGP - my.exotel.com/voipinfo MUM - my.in.exotel.com/voipinfo
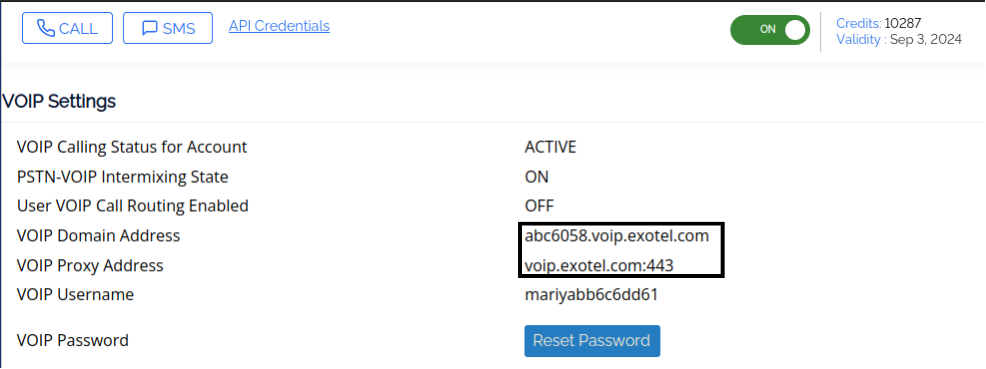
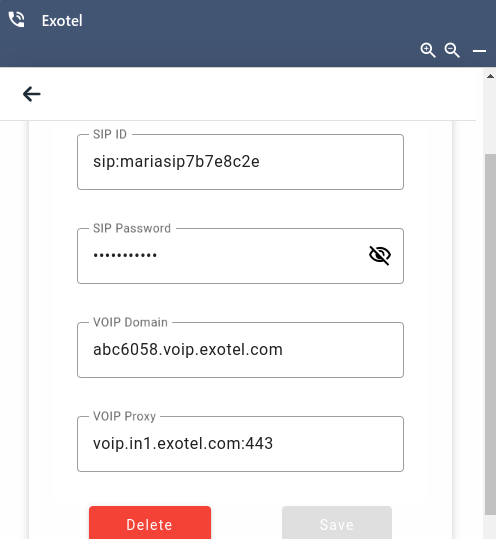
Fill in the below details and click on “Save”.
1. SIP ID - Use the SIP ID provided in the LSQ profile section. Example - sip:mariyabb6c6dd61 2. SIP Password - Use the same password you have configured under the “Get Your users ready for IP calling” section.
You can find the below two values in the Exotel’s VoIP settings page. 3. VOIP Domain 4. VOIP Proxy